background image

Service Center. Please call Wavetek Meterman or enquire at your point of purchase
for the nearest location and current repair rates.  All multimeters returned for
warranty or non-warranty repair or for calibration should be accompanied by the
following information or items: company name, customer’s name, address,
telephone number, proof of purchase (warranty repairs), a brief description of the
problem or the service requested, and the appropriate service charge (for non-
warranty repairs). Please include the test leads with the meter.  Service charges
should be remitted in the form of a check, a money order, credit card with
expiration date, or a purchase order made payable to Wavetek Meterman or to the
specific service center. For minimum turn-around time on out-of-warranty repairs
please phone in advance for service charge rates. The multimeter should be
shipped with transportation charges prepaid to one of the following addresses or
to a service center

in U.S.A.

in Canada

in Europe

Wavetek Meterman 

Wavetek Meterman

Wavetek Meterman

1420 75th Street SW  400 Britannia Rd. E.Unit #1 52 Hurricane Way
Everett, WA 98203 

Mississauga, ON  L4Z 1X9

Norwich, NR6 6JB, U.K.

Tel: 1-877-596-2680  Tel: (905) 890-7600

Tel: int + 44-1603-404824

Fax: 425-446-6390

Fax: (905) 890-6866

Fax: int + 44-1603-482409

The instrument will be returned with the transportation charges paid by Wavetek
Meterman.

D • Reparatur

Lesen Sie die Gewährl ei stung bevor Sie eine Reparat ur unter oder außerhalb
Gewährleistung anfragen. Unter Gewährleistung bringen Sie bitte das def ekte
Gerät zu ei ner aner kannten Wavetek Meterman Verkaufsstelle oder Servicestelle
füreinen direkten Umtausch. Außerhalb Gewährlei st ung senden Sie das Gerät zu
einer Wavetek Meterman anerkannten Servicestelle. Bitte informieren Sie sich bei
Wavetek Meterman oder ihrem Fachhändler nach der dichtst beigelegen Adresse
und nach aktuellen Reparaturgebühren.  Bitte senden Sie folgende Informationen
und Dokumente mit: Firmenname, Kundenname, Adresse, Telefoonnummer,
Kaufnachweis (für Reparaturen unter Gewährl eistung), ei ne kurz e Beschr eibung
der gewünschten Handlung, und di e gefordert e Bezahl ung ( Eingr iffe außerhal b
der Gewährleistung). Bitte auch Testkabel beifügen.  Bezahlungen in Form eines
Checks, Bezahlungsformulieren, Kredietkarte mit Verf alldatum, usw. bitte in
Namen der Servicestelle aufstellen. Bitte Multimeter (Frei) senden an:

- 13 -

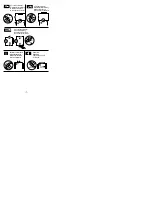
BATTERY/FUSE PLACEMENT/REPLACEMENT

Warning: 

To prevent electrical shock hazard, turn off the multimeter and any

device or circuit under test and disconnect the test leads before removing the rear
cover.

Remove the rear case by unscrewing the screws that secure it to the front. 

Remove the 1.5V AA battery and/or blown fuse and replace with same.

Reassemble the instrument.
Warnings: 

Use of an incorrect fuse can lead to personal injury. Failure to turn off

the multimeter before installing the battery could result in damage to instrument
and battery.

D • Batterie/Sicherungsaustausch

Warnung: 

Vor Öffnen des Gerätes, Gerät abschalten.

❶ 

Schrauben entfernen und Geräterückwand abheben. 

Batterie und/oder

durchgebrannte Sicherung entfernen und durch gleichwertige ersetzen. 

Gerät wieder zusammensetzen.

Warnungen: 

Verwendung einer verkehrten Sicherung kann zu ernstiger

Verletzung leiten. Nicht-Abschalten des Gerätes bei Batteriewechsel kann
Gerät und Batterie zerstören. 

E • Sustitución de la pila y los fusibles

Advertencia: 

Para evitar el peligro de descarga eléctrica, apague el

multímetro antes de abrir la tapa posterior.

❶ 

Quite los tornillos que unen la parte frontal y la parte posterior del

multímetro. 

Extraiga la pila AA de 1.5 V y/o el fusible abierto y cámbielos

por otros equivalentes.

Vuelva a montar el instrumento con los tornillos.

Advertencia:

La utilización de un fusible incorrecto puede causar graves

daños personales. Si no apaga el instrumento antes de cambiar la pila,
puede dañar tanto el multímetro como la pila.

F • Remplacement Pile et Batterie

Avertissement: 

Avant d’ouvrir l’appareil, coupez l’alimentation.

Enlevez les vis et soulevez le boîtier arrière. 

Enlevez la pile et/ou le

fusible brulé et remplacez par équivalent. 

Réassemblez l’instrument.

Avertissements: 

L’utilisation d’un mauvais fusible peut entraîner des

blessures graves. Ne pas éteindre l’appareil pour installer une nouvelle pile
peut endommager la pile et l’appareil. 

REPAIR

Read the warranty located at the front of this manual before requesting warranty
or non-warranty repairs. For warranty repairs, any multimeter claimed to be
defective can be returned to any Wavetek Meterman authorized distributor or to a
Wavetek Meterman Service Center for an over-the-counter exchange for the same
or like product. Non-warranty repairs should be sent to a Wavetek Meterman

- 12 -

AM8-8PK.Man.08.00  11/29/00  8:44 PM  Page 12

Summary of Contents for Meterman AM8

Page 1: ...Operator s Manual Model AM8 Pocket Sized Analog Multimeter Bedienungsanleitung Manual de Instrucciones Manuel d Utilisation TM Clamp On Meter ...

Page 2: ...nformación de seguridad 3 Familiarización con el instrumento 4 Procedimientos de medida 5 Especificaciones 9 Mantenimiento y reparación 12 Informations de Sécurité 3 Présentation de l Appareil 4 Procédures de Mesure 6 Spécifications 10 Maintenance et Réparation 12 Attention Refer to Operating Instructions D Achtung Bitte Anleitung lesen E Atención Consulte las Instrucciones de Uso F Attention Cons...

Page 3: ...the O OHM ADJ knob to set the pointer to the 0 at the right end of the resistance scale If this does not prove possible 3 WARNINGS AND PRECAUTIONS This instrument is EN61010 1 certified for Installation Category II It is recommended for use with local level power distribution appliances portable equipment etc where only smaller transient overvoltages may occur and not for primary supply lines over...

Page 4: ... utilisez pas des pièces endommagées Ne touchez pas les pointes de touche ou le circuit pendant les mesures Isolez vous Pour la mesure de courant connectez l appareil en série avec le circuit JAMAIS en parallèle avec une source de tension N utilisez pas cet appareil dans des atmosphères explosives MEASURING PROCEDURES Before You Start Open the back of the unit and place one AA size battery into th...

Page 5: ...ida en la escala adecuada del indicador Notas Para obtener la máxima precisión en las medidas sitúe el medidor plano sobre una superficie no metálica Seleccione la escala de forma que la lectura se indique en el tercio superior del fondo de escala Si la aguja no descansa exactamente sobre el 0 en el extremo izquierdo de la escala ajuste el tornillo de plástico situado bajo el indicador Nota para m...

Page 6: ...n el compartimento destinado a ello La pila se utiliza solamente en medidas de resistencia En general Cuando vaya a aplicar o retirar las puntas de prueba a de un circuito en primer lugar desconecte siempre la alimentación del dispositivo o circuito sometido a prueba y descargue todos los condensadores Si no conoce la magnitud de la señal ponga el selector en la escala más alta y vaya reduciendo h...

Page 7: ...cuit mesuré et déchargez les condensateurs Placez le sélecteur sur la gamme fonction désirée Si la magnitude du signal n est pas connue commencez par la gamme la plus élevée et diminuez ensuite jusqu à obtenir une bonne lecture Ne dépassez pas les limites d entrée Pour les diverses mesures connectez les pointes de touche comme illustré en page 7 Lisez la mesure sur l afficheur Notes Pour des mesur...

Page 8: ...leichstrommessung Medidas de corriente CC Mesure de courant continu Resistance measurement Widerstandsmessung Medidas de resistencia Mesure de résistance Battery test Batterietest Comprobación de pila Test de pile AC volts measurement Wechselspannungsmessung Medidas de tensión CA Mesure de tension alternative DC volts measurement Gleichspannungsmessung Medidas de tensión CC Mesure de tension conti...

Page 9: ...y 10 of good bad line 8 SPECIFICATIONS Abmessungen mit Holster HxBxT 13x6 6x4 2 cm Gewicht mit Batterie 176 Gramm Zubehör Testkabel befestigt Holster Batterie Anleitung Sicherheit Gemäß EN61010 1 Cat II 300V EMC Gemäß EN50081 1 EN50082 1 EMC Dieses Produkt beantwortet an die Bestimmungen der folgenden EWG Richtlinien 89 336 EEC Elektromagnetische Kompatibilität und 73 23 EEC Niedrige Spannung geän...

Page 10: ...r 5 Eingangsimpedanz 2kΩ V Wechselspannung Genauigkeiten sind für Sinuswellen gegeben Bereiche 10 50 500V Genauigkeit alle Bereiche 5 Eingangsimpedanz 2MΩ V Gleichstrom Bereiche 0 5 10 250mA Genauigkeit 5 Überlastschutz 200mA 250V Glas Sicherung Widerstand Bereiche 20kΩ 2MΩ Genauigkeit alle Bereiche 5 Batterietest Batteriespannung 1 5V 9V Genauigkeit 10 Gut Schlecht E ESPECIFICACIONES Especificaci...

Page 11: ...e résistance Dimensions avec holster H x L x P 13 x 6 6 x 4 2 cm Poids avec pile 176 g Accessoires Cordons de test attachés holster de protection piles manuel Sécurité Conforme à EN61010 1 Cat II 300V EMC selon EN50081 1 EN50082 1 EMC Ce produit est con forme aux exigences des directives suivantes de la Communauté Européenne 89 336 EEC Compatibilité Electromagnétique et 73 23 EEC Basse Tension mod...

Page 12: ...aux Gammes 10 50 500V Précision toutes gammes 5 Impédance d entrée 2kΩ V Courant CC Gammes 0 5 10 250mA Précision 5 Protection de surcharge fusible en verre 200mA 250V 5x20mm Résistance Gammes 20kΩ 2MΩ Précision toutes gammes 5 Test de Piles Tension de piles 1 5V 9V Précision 10 bon mauvais ...

Page 13: ...en Kredietkarte mit Verf alldatum usw bitte in Namen der Servicestelle aufstellen Bitte Multimeter Frei senden an 13 BATTERY FUSE PLACEMENT REPLACEMENT Warning To prevent electrical shock hazard turn off the multimeter and any device or circuit under test and disconnect the test leads before removing the rear cover Remove the rear case by unscrewing the screws that secure it to the front Remove th...

Page 14: ...52 Hurricane Way Everett WA 98203 Mississauga ON L4Z 1X9 Norwich NR6 6JB U K Tel 1 877 596 2680 Tel 905 890 7600 Tel int 44 1603 404824 Fax 425 446 6390 Fax 905 890 6866 Fax int 44 1603 482409 The instrument will be returned with the transportation charges paid by Wavetek Meterman D Reparatur Lesen Sie die Gewährl ei stung bevor Sie eine Reparat ur unter oder außerhalb Gewährleistung anfragen Unte...

Page 15: ...to por otro igual o similar Para reparaciones fuera de garantía deberá enviar el multímetro a un Centro de Servicio de Wavetek Meterman En Wavetek Meterman o en su Distribuidor o punto de venta le indicarán el Centro de Servicio más próximo y las tarifas de reparación vigentes La documentación que acompañe a todo multímetro enviado para reparación debe incluir los siguientes datos nombre de la emp...

Page 16: ...ayement sous forme de chèque virement carte de crédit avec date d expiration etc doit êtr e éta bli au nom du Centre de Servic es Le multimètre doit être envoyé port payé à en U S A en Canada en Europe Wavetek Meterman Wavetek Meterman Wavetek Meterman 1420 75th Street SW 400 Britannia Rd E Unit 1 52 Hurricane Way Everett WA 98203 Mississauga ON L4Z 1X9 Norwich NR6 6JB U K Tel 1 877 596 2680 Tel 9...

Page 17: ... not apply to you This warranty gives you specific legal rights and you may also have other rights which vary from state to state D GEWÄHRLEISTUNG Das analoge Multimeter AM8 ist ab Kaufdatum für ein 1 Jahr gegen Material und Herstellungsfehler gewährleistet Siehe Kapitel Unterhalt und Reparatur für Einzelheiten Implizierte Schadeforderungen sind auch auf ein Jahr beschränkt Wavetek ist nicht anspr...

Page 18: ...ng from Wavetek Meterman Specifications subject to change Wavetek is a trademark of Wavetek Wandel Golterman Wavetek Meterman 2000 U S Service Center Wavetek Meterman 1420 75th Street SW Everett WA 98203 Tel 877 596 2680 Fax 425 446 6390 Canadian Service Center Wavetek Meterman 400 Britannia Rd E Unit 1 Mississauga ON L4Z 1X9 Tel 905 890 7600 Fax 905 890 6866 European Distribution Center Wavetek M...

Reviews: