HEADER
12
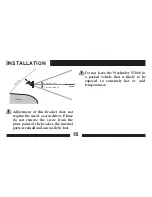
Windshield Mounting:
1. Install the suction cups into the mounting
bracket by sliding them into their holes
(if not pre-installed).
2. Do not loosen the screw at the pivot point
where the two-piece bracket is assembled
(see illustration next page).
3. Hold the base plate where the suction
cups are attached in one hand and the
compass shaped holder in the other.
4. Pull the sections apart to disengage
teeth and swivel to desired angle while
still maintaining the space between the
bracket teeth. Release once desired angle
is achieved and check that the teeth have
locked securely into place.
5. With the battery and/or 12-volt adapter
installed, slide the unit all the way into the
compass shaped holder until you hear/
feel the “click” when the locking fingers
slip into place and press the suction cup
base firmly against the windshield. If
necessary, apply a thin layer of petroleum
jelly to improve suction cup grip.
6. Insert the small plug end of the 12-volt
adapter into the jack marked “
POWER
”,
INSTALLATION
Summary of Contents for V7000
Page 1: ...OPERATION MANUAL DIGITALVEHICLECOMPASS V7000...
Page 2: ...Making Ordinary Products Extraordinary...
Page 15: ...HEADER 13 INSTALLATION...
Page 33: ...HEADER 31 DECLINATION ANGLE MAP Figure A Declination angles for the United States...
Page 43: ......
Page 44: ...PNI Corporation www pnicorp com 11381 R02 1000242 VJ2 01...


