background image

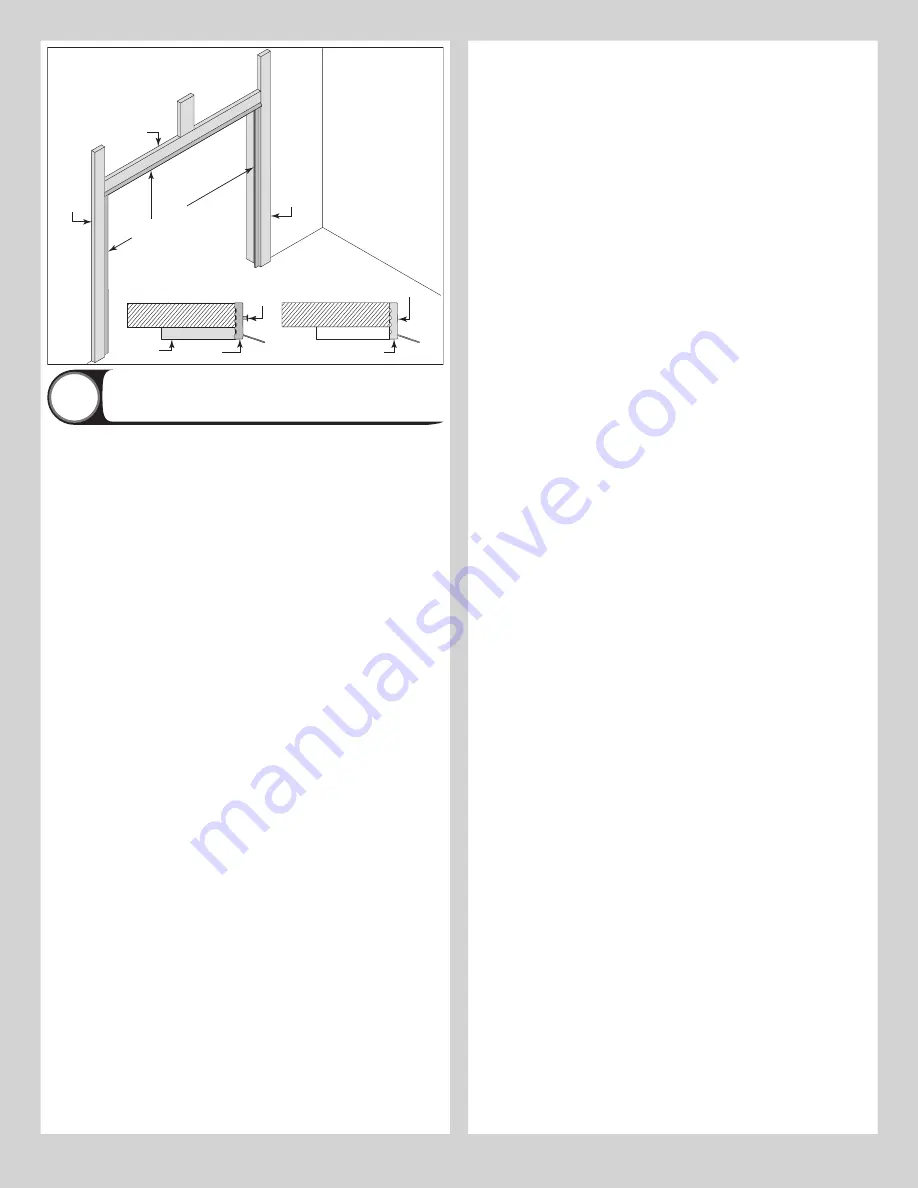
Weather seal

s

Nail

Weather 

seal

Jamb

Weather seal 

installed

Jamb

Header

Jamb

Nail

NOTE:

 Door not shown for clarity.

Balancing Door


24


Remove locking pliers. Lift door and check its balance. Adjustments to the required number 

of spring turns stated may be necessary. If door rises off floor more than 2 ft. under spring 

tension alone, reduce spring tension. If the door is hard to rise or drifts down on its own, add 

spring tension. A poorly balanced door can cause garage door operator problems.
To adjust spring tension, fully close door. Apply locking pliers to track above third track roller. 

Place locking pliers on torsion shaft, as shown in Step Attaching Counterbalance Lift Cables. 

Insert a winding rod into the winding cone. Push upward on the winding rod slightly while 

carefully loosening the set screws in the winding cone.

IMPORTANT: 

BE PREPARED TO SUPPORT THE FULL FORCE OF THE TORSION SPRING ONCE 

THE SET SCREWS ARE LOOSE.
Carefully adjust spring tension 1/4 turn. Retighten both set screws to 14-15 ft. lbs. of torque 

in the winding cone and repeat for the other side. Recheck door balance and re-adjust spring 

tension if needed.

IMPORTANT: 

DO NOT ADJUST MORE THAN 1 TURN FROM THE RECOMMENDED NUMBER 

OF TURNS.
If the door still does not operate easily, lower the door into the closed position, unwind 

spring(s) completely, and recheck the following items:
1.) Is the door level?
2.) Are the torsion shaft and flag angles / angle mount level and plumb?
3.) Does the distance between the flag angles / angle mount equal door width plus 3-3/8” to 

3-1/2”?
4.) Do the counterbalance lift cables have equal tension? Adjust if necessary.
5.) Rewind the spring(s).
6.) Make sure door is not rubbing on jambs.

IMPORTANT: 

IF DOOR STILL DOES NOT BALANCE PROPERLY, THEN CONTACT A TRAINED 

DOOR SYSTEM TECHNICIAN.

17

Summary of Contents for 9700

Page 1: ...ructions 7 Counterbalance Installation Instructions 12 Optional Installation 18 Door Arm Hookup 18 Inside Lock 18 Pull Down Rope 18 Maintenance 19 Cleaning Your Garage Door 19 Painting Your Garage Doo...

Page 2: ...permission by Wayne Dalton NOTE It is recommended that 5 16 lag screws are pilot drilled using a 3 16 drill bit prior to fastening CAUTION IF ANY PART OF THE DOOR IS TO BE INSTALLED ONTO PRESERVATIVE...

Page 3: ...ACKROOM REQUIREMENT Backroom is defined as the distance needed from the opening back into the garage to allow the door to open fully NOTE For door heights from 10 1 to 14 0 refer to your operator manu...

Page 4: ...ified by 2 graduated end hinges on a 4 section high door and by 3 graduated end hinges on a 3 section high door Also on a 3 section door the lock section will come with a warning label attached to the...

Page 5: ...Vise clamps Hammer Step ladder Pencil Leather gloves Locking pliers Safety glasses Approved winding bars Saw horses 5...

Page 6: ...ertical Track Assemblies J TORSION SPRING ASSEMBLY AS REQUIRED J1 Left Hand and Right Hand Torsion Springs As Required J2 Counterbalance Lift Cables J3 Left Hand End Bearing Bracket As Required J4 Rig...

Page 7: ...set on the vertical track Align the slot in the jamb bracket with the lower hole of the hole slot pattern Hand tighten jamb bracket using 1 1 4 20 x 9 16 track bolt and 1 1 4 20 flange hex nut Place t...

Page 8: ...n Double graduated end hinge Hinge tube Counterbalance lift cable Long stem track roller Bottom weather seal Bottom section Milford pin Cable loop Milford pin Bottom corner bracket Short stem track ro...

Page 9: ...eat same process for other side Vertical track assembly Jamb bracket Flag angle Flag angle lag screw locations 5 16 x 1 5 8 Lag screws Bottom section Track rollers 3 8 to 5 8 Spacing Bottom section 15...

Page 10: ...hand side of the top section and using the top fixture as a template shown on the Windload Specification Sheet determine the placement for the top fixture roller slide on the top portion of the strut...

Page 11: ...Assemblies you have WARNING DO NOT RAISE DOOR UNTIL HORIZONTAL TRACKS ARE SECURED AT REAR AS OUTLINED IN STEP REAR BACK HANGS OR DOOR COULD FALL FROM OVERHEAD POSITION CAUSING SEVERE OR FATAL INJURY I...

Page 12: ...er to Package Contents Breakdown of Parts to determine which Center Bracket s came with your door NOTE Drill 3 16 pilot holes into header for the lag screws NOTE Refer to Package Contents Breakdown of...

Page 13: ...able drum at the left end of the torsion shaft torsion keyed shaft Slide the center bracket bearing onto the torsion shaft torsion keyed shaft followed by the torsion springs and cable drums IMPORTANT...

Page 14: ...kets If your spring diameter is either 2 or 2 5 8 then two springs will share the same center bracket unless a coupler assembly is provided IF YOU DON T HAVE A COUPLER ASSEMBLY Slide center bracket be...

Page 15: ...ical tracks just above the third track roller This is to prevent the garage door from rising while winding springs NOTE Check the following before attempting to wind torsion spring s a Counterbalance...

Page 16: ...LOCKING PLIERS FROM VERTICAL TRACKS Raise the door until the top section and half of the next section are in the horizontal track radius Do not raise door any further since rear of horizontal tracks a...

Page 17: ...ing the set screws in the winding cone IMPORTANT BE PREPARED TO SUPPORT THE FULL FORCE OF THE TORSION SPRING ONCE THE SET SCREWS ARE LOOSE Carefully adjust spring tension 1 4 turn Retighten both set s...

Page 18: ...th the square hole in the vertical track The inside lock should be spaced ap proximately 1 8 away from the section edge IMPORTANT INSIDE LOCK S MUST BE REMOVED OR MADE INOPERATIVE IN THE UN LOCKED POS...

Page 19: ...rce settings must be adjusted properly Refer to the owner s manual supplied with your drawbar operator for complete details on installa tion operation maintenance and testing of the operator MAINTAINI...

Page 20: ...rate door ONLY when it is properly adjusted and free of obstructions 2 If a door becomes hard to operate inoperative or is damaged immediately have necessary adjustments and or repairs made by a train...

Page 21: ...rized alteration or repair of the Product or to any Product or component which has been damaged or deteriorated due to misuse neglect accident failure to provide necessary maintenance normal wear and...

Page 22: ...rvice representative They will be happy to handle any questions that you may have Thank you for your purchase PLEASE DO NOT RETURN THIS PRODUCT TO THE STORE After installation is complete leave this I...

Reviews: