background image

4


FCC RF Interference Statement  


This equipment has been tested and found to comply with the limits for a 

Class B digital device, pursuant to Part 15 of the FCC Rules. These limits 

are designed to provide reasonable protection against harmful 

interference in a residential installation. 
This equipment generates, uses, and can radiate radio frequency energy and, if not 

installed and used in accordance with the instructions, may cause harmful interference to 

radio communications. However, there is no guarantee that interference will not occur in a 

particular installation. 

If this equipment causes harmful interference to radio or television reception, which 

can be determined by turning the equipment off and on, the user is encouraged to try 

to correct the interference by one or more of the following measures. 

o

Reorient or relocate the receiving antenna. 

o

Increase the space between the equipment and receiver. 

o

Connect the equipment into an outlet on a circuit different from that to which the 

receiver is connected. 

o

Only a shielded interface cable should be used. 

Finally, any changes or modifications to the equipment by the user not expressly approved 

by

as well as voiding product warranty.

 the grantee or manufacturer could void the user's authority to operate such equipment. 


DOC Compliance Notice 

This digital apparatus does not exceed the Class A limit for radio noise emissions from 

digital apparatus set out in the radio interference regulation of Canadian Department of 

Communications. 


CE Compliance 

This monitor complies with the basic protection requirements of the 

Electromagnetic Compatibility (EMC) Directive 2014/30/EU for electrical


and electronic equipment imported into the European Union (EU): 
The electromagnetic disturbance generated by the apparatus does not exceed the 

level specified in the harmonized EMC Standards for this type of apparatus. It has a 

level of immunity to the electromagnetic disturbance to be expected in its intended 

use, and should operate without unacceptable degradation of its specified 

performance. 

Summary of Contents for 0E-32MON720P

Page 1: ...LED SEMI COMMERCIAL MONITOR 0E 32MON720P HD 0E 43MON1080 FHD Tech Support 833 574 9124 Option2 info wboxtech com ...

Page 2: ...the product 4 Disconnect the monitor from all power before cleaning Use a damp cloth for cleaning and do not use liquid or aerosol cleaners 5 Never use the monitor in damp areas or near water 6 Never place the monitor on an unstable surface if the monitor falls it may cause serious damage to people or property 7 When selecting a location for placement installation please ensure A To allow for suff...

Page 3: ...insert objects of any kind into the monitor cabinet slots Never spill any kind of liquid on the monitor 13 Do not attempt to service this monitor yourself as opening or removing the cover may expose you to dangerous voltage points or other risks 14 If any of the following occur disconnect the power to the monitor and refer servicing to qualified service personnel A The power cord or plug is damage...

Page 4: ... slots Avoid placing the monitor in direct sunshine or near a heating appliance Do not use the monitor against a bright background or where sunlight and other light sources will shine directly on the monitor Neither the monitor itself nor any other heavy object should rest on the power cord Damage to a power cord can cause fire or electrical shock POWER SUPPLY CORD IS USED AS MAIN POWER DISCONNECT...

Page 5: ...he equipment into an outlet on a circuit different from that to which the receiver is connected o Only a shielded interface cable should be used Finally any changes or modifications to the equipment by the user not expressly approved by as well as voiding product warranty the grantee or manufacturer could void the user s authority to operate such equipment DOC Compliance Notice This digital appara...

Page 6: ...Y PB PR VIDEO IN HDMI1 HDMI2 VGA AUDIO IN L IN R IN USB AUDIO OUT MUTE MENU SOURCE HDMI VGA AV 1 3 4 8 2 6 7 9 5 1 Power button Press to enter or exit the standby mode 2 Mute button Press to turn on or off the audio output 3 OK button Press to confirm selection in the setup menu 4 Menu button Press to enter or exit the setup menu 5 Source button Press to enter or exit the interface display menu 6 ...

Page 7: ...n one source connected to the monitor B VOL button 6 Press the button volume increase Press the button to scroll the cursor to desired function A POWER button Press the button to turn ON or turn OFF the monitor Press the button volume decrease Press the button to scroll the cursor to desired function C VOL button D CH button Press the button to scroll the cursor to desired function Press the butto...

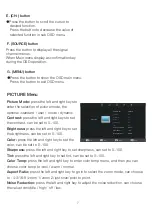
Page 8: ...enter the selection of picture mode the optional standard user movie dynamic Contrast press the left and right keys to set the contrast can be set to 0 100 Brightness press the left and right key to set the brightness can be set to 0 100 Color press the left and right key to set the color can be set to 0 100 Sharpness press the left and right key to set sharpness can set to 0 100 Tint press the le...

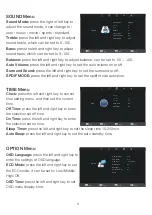
Page 9: ...set the spdif mode auto pcm Enter Enter Select EXIT TIME Clock Off Time On Time Sleep Timer Auto Sleep Off Off Off Off EXIT OK Clock press the left and right key to current time setting menu and then set the current time Off Time press the left and right key to enter the selection set off time On Time press the left and right key to enter the selection set on time Sleep Timer press the left and ri...

Page 10: ...d 0000 to go into system lock menu setting Through the left and right click Photo icon and then click C disk and open the picture Select the picture press the OK key will appear the following icon lcon 1 Play or Pause photo lcon 2 Play a preview photo lcon 3 Play a next photo lcon 4 Stop playing lcon 5 Set repeatplay mode lcon 6 Random play lcon 7 set the background music lcon 8 Photo playlists lc...

Page 11: ...g time which will lead to damage of display Icon 1 Play or Pause movie Icon 2 Fast backward the movie play Icon 3 Fast forward the movie play Icon 4 Play a preview movie Icon 5 Play a next movie Icon 6 Stop playing Icon 7 Set movierepeat mode Icon 8 Random play Icon 9 Set A B Play Icon 10 Movie Playlist Icon 11 Movie information Icon 12 Slow forward play Icon 13 Step forward play Icon 14 Goto time...

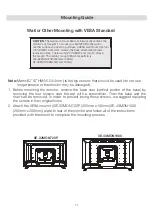
Page 12: ...ng the screws in their original holes 2 Attach the VESA mounnt 0E 32MON720P 200mm x 100mm 0E 43MON1080 200mm x 200mm plate to rear of the monitor and follow all of the instructions provided with the mount to complete the mounting process CAUTION The wall mount must bear a minimum of five times the monitor s net weight To mount your MONITOR to the wall or another surface you need to purchase a VESA...

Page 13: ...or remains ON to be instantly ready to display video when the source is changed or if a PC changes state from sleep standby to active mode A floating No Signal box moves slowly across the screen until video is restored IR Remote Control Qty 1 Qty 2 User Manuals Qty 2 AAA Batteries Qty 2 Base of Stands Screws Type 32 43 BT Ф4 0x10mm Qty 4 Screws for Installing Monitor Stand MUTE MENU SOURCE HDMI VG...

Page 14: ... 38 2 434 17 566 22 45 9 1 8 47 1 1 85 474 6 18 7 608 2 23 9 684 2 26 9 913 5 35 9 195 5 7 7 211 2 8 3 701 8 27 6 942 9 37 1 396 4 15 6 531 1 20 9 11 2 0 44 11 5 0 45 17 3 0 68 14 5 0 57 9 5 0 37 9 4 0 36 Depth of monitor body Height of monitor on base Width of base Depth of base Width of viewable area Height of viewable area Thickness of monitor Bottom bezel width Side bezel width ...

Page 15: ...5 680 2 211 2mm 38 2 x26 7 x3 8 200x100 9 9Ibs 4 5 Kg 16 4Ibs 7 45 Kg 25 1Ibs 11 4Kg 14 9Ibs 6 8 Kg 200x200 110W Typical 0 5 Matte black Plastic Yes 5 15 AC 100 240V 50 60Hz 1 8A AC 100 240V 50 60Hz 1 1A 0 C 40 C 32 104 20 C 50 C 4 122 10 90 CO AXIAL OUT HDMI VGA AUDIO IN YPBPR VIDEO IN LIN RIN AUDIO IN USB AUDIO OUT Power Cable IR Remote Control AAA Batteries Screws Base Of Stands User Manuals HD...

Page 16: ... services or repaired III Damage is caused by outside natural occurrences such as lightning power surges fire floods acts of nature or the like IV Defects resulting from unauthorized modification misuse vandalism or other causes unrelated to defective materials or workmanship or failures related to batteries of any type used in connection with the products sold here under ADI only warrants those p...

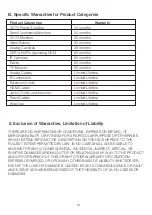
Page 17: ...ER WARRANTY OR CONDITION EXPRESS OR IMPLIED OR UPON ANY OTHER BASIS OF LIABILITY WHATSOEVER EVEN IF THE LOSS OR DAMAGE IS CAUSED BY ADI S OWN NEGLIGENCE OR FAULT AND EVEN IF ADI HAS BEEN ADVISED OF THE POSSIBILITY OF SUCH LOSSES OR DAMAGES Product Categories Warranty CCTV Power Supplies 24 months CCTV Monitors 30 months Semi Commercial Monitors 24 months Video Baluns 30 months Analog Cameras 36 mo...

Page 18: ...bility shall not in any case exceed the purchase price of the product which shall be fixed as liquidated damages and not as a penalty and shall be the complete and exclusive remedy against ADI FOR THE AVOIDANCE OF DOUBT ADI DOES NOT SEEK HEREUNDER TO EXCLUDE OR RESTRICT ITS LIABILITY IN RELATION TO I FRAUD II DEATH OR PERSONAL INJURY DIRECTLY RESULTING FROM ITS NEGLIGENCE OR III ANY MATTER IN RESP...

Page 19: ...WWW WBOXTECH COM Be sure to have the model number and the nature of the problem available In the event of replacement the return product will be credited to Buyer s account and a new invoice issued for the replacement item ADI reserves the right to issue a credit only in lieu of replacement If any WBox Technologies product is found to be in good working order or such product s inability to functio...

Page 20: ...0E 32MON720P 0E 43MON1080 wboxtech com Tech Support 833 574 9124 Option2 info wboxtech com 5 8 4 0 0 4 9 3 0 1 2 4 9 8 4 0 0 4 9 3 0 3 4 0 ...

Reviews: