background image

6

Care Equipment Excellence

www.wealdenrehab.com 

     wealdenrehab 

01634 813388 
hello@wealdenrehab.com

4 Setting-up for Use

To assemble the equipment do the following

1. Remove all the components from the packaging.
2.  Insert the mast into the socket or into the plate and connect it to the 

“EARTH” electric system cable. Use a “spiral” cable to allow the rod to 
rotate.

3.  Insert the boom into the mast and tighten the fixing bolt to take up 

slack, thus ensuring free rotation.

4.  Attach the electric actuator with the motor downwards between the 

rod and boom and tighten the fixing bolts until they come into contact 
with the forks.

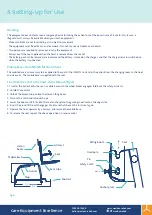
5. Disassemble the control box unit as follows (Fig.3):
•  Release the battery from its support - bracket by pulling the release 

handle and the battery upwards

•  Pull the control box out of the bracket after removing the fixing screw

6.  Attach the control box bracket to the mast and tighten the screws, 

reassemble the control box unit by following the steps described above 
– see paragraph 5 – in reverse order (Recharge battery for at least 24 
hours before using it for the first time).

7.  Connect the remote control and the actuator connectors to the control 

box (Fig.3). Make sure that the pins are fully inserted, otherwise the 
hoist may not work.

Use

Heron with spreader bar

1. Apply the sling to the patient (refer to special instructions).
2.  Press the ‘Lower’ button on the remote control until the desired height is achieved and connect to the sling.
3.  Raise the patient, by pressing the ‘Lift’ button, until the patient remains suspended and rotate the equipment towards the 

swimming pool, using the handle and the boom of the hoist.

4. Lower the patient into the water holding down the ‘Lower’ button until the desired height is achieved.

Heron with integral seat

1.  Transfer the patient onto the seat - mobile base and hook the seat to the Heron boom (refer to specific instructions, see Fig. 4).
2. Raise the patient, pressing the ‘Lift’ button, until the patient remains suspended.
3. Remove the mobile base from the seat.
4. Rotate the equipment towards the swimming pool, using the handle and the boom of the hoist.
5. Lower the patient into the water holding down the ‘Lower’ pushbutton until the desired height is achieved.

Emergency 

stop button 
Emergency 

lowering button


Battery 
Support bracket


Release handle 

Battery charger


Remote control


Actuator


Socket


Power 

mains 

Fig.3

Summary of Contents for N3242-1 Heron Lift E

Page 1: ...ehab com Heron Pool Lift Operation Maintenance Manual N3242 1 Heron Lift E with spreader bar N3242 3 Heron Lift Max E with spreader bar N3242 0 Heron Lift E with integral seat N3242 2 Heron Lift Max E with integral seat N5429 Mobile Base For Liftpoolseat N2463 Pool Socket N2465 Pool Plate ...

Page 2: ...ental conditions 3 Safety Page 4 General warning Proper and improper use Emergency lowering and stop functions Setting up for use Installing the anchor systems Main components and dimensions cm Use 4 Battery Charging Page 4 5 Maintenance Cleaning Page 9 Troubleshooting Technical assistance and spareparts 6 Lifting Supports Page 10 Lifting supports 7 Warranty Specification Conformity Page 10 Warran...

Page 3: ... failure to comply with these instructions Target readership This manual is intended for users therapist attendant it must always be kept with the equipment and stored in a safe place for future reference 2 Equipment Description Intended use operation Electric hoist for easy transfer of disabled users into a swimming pool Painted stainless steel Available versions HERON with a sling bar and HERON ...

Page 4: ... if no lifeguard is at the pool Emergency lowering stop functions The machine can be stopped by depressing the lift lower buttons pressing the emergency button Fig 3 to disable the button and put the equipment back into operation rotate the button in the arrow direction Warning Press the emergency button when you need to stop the equipment immediately The emergency lowering can be enabled by press...

Page 5: ...tem must be capable of withstanding the load applied Pool Socket Determine the proper position for installing the hoist see fig 2 Bore a hole 90mm in diameter and 240mm deep Put a shim on the bottom of the hole so that the socket and cap are level with the floor Remove the socket and fill 1 4 of the hole with fluid quick cement Insert the socket and press it until the cap is flush with the floor M...

Page 6: ...he first time 7 Connect the remote control and the actuator connectors to the control box Fig 3 Make sure that the pins are fully inserted otherwise the hoist may not work Use Heron with spreader bar 1 Apply the sling to the patient refer to special instructions 2 Press the Lower button on the remote control until the desired height is achieved and connect to the sling 3 Raise the patient by press...

Page 7: ...ase item N5429 for Heron Seat The mobile base is an accessory to be applied to the seat of the HERON to transfer the patient from the changing room to the hoist and vice versa The mobile base is supplied with the seat To attach the seat to the hoist do as follows Fig 4 1 Transfer the patient onto the seat mobile base with the wheel brakes engaged fold back the safety armrests 2 Unfold the footrest...

Page 8: ...d battery upwards 2 Connect the power supply unit to the mains with a voltage of 220V 50Hz and insert the charging pin into the relevant socket located on the battery 3 When charging is completed disconnect the battery charger and reinsert the battery into its seat control box until it clicks into place Battery life can be extended if you avoid discharging batteries completely We recommend you to ...

Page 9: ...water spray Troubleshooting Problem Cause Solution The equipment won t work Emergency button is ON Disable Connectors disconnected or improperly plugged in Check connections Flat batteries Recharge Burnt battery protection fuse Contact service centre Damaged control box Contact service centre Batteries do not recharge Battery charger is not powered or is improperly connected Check connections Chec...

Page 10: ...odge a complaint please contact our Technical Assistance Manager Technical sheet N3242 1 N3242 3 N3242 0 N3242 2 N2463 N2465 10 4 14255 N5429 Item name Electric Liftpool Electric Liftpool seat without mobile base Socket Plate Legrest Mobile base without seat Dimensions cm See figures Weight 35 38max 55 58max 5 22 5 10 Max capacity 135 135 Use Equipment for temporary use 10 max 6min hour Electric p...

Page 11: ...ldenrehab 01634 813388 hello wealdenrehab com 8 Inspection record sheet Equipment Manufacturer CHINESPORT S p A 33100 Udine Italy Serial number Date of first installation Date of inspection Operations carried out Technician s name Signature Next due date ...

Reviews: