background image

INSTRUCTION MANUAL

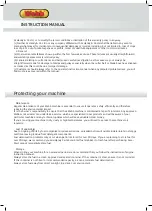
This Service Book is provided with your Webb, to help you look after your purchase to our recommendations and 

enable you to take advantage of the conditional manufacturer domestic warranty*. 

Present this service book to your authorised Webb repair dealer, whenever a service or a warranty appraisal is 

required.

The booklet is applicable to the following products, in the UK only:

Ride On Lawn Tractors

Cylinder Lawnmowers

Petrol Rotary Lawnmowers

Petrol Hand Held Range

Please register your machine using the following pages or at www.webbgardenpower.co.uk. By registering your 

machine, you agree to maintain the machine in accordance with the service schedules specifi ed in this manual and 

services duly recorded. (Not applicable for Webb electric handheld machines). You may be asked to produce this 

booklet as proof of servicing in the event of a claim. Proof of purchase should also be kept as a reference.

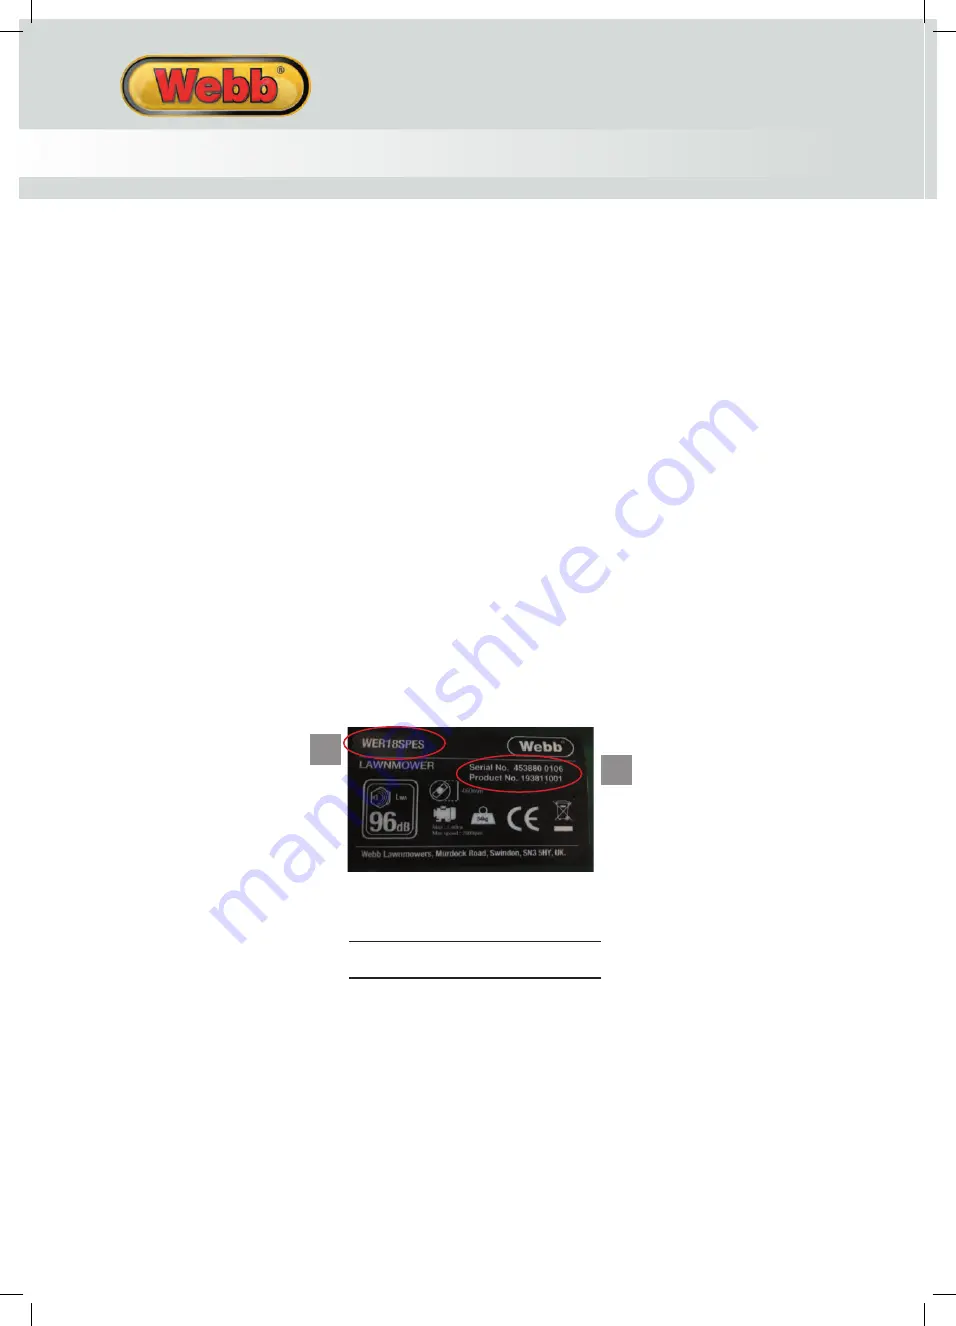
Ensure you have the following information available from your machine product label. The two examples below can 

be found on your machine:

1

2

1.   Model Number

2.  Serial  & Product Number

Please complete using BLOCK CAPITALS. 

Sections marked* must be completed to validate Warranty. 

1. Users Statement of Warranty

Each new machine is warranted against defective material or assembly of material under normal usage. The 

warranty applies to the original purchaser, is not transferable and covers faulty parts and the labour involved in 

replacing and repairing those parts, which are of original manufacture.

2. Period of Warranty

Webb (excludes Electric Handheld) & Webb Pro, 2 year conditional warranty from the original date of sale to the 

fi rst domestic user.

Webb Electric Handheld & Dynamic, Legacy & Heritage 1 year warranty from the original date of sale to the fi rst 

domestic user.

90 days from the original date of sale to the professional/commercial or for hire user.

Engine warranty as per the engine manufacturer’s warranty, which will be supplied with the machine.

90 days from the original date of sale for Replacement Spare Parts 

All machines’ must be serviced within the fi rst 14 months from the original date of purchase, to qualify for a second 

year parts & labour warranty, details of the service must be recorded in the service record within this manual.

A reduced warranty period of 90 days applies to those items which are subject to normal wear and tear and in 

normal use, will need replacement or adjustment.

These items are chargeable after 90 days of ownership. 

Filters 

Tyres / Wheels

Drive chains and belts 

Brake & clutch friction components

Control cable & starter cords

Fluids & lubricants

Spark plugs

Blades (Lawnmowers & Brushcutters)

Cutter bars (Hedgecutters)

Drive & clutch cable surfaces

Nylon Lines (Line Trimmers)

Carburettor cleaning

Bearings

Bushes

Electric cable

Grass collectors

3. Not covered by this warranty

(a) The warranty policy does not cover any depreciation or damages caused by ordinary wear, rusting or corrosion, 

lack of correct maintenance or operation, misuse, abuse, lack of transportation or accident.

(b) The warranty policy does not cover any costs necessary for the standard periodic maintenance services 

instructed by the operators manual, or service parts replacement which would include oil, fi lters, tyres, belts, brake 

linings, fuses, blades, seals and other service parts unless it can be proven that the item has evidence of faulty 

manufacture.

(c) The warranty policy will not cover failure or damage caused as a result of parts or accessories being modifi ed 

without the written approval of GJ Handy & Co Ltd.

(d) The warranty policy will not cover the unit if non-genuine parts have been fi tted and as a result damage has 

occurred to the unit.

(e) The warranty policy is non-transferable and is only applicable to the original purchaser.

4. Disclaimer

(a) This warranty is only a remedy for defect of products. GJ Handy & Co Ltd will never warranty in terms of the 

merchantability or the fi tness for a particular purpose.

(b) No person is authorised to make any warranties, representations or promises, expressed or implied, on behalf of 

Summary of Contents for 193806006

Page 1: ...st every e ort has been made to ensure the accuracy of information contained in this manual our policy of continuous improvement determines the right to make modi cations without prior warning Images...

Page 2: ...ritten permission from Handy Distribution In all cases this copyright notice must remain intact Copyright Notice Copyright Handy Distribution Permission is granted to reproduce this publication for pe...

Page 3: ...Basic Maintenance Technical Speci cation Parts List Diagrams Declaration of Conformity Waranty For Spares or Support of your Webb product please contact us Tel 01793 333212 Mon Fri 8 30am to 5 00pm E...

Page 4: ...ut Assembly 7 Spark Plug Socket 8 Cable Ties 9 Mulch Plug 10 Quick Release Handle INSTRUCTION MANUAL 1 1 1 7 1 4 1 2 2 8 1 9 2 10 1 5 1 3 4 6 What you get with your mower Please read understand this m...

Page 5: ...d nuts 11 Set the g and grass b together the plastic buck grass bag fr BOX CONTENTS PRODUCT DIAGRAM 1 Drive Lever WERR17SP Only 2 Brake OPC Lever 3 Fuel Tank 4 Air Filter Primer Bulb 2 5 6 7 8 4 1 3 9...

Page 6: ...fig 2 fig 1a fig 3 fig 4 fig 5 fig 6 fig 7 fig 8 fig 9 fig 10 INSTRUCTION MANUAL INSTRUCTION MANUAL Remove the machine and all components from the carton 1a Select the left hand the two studs on the r...

Page 7: ...d side of the handle the photo the grass bag ass bag frame er then lock the buckles on the ag frame e carton Assemble as follows mble the upper o the lower sing the two olts and nuts that the large go...

Page 8: ...that you securely tighten the petrol cap after filling Funnel fuel not supplied INSTRUCTION MANUAL The mower is supplied without oil in the engine Refer to the B S engine manual before starting the e...

Page 9: ...restart a hot engine refer to Point 3 5 To turn off your mower release the brake handle Fig 5 Fig 7 WARNING The following procedures must be carried out before you start the engine of your lawnmower S...

Page 10: ...utting height lever Turn mower off before cleaning Fig 9 Fig10 Fig12 Fig13 Fig11 INSTRUCTION MANUAL USING YOUR MOWER Attach the Grass Collection Bag The grass collection bag attaches easily by lifting...

Page 11: ...overning settings or over rev the engine as excessive speed is dangerous and can reduce engine life Before starting your mower inspect it carefully to ensure that there are no loose parts and that it...

Page 12: ...he spark plug cap must be removed before any attempt is made to remove the blade INSTRUCTION MANUAL Holding the blade firmly in one hand use a spanner or socket to loosen the blade screw rotate anti c...

Page 13: ...w the oil level dipstick Fig 20 and wipe dry Insert the dipstick until it reaches BASIC MAINTENANCE MAX MIN Air Filter will reduce the performance and life of the engine while making it harder to star...

Page 14: ...ABS Dimensions cm a 155 b 110 c 51 5 a 155 b 110 c 51 5 Function Collection Mulch Collection Mulch TECHNICAL SPECIFICATION c a b Consistent with our policy of continuous improvement WEBB reserves the...

Page 15: ...just the cutting height Blocked grass catcher vents Clear and clean the vents FAST TROUBLE SHOOTING Problem Likely cause Suggested remedy Engine does not start Out or almost out of fuel Fill tank with...

Page 16: ...Model WERR17SP Product No 193806006...

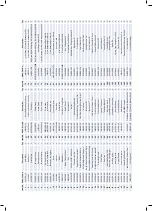
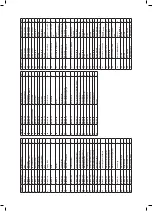
Page 17: ...Housing 1 89 WE106 21 Big Washer 8 6 18 WE106 109 Height Adjustment Arm 1 54 WE106 66 One Way Bearing Housing Left 1 90 WE106 101 Flat Washer 8 1 19 WE106 110 Height Adjustment Board 1 55 WE106 74 On...

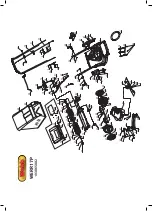
Page 18: ...3 80 84 82 44 42 43 75 86 8 86 8 86 8 77 77 10 58 61 59 36 64 W e b b 19 17 16 72 22 21 18 70 15 73 71 69 87 54 53 29 40 51 52 1 2 3 4 5 6 7 8 9 11 12 13 14 31 23 24 25 30 32 33 34 35 36 37 39 41 43 4...

Page 19: ...her A Grade 10 2 15 WE106 103 Connecting Bar 1 48 WE106 75 Roller Cover 1 71 Flat Washer C Grade 8 Flat Washer C Grade 8 1 16 WE106 109 Height Adjustment Bar 1 49 WE106 71 Roller Axle Bush GB T95 2002...

Page 20: ...ironment by Equipment for use Outdoors Directive The conformity assessment procedure followed was in accordance with EN ISO 5395 1 2013 EN ISO 5395 1 2013 EN ISO 14982 2009 Notified Body T V S D Produ...

Page 21: ...Notes...

Page 22: ...ister your machine using the following pages or at www webbgardenpower co uk By registering your machine you agree to maintain the machine in accordance with the service schedules speci ed in this man...

Page 23: ...s Brake clutch friction components Control cable starter cords Fluids lubricants Spark plugs Blades Lawnmowers Brushcutters Cutter bars Hedgecutters Drive clutch cable surfaces Nylon Lines Line Trimme...

Page 24: ...fely e ciently and therefore reducing the environmental impact It is the owner s responsibility to ensure that their Webb machine is maintained at speci c intervals Any approved Webb service dealer ca...

Page 25: ...actions have been completed PLEASE ENSURE THE SERVICE BOOK IS AVAILABLE FOR THE DEALER DURING SERVICE WORK 1st Service This must be stamped by an approved service dealer to qualify for a free second...

Page 26: ...INSTRUCTION MANUAL Service Record 48 Months Date Date Date Date Date Date Date Date 72 Months 96 Months 120 Months 60 Months 84 Months 108 Months 132 Months...

Page 27: ...regarding our products services o ers or just opinions which may be used for marketing research or analysis purposes If you wish to be contacted by any of the following methods please tick the relevan...

Page 28: ...Webb Lawnmowers Murdock Road Dorcan Swindon Wiltshire SN3 5HY...

Reviews: