background image


FUEL & OIL MIXTURE 


Fuel & its vapors are very flammable. Do not use or fuel the machine near a flame, sparks or while smoking. 

Allow the engine to cool for more than 2 minutes, before re-fueling. Never fuel the machine with the engine 

running. Fuel the engine at least 3 metres away from your work area. Always fuel your machine outdoors. 


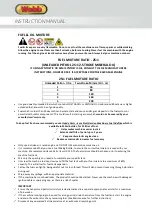
FUEL MIXTURE RATIO - 25:1  

(UNLEADED PETROL 25:1 2-STROKE MINERAL OIL) 

IF USING SYNTHETIC OR SEMI SYNTHETIC OIL, CONSULT THE OIL MANUFACTURERS 

INSTRUCTIONS, HOWEVER 50:1 IS ACCEPTABLE FOR THE KAWASAKI ENGINE 


25:1 FUEL MIXTURE RATIO 

Unleaded Petrol – litre  Two-Stroke Mineral Oil - ml 

40 

80 

120 

160 

200 


Use good quality unleaded fuel which contains NO ETHANOL or METHANOL. Use Branded 89 octane or higher 

unleaded fuel, known to be of good quality. 


Fuel which is older than 30 days old can become stale and cause acid & gum deposits in the fuel system or 

essential carburetor components. This could result in starting issues which 

would not be covered by your 

manufacturer’s warranty


To keep fuel fresh, we recommend you use 

Handy Parts – Sure Start Garden Machinery Fuel Additive

 which is 

available in 250ml bottles, for 25 litres of fuel. 

ü


Helps makes machines easier to start 

ü


Extends shelf life of petrol up to 2 years 

ü


Keeps carburetor & engine clean 

ü


Reduces emissions & increases fuel economy 


Only use 2-stroke air cooled engine oil. DO NOT USE automotive or marine oil. 


It is recommended that you use a Fuel Mixing Bottle, to ensure the correct fuel mixture is used with your 

machine. We recommend Handy Parts item HP-120. The fuel mixture should be shaken prior to entering the 

machine fuel tank. 


Mix only the quantity you require to complete your specific task. 


Unscrew the machine fuel cap slowly and fill the fuel tank with your fuel mixture to a maximum of 80% 

capacity. This will allow for fuel tank expansion. 


Fasten the fuel cap tightly, being careful not to cross-thread. This will also prevent loosening through vibration 

during use. 


Wipe away any spillage, with an appropriate material.  


If the machine has continued leaks, the product should not be started. Never use the machine with damaged 

ignition cable or spark plug cap, as there is a risk of sparks. 


IMPORTANT 

ü


Ensure that any stored petrol/oil mixture is clearly marked in a separate appropriate canister for a maximum 

of 4-6 weeks.  

ü


If the machine is not going to be used for a long period, drain the mixture from the fuel tank, start the engine 

and drain the carburetor of any remaining fuel. (See Maintenance for further instruction) 

ü


Dispose of any unwanted 2-stroke mixture at an authorised recycling point.

INSTRUCTION MANUAL

Summary of Contents for 1938127001

Page 1: ...ual paying particular attention to the safety instructions before use Operator s Manual Parts List 1938128001 23 Nov 2016 Straight Shaft Cow Horn Handle Brushcutter WEPK35CH 1938127001 Straight Shaft...

Page 2: ......

Page 3: ...CONTENTS SAFETY INSTRUCTIONS SPECIFICATIONS COMPONENTS ASSEMBLY OPERATION MAINTENANCE CLEANING STORAGE TROUBLE SHOOTING PARTS DIAGRAM LIST WARRANTY DECLARATION OF CONFORMITY...

Page 4: ...e machine during operation If approached stop the machine immediately No smoking Risk of Carbon Monoxide Poisoning Ensure working area is correctly ventilated Do not use near a flame or sparks Fire Ri...

Page 5: ...eventing it from getting caught in machinery DO NOT use whilst barefoot or wearing open toed footwear KEEP BYSTANDERS AND CHILDREN AWAY Keep unauthorised persons or animals a minimum distance of 15 me...

Page 6: ...Max 8 2 m s 9 m s Vibration level for idling Max 6 1 m s 6 m s Maximum engine performance 1 4kW 1 2 kW Engine speed rotational frequency at recommended max spindle rotational frequency 12500 min 1 Max...

Page 7: ...Off Switch 12 Safety Button 13 Throttle Trigger 14 Throttle Lock Button 15 Harness 16 Metal Blade Carefully remove the machine from its packaging and check that you have all the components If parts a...

Page 8: ...op handle to the main shaft using the bottom clamp Tighten the handle bolts through the handle bottom clamp and supplied nuts HANDLE ASSEMBLY THPK35CH Insert both handles into Handle Joint evenly Ensu...

Page 9: ...CAUTION Only use the quick release mechanism in an emergency The double shoulder harness has a quick release mechanism to release the harness instantly in an emergency Pull the harness grip upward to...

Page 10: ...ng nut cup washer and lower blade mounting washer from the gear housing Fit the cutting blade ensuring it is seated correctly and level Tighten the nut securely in an anti clockwise direction Remove t...

Page 11: ...ght hand hold the D Handle with your left hand WEPK27L Only Operate the trigger on the right handle and hold the left handle for stability WEPK35CH The trigger increases and decreases the power of the...

Page 12: ...u wish to cut Tilt the head slowly to direct debris away from you If cutting up to a barrier such as fence wall or tree approach from an angle where any debris ricocheting off the barrier will fly awa...

Page 13: ...acked or damaged metal blade Before cutting inspect for obstructions If an obstruction cannot be removed mark its location clearly so you can avoid it during operation Rocks metal can dull or damage a...

Page 14: ...xtends shelf life of petrol up to 2 years Keeps carburetor engine clean Reduces emissions increases fuel economy Only use 2 stroke air cooled engine oil DO NOT USE automotive or marine oil It is recom...

Page 15: ...ttle lock button on the handle Set the switch to the I position Hold the trimmer shaft near the engine firmly and as in Fig 17 pull the starter strongly DO NOT LET THE RECOIL STARTER ROPE RETRACT BY I...

Page 16: ...plug cap removed before the machine is unassembled cleaned serviced or maintained ADJUSTING CARBURETOR Do not adjust carburetor unless necessary If you have trouble with the carburetor see your deale...

Page 17: ...the end of each use paying particular attention to cuttings in and around the guard and cutting tool AIR FILTER Accumulated dust in the air filter will reduce engine efficiency increase fuel consumpti...

Page 18: ...ot covered by the machines manufacturer s warranty TROUBLE SHOOTING Failures such as a difficulty in starting the engine irregularity in functions and abnormality in performance can normally be preven...

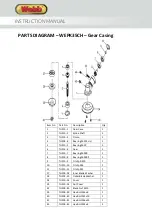
Page 19: ...209 6 Gear 1 7 TH209 7 Bearing 609 KSK 1 8 TH209 8 Bearing 609Z KSK 1 9 TH209 9 Circlip R S9 1 10 TH209 10 Circlip R24 1 11 TH209 11 Circlip R28 1 39 TH209 39 Hex Bolt M6x8 1 40 TH209 40 Hex Bolt M5x1...

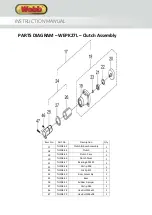
Page 20: ...lutch 1 19 TH208 45 Clutch Case 1 20 TH208 46 Clutch Drum 1 21 TH208 47 Bearing 6001ZZ 1 22 TH208 48 Circlip R28 1 23 TH208 49 Circlip S12 1 24 TH208 50 Boss Assembly 1 25 TH208 51 Boss 1 26 TH208 52...

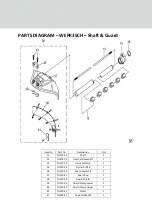
Page 21: ...9 Shaft 1 14 TH208 40 Internal Driveshaft 1 15 TH208 41 Harness 1 16 TH208 42 Trigger Assembly 1 32 TH209 32 Guard Assembly 1 33 TH209 33 Guard 1 34 TH209 34 Guard Clamp Lower 1 35 TH209 35 Cutter 1 4...

Page 22: ...7 TH210 7 Bearing Z6000 1 8 TH210 8 Bearing Z6000Z 1 9 TH210 9 Circlip R S10 1 10 TH210 10 Circlip R26 1 11 TH210 11 Circlip R32 1 27 TH209 28 Inner Blade Washer 1 28 TH209 29 Outer Blade Washer 1 34...

Page 23: ...13 TH210 13 Internal Driveshaft 1 15 TH210 15 Harness Clamp 1 16 TH210 16 Circlip R IR28 1 36 TH210 36 Guard Assembly 1 37 TH210 37 Guard Top 1 38 TH210 38 Guard Shield 1 39 TH210 39 Guard Clamp Lowe...

Page 24: ...onformity assessment procedure followed was in accordance with EN ISO 12100 2010 EN ISO 11806 1 2011 Measured Sound Power Level LWA 110 dB A Vibration Level Max During Use 9 m s Idling 6 m s Notified...

Page 25: ...EC The conformity assessment procedure followed was in accordance with EN ISO 12100 2010 EN ISO 11806 1 2011 Measured Sound Power Level LWA 112dB A Vibration Level Max During Use 8 2 m s Idling 6 1 m...

Page 26: ...nmowers Petrol Hand Held Range Please register your machine using the following pages or at www webblawnmowers co uk By registering your machine you agree to maintain the machine in accordance with th...

Page 27: ...ranty a The warranty policy does not cover any depreciation or damages caused by ordinary wear rusting or corrosion lack of correct maintenance or operation misuse abuse lack of transportation or acci...

Page 28: ...which are specialised in our products and will be aware of your particular machine and any technical updates which will save valuable time money If you are using your machine in dry dusty or high temp...

Page 29: ...correct service actions have been completed PLEASE ENSURE THE SERVICE BOOK IS AVAILABLE FOR THE DEALER DURING SERVICE WORK 1st Service This must be stamped by an approved service dealer to qualify fo...

Page 30: ...Service Record 48 Months Date Date Date Date Date Date Date Date 72 Months 96 Months 120 Months 60 Months 84 Months 108 Months 132 Months INSTRUCTION MANUAL...

Page 31: ...your and or your machine We value your trust by giving us this information about yourself and we are committed to protecting your privacy From time to time Webb its associated companies authorised dea...

Page 32: ...Webb Lawnmowers Murdock Road Dorcan Swindon Wiltshire SN3 5HY...

Reviews: