background image

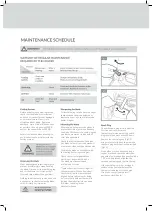
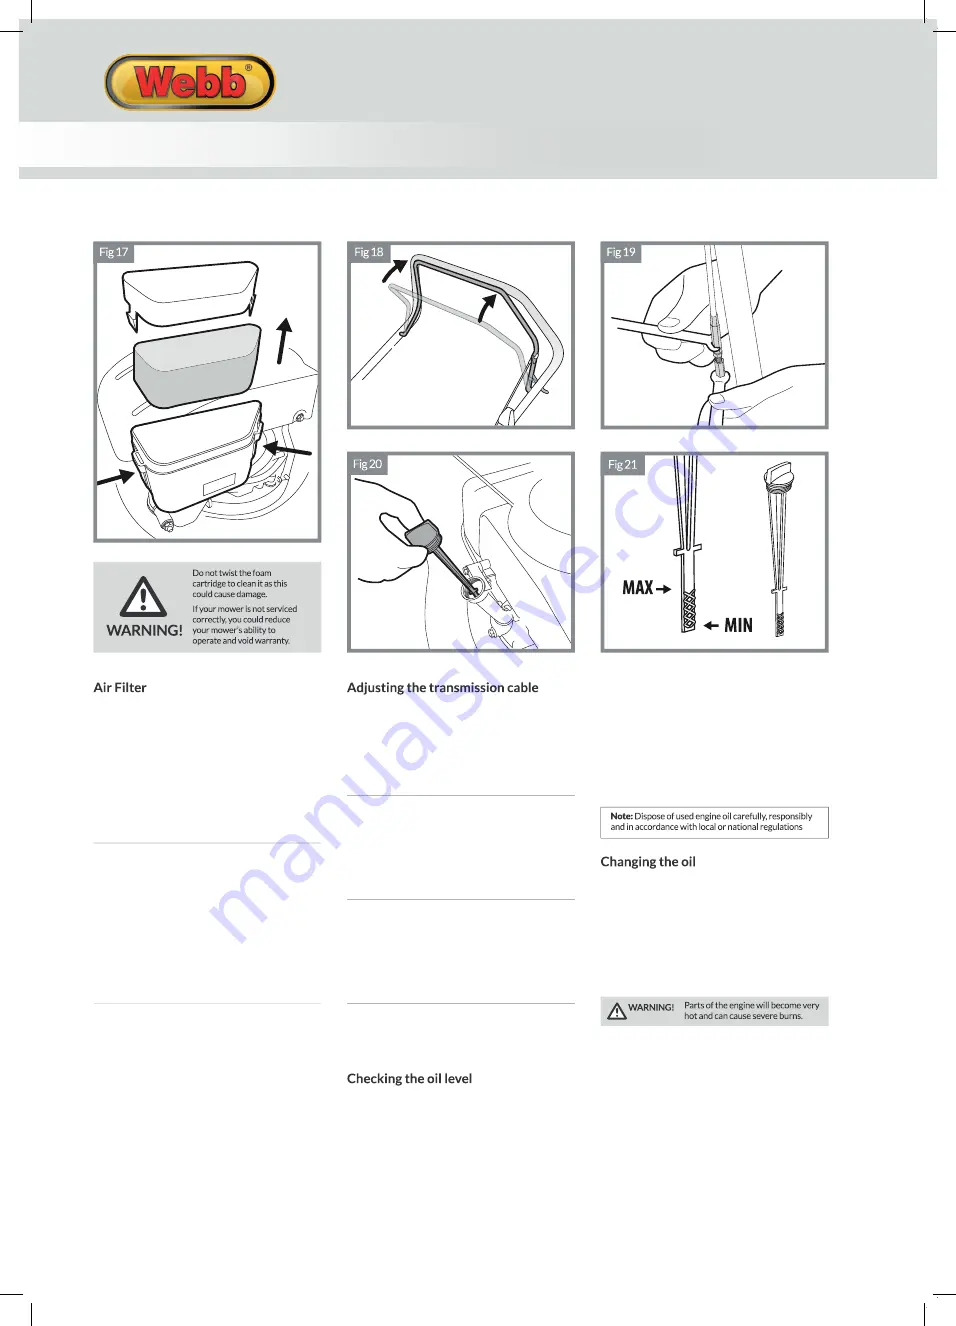
An air filter in poor condition will reduce
the performance and life of the engine
while making it harder to start. 
Regular checks are therefore essential,
especially when using the mower in dusty 
conditions. Check and clean the  air filter 
every 25 hours of use or more often if 
the engine is used in a dusty 
environment.

Clean the cover and inside of the air filter
box with a clean lint-free cloth. Apply a
uniform layer of oil to the outside of the
cartridge filter with a brush (you can use
clean engine oil). Insert the filter cartridge
into its housing and replace the filter lid,
ensuring that each component is in place
and properly installed.  If the filter cartridge
is damaged or is very dirty, replace it using
a genuine part.

The first oil change should be carried out
after the first 5 hours of mower use. 
Thereafter, change the oil after every 25
hours use or at least once a year. 
Leave the engine running outdoors for
several minutes to warm the oil and
make it more fluid. 

To adjust the tension of the cable
trasmission, increase or reduce the 
length of adjustment device using
the spanner 

(fig. 19)

. Check the

effectiveness of the transmission and 
resistance of the lever. 

Once a proper adjustment has been
reached, secure the adjustment device
by tightening the lock nuts. 

If the transmisison cable is too tight,
it will be difficult to move the drive
lever towards the handlebars. 
Conversely, if the transmission cable is
not tight enough, the transmission will
function poorly and lack power.

In its transmission-engaged position
(fig. 18), the mower’s brake lever is
pushed fully towards the handlebar.
An incorrectly-adjusted transmission
cable can cause premature wear to the
mower’s drive system.

Remove the spark plug cap and
unscrew the oil level dipstick. 
Place a suitable container beneath the
mower’s oil filler pipe and tilt the mower
onto its side with the air filter and
carburettor uppermost. 
Allow the oil to drain completely into
the container. Return the mower
onto its four wheels and fill the
engine with new oil.

The oil level should be between the
minimum and maximum oil level marks
on the dipstick 

(fig.21)

.  Add oil if

necessary and repeat the above
checking process. Running the engine
without oil or with too little oil can
cause serious engine damage.

Position the mower on a firm, level
surface. Unscrew the oil level dipstick
(fig.20) and wipe dry. Insert the dipstick
until it reaches  the filler neck, but do not
screw in. Remove the dipstick and check
the oil level holding the dipstick horizontal. 

Remove the air filter cover lid and carefully
remove the foam filter cartridge. 
Clean the cartridge in a small bowl of
warm water containing a few drops of 
washing-up liquid until it is perfectly clean
and free from all traces of grease and dust.
Rinse the filter cartridge in clean water and
then squeeze gently to remove most of the
water. Let it air dry until it is completely dry.


22

23

1.
2.
3.
4.


.

INSTRUCTION MANUAL

Summary of Contents for 1938185001

Page 1: ...lar attention to the safety instructions The manufacturer reserves the right to change the product speci cation and livery according to continues product improvements v en Original Instructions 46cm 1...

Page 2: ...l use only Commercial copying redistribution hiring or lending is prohibited No part of this publication may be stored in a retrieval system or transmitted in any other form or means without written p...

Page 3: ...Assembly Guidelines Basic Maintenance Warranty For Spares or Support of your Webb product please contact us Tel 01793 333212 Mon Fri 8 00am to 5 30pm Excl Bank Holidays Email customerservice webblawn...

Page 4: ...ease read understand this manual paying particular attention to the safety instructions before use The manufacturer reserves the right to change the product speci cation and livery according to contin...

Page 5: ...Brake OPC Lever Drive Lever FuelTankCap Air Filter 2 4 5 6 7 8 9 10 1 Exhaust Height Adjustment Lever 11...

Page 6: ...ge 2 for reference Attach lower handle bar bolts Take the weight of the handle bar and fit the lower bolt first 3 5 4 5 5a 5b TIES Fit the Cable ties Pull the starter cord upto the spring Holding the...

Page 7: ...o not screw back in place remove the dipstick again and check the level The oil level must be between the min and max marks on the dipsick fig 3 Replace the dipstick and screw into place Petrol is hig...

Page 8: ...Push the red primer three times Note If n times ex v r ke lever with one one positiv e r ou ke the motor W k ke keep it W A B INSTRUCTION MANUAL...

Page 9: ...sure washer or hot water to clean the mower Dry off the machine before storing by leaving it running for a few minutes on a flat clean surface to prevent corrosion or seizure Start your mower see star...

Page 10: ...ecommend you avoid mowing when it is raining after nightfall or in poor light conditions Do not transport the mower in a vehicle if there is any petrol in the tank Be aware that the machine s exhaust...

Page 11: ...fixing bolt very firmly with a wrench while holding the blade firmly in one hand NB wear suitable gloves Rotate clockwise Check the correct alignment and matching of pads with the blade The blade must...

Page 12: ...ver towards the handlebars Conversely if the transmission cable is not tight enough the transmission will function poorly and lack power In its transmission engaged position fig 18 the mower s brake l...

Page 13: ...22 23 1 2 3 4...

Page 14: ...B reserves the right to change the design and configuration of any of its products without notice or obligation Therefore please treat the text and images in this manual as being for illustrative purp...

Page 15: ...Outdoors Directive The conformity assessment procedure followed was in accordance with EN ISO 5395 1 2013 EN ISO 5395 2 2013 A2 2017 EN ISO 14982 2009 Notified Body T V S D Product Service GmbH Addres...

Page 16: ...Notes...

Page 17: ...Notes...

Page 18: ...using the following pages or at www webbgardenpower co uk By registering your machine you agree to maintain the machine in accordance with the service schedules speci ed in this manual and services du...

Page 19: ...cords Fluids lubricants Spark plugs Blades Lawnmowers Brushcutters Cutter bars Hedgecutters Drive clutch cable surfaces Nylon Lines Line Trimmers Carburettor cleaning Bearings Bushes Electric cable Gr...

Page 20: ...the owner s responsibility to ensure that their Webb machine is maintained at speci c intervals Any approved Webb service dealer can undertake a service which are specialised in our products and will...

Page 21: ...actions have been completed PLEASE ENSURE THE SERVICE BOOK IS AVAILABLE FOR THE DEALER DURING SERVICE WORK 1st Service This must be stamped by an approved service dealer to qualify for a free second...

Page 22: ...Service Record 48 Months Date Date Date Date Date Date Date Date 72 Months 96 Months 120 Months 60 Months 84 Months 108 Months 132 Months INSTRUCTION MANUAL...

Page 23: ...regarding our products services o ers or just opinions which may be used for marketing research or analysis purposes If you wish to be contacted by any of the following methods please tick the relevan...

Page 24: ...Webb Lawnmowers Murdock Road Dorcan Swindon Wiltshire SN3 5HY...

Reviews: