ALWAYS REFER TO THE BRIGGS & STRATTON OPERATORS MANUAL FOR FULL AND COMPLETE
INSTRUCTIONS FOR ENGINE MAINTENANCE.
REMOVE ENGINE OIL
CAUTION
Used oil is a hazardous waste product and must be disposed of properly. Do not discard with household
waste. Check with your local authorities, service center, or dealer for safe disposal/recycling facilities.
WARNING
Before draining any oil, ensure the fuel tank is empty. Fuel can leak out and result in a fire or explosion. To
empty the fuel tank, run the engine until it stops from lack of fuel.
•
Draining the oil can only be undertaken from the oil filler neck.
•
Turn off the engine.
•
Remove the spark plug cap and keep away from the spark plug.
•
Drain while the engine is still warm to assure rapid and complete drainage.
•
Remove the oil filler cap with dipstick.
•
Place an approved container below the machine.
•
Ensure you keep the spark plug end of the engine up.
•
Install Oil drain plug and wrench tighten.
•
Refill with the recommended oil and check its level as required, following instructions within this manual.
Oil capacity: See Specification section of this manual.
Wash your hands with soap and water after touching used oil.
NOTE: Please dispose of used motor oil in a manner that is compatible with the environment. We suggest
you put it in a sealed container to your local service for reclamation. Do not throw it away into the refuge
collection or pour it on the ground or in drains.
AIR FILTER
A dirty air filter will block air flow into the carburettor. To prevent carburettor malfunction, service the air filter
regularly. Service more frequently when operating the engine in extremely dusty areas.
1.
Remove the air filter cover. Remove the filter. Carefully check both for holes and tears and replace it if
damaged.
2.
Foam element:
clean in warm soapy water, rinse and allow to dry thoroughly or clean in high flash-point
solvent and allow to dry. Dip the element in clean engine oil and squeeze out all the excess. The engine
will smoke during initial start-up if too much oil is left in the foam.
WARNING
Never use gasoline or low flash point solvents to clean the air cleaner element. A fire or explosion
could occur.
CAUTION
Never run the engine without air filter or rapid engine wear will be the result.
WARNING
Periodically inspect the blade adaptor for cracks, especially if you strike a foreign object. Replace where
necessary
When sharpening the blade, follow the original angle of grind as a guide. It is extremely important that each
cutting edge receives an equal amount of grinding to prevent an unbalanced blade. An unbalanced blade will
cause excessive vibration when rotating at high speeds. It may cause damage to the mower or personal injury.
It is recommended that cutting blade sharpening should be undertaken by an approved service dealer.
•
Be sure to install the blade with the side of the blade marker with the part number, facing to the ground,
when the lawnmower is in the operating position.
•
Slide the blade adaptor onto the engine crankshaft.
•
Place the blade onto the blade adaptor. Ensure the blade is aligned with and seated on the blade adaptor
flange.
•
Place washer onto the blade. Make sure the notches on the blade bell support are aligned with small holes
on the blade.
•
Replace the blade bolt.
•
Tighten blade bolt to torque 45-50Nm (33-36ft.lb)
•
Three-disc bolts to torque: 9-11Nm (6.6-8ft.lb)
•
Tip mounting bolt to torque: 20-25Nm (15-18ft.lb)
Note:
To ensure safe operation of your lawnmower, the blade bolt & tip mounting blade must be checked
periodically for correct torque.
Blade Adaptor
Disc
Blade x4
Disc Bolt x3
Blade Bolt
Tip Mounting Bolt x4
Spring Washer
INSTRUCTION MANUAL
Summary of Contents for 1938290001
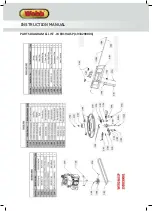
Page 30: ...PARTS DIAGRAM LIST WER19ALSP 1938290001 INSTRUCTION MANUAL ...
Page 31: ......
Page 32: ...INSTRUCTION MANUAL ...
Page 33: ......
Page 34: ...PARTS DIAGRAM WER21ALSP 1938291001 INSTRUCTION MANUAL ...
Page 35: ...PARTS LIST WER21ALSP 1938291001 ...
Page 44: ...Webb Lawnmowers Murdock Road Dorcan Swindon Wiltshire SN3 5HY ...


