background image


Do not tilt the machine when starting or switching on the motor, except if the machine has 
to be tilted for starting in long grass. In this case, do not tilt it more than absolutely 
necessary and tilt only the part which is away from the operator. Always ensure that both 
hands are in the operating position before returning the machine to the ground. 


Switch on the lawnmower according to instructions and with feet well away from the 
blades. 


Do not put hands or feet near or under rotating parts. 


Keep clear of

 the

 discharge

 chute

 at all times. 


Never pick up or carry the lawnmower while the motor is running. 


Remove the plug from the socket: 


W

henever you leave the machine

.


B

efore clearing a blockage

.


B

efore checking, cleaning or working on the lawnmower

.


A

fter striking a foreign object. Inspect the lawnmower for damage and make

 any necessary

repairs.


Check immediately i

f the lawnmower starts to vibrate abnormally. 


Keep all nuts, bolts and screws tight to be sure that the lawnmower is in safe working 
condition. 


Check the grass catcher frequently for wear or deterioration. 


Replace worn or damaged parts 

before use


Do n

ot to connect a damaged cord to the supply or touch a damaged cord before it is 

disconnected from the supply. A damaged cord can lead to contact with live parts. 


Do n

ot to touch the blade before the machine is disconnected fr

o

m the supply and the  

blade 

have come to a complete stop

.


K

eep 

power 

cords away from the blade. The blade can cause damage to the cords 

and lead to contact with live parts. 


Children should be supervised to ensure that they do not play with the appliance. 


This appliance is not intended for use by

 children or

 persons with reduced 

physical,

sensory or mental capabilities, or lack of experience and knowledge

.


New users should

be given supervision 

or

 instruction concerning use of the appliance 

and should read this


manual.


If the external flexible cable or cord is damaged, it 

must

 be replaced by the 

manufacturer

or an authorised

 service agent

 to ensure safe use.


Follow the instructions for safe use, including the recommendation that it must be supplied 
with a Residual Current Device (RCD) with a tripping current of not more than 30 mA. 


Completely uncoil your 

power

 cable before use to prevent over heating and loss of 

mower efficiency. When tidying away the cable, wind it carefully to avoid kinking. 


Before use check the supply and 

power

 cord for signs of damage or ag

e

ing. If the 

cord becomes damaged during use, disconnect the cord from the supply immediately. 


Do not cross roads or gravel paths with the machine still running. 

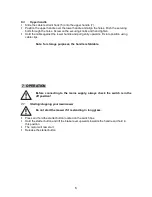
6  ASSEMBLY 

Some parts of the lawnmower have been dismantled for transport. The screws,

 wheels,


handwheels, cable clips and screwdrivers are to be found in plastic bags. Assembly is 

simple

if you follow these instructions:  

6.1 

Grass collection box. 


Assemble the 2 halves and fix them together. 


Lift the rear 

flap

 and 

attach

 the grass box 

to the mower

6.2 

Lower handle 

Loosen the lower handle set knob (13) on both sides, adjust the lower handle 

to the 


correct 

position, then tighten the lower handle sets knobs.

5

Summary of Contents for WEER38

Page 1: ...ANUAL AND PARTS LIST ELECTRIC LAWNMOWER WEER38 Spares Support 01793 333212 www webblawnmower co uk Before use please read understand this manual paying particular attention to the safety instructions 22 02 2013 v1 ...

Page 2: ......

Page 3: ...1 2 7 4 6 10 11 12 13 8 9 5 3 ...

Page 4: ...le preferably until the end of the warranty period WARNING Packaging materials are not toys Children must not play with plastic bags There is a danger of suffocation 1 x manual 1 x collection box 2 x cable clip 2 x fixed knobs and screws 1 x hook If any parts are missing or damaged please contact your dealer 3 SYMBOLS In this manual and or on the machine the following symbols are used Read the ope...

Page 5: ...arks which may ignite the dust or fumes Keep children and bystanders at a distance when operating a power tool Distractions can cause you to lose control of it 4 2 Electrical safety Always check that the power supply corresponds to the voltage on the rating plate Power tool plugs must match the outlet Never modify the plug in any way Do not use adapter plugs with earthed power tools Unmodified plu...

Page 6: ...ool to do more than it can Use the correct power tool for what you want to do A power tool will achieve better results and be safer if used for the purpose for which it was designed Do not use the power tool if the switch does not turn it on and off A power tool with a broken switch is dangerous and must be repaired Disconnect the plug from the power source before making adjustments changing acces...

Page 7: ...y involving the lawnmower Do not operate the lawnmower when barefoot or wearing open sandals always wear substantial footwear and trousers Thoroughly inspect the area where the lawnmower is to be used and remove all stones sticks wires bones and other foreign objects Before use always visually inspect to see that the blades blade bolts and cutter assembly are not worn or damaged Replace worn or da...

Page 8: ...de The blade can cause damage to the cords and lead to contact with live parts Children should be supervised to ensure that they do not play with the appliance This appliance is not intended for use by children or persons with reduced physical sensory or mental capabilities or lack of experience and knowledge New users should be given supervision or instruction concerning use of the appliance and ...

Page 9: ...ds Fix into position using cable clips Note for storage purposes the handle is foldable 7 OPERATION Before connecting to the mains supply always check the switch is in the off position 7 1 Starting stopping your lawnmower Do not start the mower if it is standing in long grass Press and hold the starter button located on the switch box Hold the starter button and lift the brake lever upwards toward...

Page 10: ...utting position should be selected 7 3 Mowing Cutting the grass Select a cutting height to suit the actual height of the grass If necessary mow the same section several times so that no more than 4cm is removed at once Place the lawnmower on the edge of the lawn close to the power supply Work away from that point Alter the position of the cable at each turn move it to the already cut side When mow...

Page 11: ...work The part most susceptible to wear and tear in the machine is the blade Check the condition of the blade and its fastener at regular intervals If the blade is worn it must be replaced or sharpened If the mower vibrates excessively this means that the blade is either not balanced correctly or has been bent out of shape by knocks in which case it must be repaired or replaced 10 1 Replacing the b...

Page 12: ...ting Power cord not connected to the mower plug Power cord not connected to power source Tripped circuit breaker in the house Motor control switch defective Reconnect the cord and use the cord retainer to keep the cord close to the motor blade control Connect the power cord to a live 230V 50Hz AC receptacle Reset house circuit breaker If it trips again call a qualified electrician Have motor contr...

Page 13: ...ires in the mains lead are coloured in accordance with the following code Blue Neutral Brown Live As the colours of the wires in the mains lead of this appliance may not correspond with the coloured markings identifying the terminals in your plug proceed as follows The wire which is coloured blue must be connected to the terminal which is marked with N The wire which is coloured brown must be conn...

Page 14: ...PARTS DIAGRAM AND LIST ...

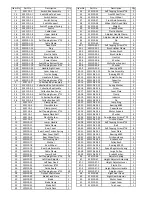
Page 15: ...7 WE110 45 17 Cover Plate 1 2 4 WE110 2 4 Self Tapping Screw 4 14 2 45 18 WE110 45 18 Clamp 2 2 5 WE110 2 5 Collection Box Right 1 45 19 WE110 45 19 Inductor 1 2 6 WE110 2 6 Collection Box Left 1 45 20 WE110 45 20 Pin 2 3 WE110 3 Clamp Upper 1 45 21 WE110 45 21 Jump Ring 1 4 WE110 4 Clamp Washer 2 45 22 WE110 45 22 Bearing 608Z 1 5 WE110 5 Clamp Lower 1 45 23 WE110 45 23 Capacitance 1 6 WE110 6 Se...

Page 16: ... only covers domestic use and will be void if the tool is used for a commercial application In the event of a problem with the product within the guarantee period please contact Customer Service on 01793 333212 or email customerservice webblawnmowers co uk If the issue cannot be resolved over the telephone or by email you may be referred to your local approved service dealer Please keep your sales...

Page 17: ... EN 60335 2 77 2010 EN 62233 2005 2008 CR 1030 1 1995 EN 62335 2 77 2010 EN ISO 354 1993 EN ISO 3767 1 EN ISO 3767 3 EN ISO 3767 5 ISO 3864 EN ISO 4871 1996 EN ISO 11201 1995 1996 EN ISO 11688 1 1998 EN ISO 11691 1995 EN ISO 11820 1996 EN ISO 12100 2 2003 EN ISO 13857 2008 EN ISO 20643 2005 EN ISO 3744 1995 UNE EN 50075 IEC60034 1 IEC 60068 2 2 IEC 60068 2 32 IEC 60068 2 75 IEC 60083 1975 IEC 6011...

Page 18: ......

Page 19: ...d return to the address above Owner s Name Address Postcode Telephone No Email Address Agent Dealer Product Model Serial No Engine No Date of Purchase Date of Delivery Warranty Commences From Date of Delivery Webb Lawnmowers Hobley Drive Swindon SN3 4NS United Kingdom Telephone 44 0 1793 333220 Fax 44 0 1793 834461 E mail sales webblawnmowers co uk www webblawnmowers co uk ...

Page 20: ...Webb Lawnmowers Hobley Drive Stratton St Margaret Swindon Wiltshire SN3 4NS ...

Reviews: