ASSEMBLY
It is recommended that you wear gardening gloves when unpacking, adjusting, assembling and
maintaining the lawnmower.
Remove the machine and contents from the carton. Be sure the carton is empty before discarding.
If you require any assistance with regards to the contents of the lawnmower contact us:
Tel: 01793 333212 - Mon – Fri 8.00am – 5.30pm
Email: customerservice@webblawnmowers.co.uk
(excl. Bank Holidays)
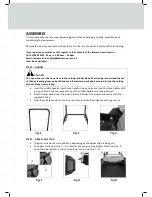
STEP 1 – HANDLE
CAUTION
This operation must be done close to the cutting cylinder blade. We strongly recommend the use
of thick gardening gloves on both hands and the lawnmower body is secured to stop the cutting
cylinder blade from rotating.
•
Insert the middle handles into the top handle. Line up holes and insert bolt and tighten with
wing nut. Ensure the concaved section of the middle handles are facing inwards.
•
Slot the lower handle over the pins on the main body of the mower and secure with the
supplied E-Clips.
•
Align the middle handles to the lower handles, insert bolt and tighten with wig nuts x4.
STEP 2 – GRASS COLLECTOR
•
The grass collector has two positions, depending on the height of grass being cut.
•
The upper torsion bar (Fig. 7 – a) is ideal for the upper cutting heights of the machine. If
using the lower heights, position using lower torsion bar (Fig 7 – b).
INSTRUCTION MANUAL
Summary of Contents for WEH18
Page 2: ......
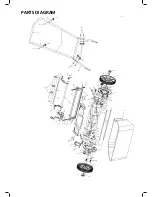
Page 14: ...PARTS DIAGRAM ...
Page 17: ...NOTES ...
Page 24: ...Webb Lawnmowers Murdock Road Dorcan Swindon Wiltshire SN3 5HY ...

