background image

TROUBLE SHOOTING 


Switch off the trimmer and disconnect the battery before inspecting, cleaning or working on 

the thread. 


Error/Fault 

Cause 

Remedy 

Slow running, noisy or hot 

blades. 

Dry, corroded blades. 

Lubricate blades with rust 

preventative solution or light 

machine oil. 

Blades or blade support 

bent. 

Straighten blade or blade support. 

To be actioned by an approved 

service dealer. 

Bent or damaged teeth. 

Straighten teeth. To be actioned 

by an approved service dealer. 

Loose blade bolts. 

Tighten blade bolts. 

Unit will not start. 

Battery not installed 

properly. 

Check battery installation. 

Battery not charged. 

Check battery charging 

requirements. 

Safety Lever not fully 

operated. 

Check that safety button is fully 

pushed in prior to moving trigger. 

Battery won’t charge. 

Battery not inserted into 

charger. 

Insert battery into charger until 

green LED appears. Charge up to 4 

hours if battery totally drained. 

Charger not plugged in. 

Plug charger into a working outlet. 

Refer to “Important Charging 

Notes” for more details. 

Check current at outlet by plugging 

in a lamp or other appliance. 

Surrounding air temperature 

too hot or too cold 

Move charger and tool to an area 

which has a temperature of above 

40

o

F (4.5°C) or below 105

o

 F 

(+40.5°C). 


If you can’t fix the fault yourself, contact your retailer. Please be aware that any improper 

repairs will also invalidate the warranty and additional costs may be incurred. 


INSTRUCTION MANUAL

Summary of Contents for WEV20PHT

Page 1: ...rticular attention to the safety instructions The manufacturer reserves the right to change the product specification and livery according to continues product improvements v en Original Instructions 50cm Pole Hedge Trimmer with 20V 2Ah Lithium Ion Battery Charger WEV20PHT 1938202001 ...

Page 2: ...nal use only Commercial copying redistribution hiring or lending is prohibited No part of this publication may be stored in a retrieval system or transmitted in any other form or means without written permission from Handy Distribution In all cases this copyright notice must remain intact 18 March 19 INSTRUCTION MANUAL ...

Page 3: ...illustrative purposes only They may in no case serve as a basis for any legal claim If you require any assistance with regards to the contents or operation of your machine please call our Customer Service Team on 01793 333212 or email customerservice webbgardenpower co uk Monday to Friday 8 00am to 5 30pm excl Bank Holidays Model WEV20PHT Product Number 1938202001 Voltage 18Vd c 20Vd c Max No Load...

Page 4: ...use in private gardens whose annual use does not generally exceed 50 hours and that are primarily used for tending HEDGES or BUSHES but not in public facilities parks or sports grounds and not for agricultural or forestry use Compliance with this manual supplied by the manufacturer is a prerequisite for the proper usage of the machine The operating manual contains servicing and maintenance instruc...

Page 5: ...ue to electric shock Keep at least 10 m away from electricity lines STAY ALERT Safety alert symbol Used to alert you to potential personal injury hazards Obey all safety messages that follow this symbol to avoid possible injury DANGER Indicates an imminently hazardous situation which if not avoided will result in serious injury WARNING Indicates a potentially hazardous situation which if not avoid...

Page 6: ...the off position before connecting to battery picking up or carrying the tool Carrying power tools with your finger on the switch or energising power tools that have the switch on invites accidents Do not overreach Keep proper footing and balance at all times This enables better control of the power in unexpected situations Dress properly Do not wear loose clothing or jewellery Keep your hair clot...

Page 7: ...rimmer will reduce possible personal injury from the cutter blades Hold the power tool by insulated gripping surface only because the cutter blade may contact hidden wiring Cutter blades contacting a live wire may make exposed metal parts of the power tool live and could give the operator an electric shock ADDITIONAL SAFETY RULES Clear the work area before each use Remove all objects such as cords...

Page 8: ...als and de icing salts Do not store outdoors Cover the blade with the blade protector before storing the unit or during transportation For transportation secure the machine against movement or falling to prevent injury to persons or damage to the machine MAINTENANCE WARNING Use only original manufacturer s replacement parts accessories and attachments Failure to do so can cause possible injury poo...

Page 9: ...to a condition called Raynaud s Syndrome in certain individuals Symptoms may include tingling numbness and blanching of the fingers usually apparent upon exposure to cold Hereditary factors exposure to cold and dampness diet smoking and work practices are all thought to contribute to the development of these symptoms There are measures that can be taken by the operator to possibly reduce the effec...

Page 10: ...electric tools Lithium ion cells contain hazardous substances and may therefore not be disposed off with normal household waste Our batteries are lithium ion cells and are therefore subject to special disposal regulations Bring defective batteries to your specialist dealer Before disposing of the tool remove the battery We wish to encourage users to act in an environmentally friendly manner INSTRU...

Page 11: ...KNOW YOUR MACHINE 1 Rear Handle 2 Trigger 3 Front Handle 4 Safety Button 5 Shoulder Strap 6 Blade Assembly Guard 7 Head Adjuster 8 Battery 2Ah 9 Charger 10 Telescopic Adjuster 9 8 7 2 5 1 4 6 10 3 ...

Page 12: ...ASSEMBLY INSTALLING THE TELESCOPIC HANDLE 1 Slide the telescopic handle into the head motor housing until you reach the stop position 2 Tighten the Collar COLLAR N INSTRUCTION MANUAL ...

Page 13: ...ER STORAGE Fully charge for 4 hours before winter storage Re charge the Battery every 3 to 4 months for a full 4 hour charging period to top up the battery during winter storage Avoid extended storage without recharging Store in a cool dry place CHARGING The battery must be charged for approximately 4 hours before using it for the first time Use only the original charger supplied with this machine...

Page 14: ...lithium ion battery prior to any prolonged period of non use i e before storing away in autumn winter The charging time is 4 hours maximum for a battery that is completely empty The lithium ion rechargeable battery can be charged at any charge level and charging can be interrupted at any time without damaging the battery no memory effect OPERATION DANGER Risk of injury The device may only be put i...

Page 15: ...our hand Switching off Release the On Off trigger WARNING Never attempt to lock a switch in the ON position TRIMMING INSTRUCTIONS A Side Trimming Telescopic shaft retracted B Vertical Trimming at high level Telescopic shaft extended C Horizontal Trimming at high level Motor head tilted 90o telescopic shaft extended D Trimming at low level Motor head titled by 45o telescopic shaft extended A B C D ...

Page 16: ... shaft can be extended by up to 60cm 1 Remove the battery from the handle 2 Loosen the Collar 11 extend the telescopic shaft 2 to the require length and tighten the Collar 11 again 3 Place the battery on to the handle with an audible click WARNING To guard against injury observe the following Read this instruction manual before using Save the instruction manual Check the hedge for foreign objects ...

Page 17: ...re 9 stones glass or other hard objects you may put a nick in the blade There is no need to remove this nick as long as it does not interfere with the movement of the blade If it does interfere remove the battery and have an approved service dealer use a fine toothed file or sharpening stone to remove the nick If you drop the trimmer carefully inspect it for damage If the blade is bent housing cra...

Page 18: ...ck battery charging requirements Safety Lever not fully operated Check that safety button is fully pushed in prior to moving trigger Battery won t charge Battery not inserted into charger Insert battery into charger until green LED appears Charge up to 4 hours if battery totally drained Charger not plugged in Plug charger into a working outlet Refer to Important Charging Notes for more details Che...

Page 19: ...Notes ...

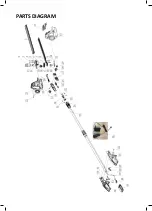
Page 20: ...PARTS DIAGRAM ...

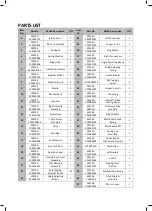
Page 21: ...34 WE145 301062913 Internal Thread Locking Sleeve 1 12 WE145 301062920 Right Housing Assembly 1 35 WE145 4990141 Telescopic Tube Assembly 1 13 WE144 103070102 Motor Gear 1 36 WE145 301062909 Right Handle 1 14 WE144 104030081A Triple Screw Assembly 2 37 WE145 103060235 Main Switch Knob Spring 1 15 WE144 104010149 Shim 5 38 WE145 301062774 Main Switch Lift 1 16 WE144 103070101 Mid Gear 1 39 WE145 10...

Page 22: ...2006 42 EC EMC Directive 2014 30 EU For the relevant implementation of the safety and health requirements mentioned in the Directives the following standards and or technical specification s have been respected EN60745 1 2009 A11 2010 EN 60745 2 15 2009 A1 2010 EN55014 1 2017 EN55014 2 2015 Guaranteed Sound Power Level LWA 95 dB A KpA 3 0 dB A Vibration Level 1 37m s Uncertainty K 1 5m s2 Notified...

Page 23: ...Notes ...

Page 24: ... using the following pages or at www webbgardenpower co uk By registering your machine you agree to maintain the machine in accordance with the service schedules specified in this manual and services duly recorded Not applicable for Webb electric handheld machines You may be asked to produce this booklet as proof of servicing in the event of a claim Proof of purchase should also be kept as a refere...

Page 25: ...ts Brake clutch friction components Control cable starter cords Fluids lubricants Spark plugs Blades Lawnmowers Brushcutters Cutter bars Hedgecutters Drive clutch cable surfaces Nylon Lines Line Trimmers Carburettor cleaning Bearings Bushes Electric cable Grass collectors 3 Not covered by this warranty a The warranty policy does not cover any depreciation or damages caused by ordinary wear rusting...

Page 26: ...d therefore reducing the environmental impact It is the owner s responsibility to ensure that their Webb machine is maintained at specific intervals Any approved Webb service dealer can undertake a service which are specialised in our products and will be aware of your particular machine and any technical updates which will save valuable time money If you are using your machine in dry dusty or high...

Page 27: ...e actions have been completed PLEASE ENSURE THE SERVICE BOOK IS AVAILABLE FOR THE DEALER DURING SERVICE WORK 1st Service This must be stamped by an approved service dealer to qualify for a free second year warranty Excluding the Webb Electric Handheld machines 24 Months Date Date 36 Months 12 Months Date ...

Page 28: ...Service Record 48 Months Date Date Date Date Date Date Date Date 72 Months 96 Months 120 Months 60 Months 84 Months 108 Months 132 Months INSTRUCTION MANUAL ...

Page 29: ... regarding our products services offers or just opinions which may be used for marketing research or analysis purposes If you wish to be contacted by any of the following methods please tick the relevant boxes Post Telephone Email You may give Webb Lawnmowers notice in writing at any time that you no longer wish to receive direct marketing communications House Number House Name Address 1 Address 2 ...

Page 30: ...Webb Lawnmowers Murdock Road Dorcan Swindon Wiltshire SN3 5HY ...

Reviews: