C-3
Gas Instructions
(1)
(2)
Check for gas leaks
Note - All factory-made connections have been thoroughly
checked for gas leaks. The burners have been flame-
tested. As a safety precaution however, you should
recheck all fittings for leaks before using your Weber Gas
Barbecue. Shipping and handling may loosen or damage a
gas fitting.
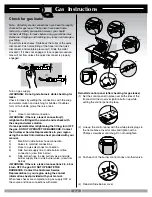
To perform leak checks: Slide back the collar of the quick
disconnect. Push male fitting of the hose into the quick
disconnect, and maintain pressure(1). Slide the collar
closed(2). If it does not engage or lock, repeat procedure.
Gas will not flow unless the quick disconnect is properly
engaged.
Turn on gas supply.
WARNING: Do not ignite burners while checking for
leaks.
Check for leaks by wetting the connections with the soap
and water solution and watching for bubbles. If bubbles
form or if a bubble grows, there is a leak.
(1)
(2)
(4)
(3)
(5)
(6)
Check:
1)
Hose to manifold connection.
WARNING: if there is a leak at connection(1),
retighten the fitting with a wrench and recheck with
the soap and water solution
If a leak persists after retightening the fitting, turn OFF
the gas. DO NOT OPERATE THE BARBECUE. Contact
the Customer Service Representative in your region
using the contact information sheet provided with your
manual.
2)
Manifold to side burner hose connection.
3)
Valves to manifold connections.
4)
Hose to quick disconnect connection.
5)
Side burner supply line to side burner orifice
connection. (view from below)
6)
Side burner hose to side burner valve, and side
burner supply line to side burner valve. (view from
below)
WARNING: If there is a leak at connections 2,3,4,5 or
6 turn OFF the gas. DO NOT OPERATE THE
BARBECUE. Contact the Customer Service
Representative in your region using the contact
information sheet provided with your manual.
When leak checks are complete, turn gas supply OFF at
the source and rinse connections with water.
Reinstall control panel (after checking for gas leaks)
(1) Set the control panel in place over both sides of the
frame. Hold the crossover ignition button up while
setting the control panel in place.
(2) Line up the control panel with the white plastic plugs in
the frame brace. Insert screws and tighten with a
Phillips screwdriver until snug. Do not overtighten.
(3) Push each of the burner control knobs onto their valve.
(4) Reinstall Side Burner cover.


