42
Operating Instructions
Lighting the Rotisserie Burner
WARNING: Check hose before each use of grill for
nicks, cracking, abrasions or cuts. If the hose is
found to be damaged in any way, do not use the
grill. Replace using only a Weber
®
authorized
replacement hose. Contact the Customer Service
Representative in your region using the contact
information sheet provided with your manual.
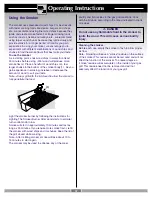
1) Open the lid.
2) Remove the warming rack and the cooking grates
from the cookbox.
DANGER:
Failure to open the lid while igniting the grill, or not
waiting 5 minutes to allow the gas to clear if the grill
does not light, may result in an explosive flare-up
which can cause serious bodily injury or death.
3) Make sure all burner control knobs are turned OFF.
(Push control knob down and turn clockwise to ensure
that it is in the OFF position.)
WARNING: The burner control knobs must be in the
OFF position before turning on the liquid propane
cylinder tank valve.
4)
Turn the cylinder on by turning the cylinder valve
anticlockwise.
WARNING: Do not lean over the open grill.
5) Push rotisserie burner control knob down and turn to
START/HI. Continue to hold the control knob down.
Continue to the next lighting step.
6) Push and hold down the Igniter button until burner
ignites. You will hear the igniter sparking.
7)
Continue to hold the control knob down until
twenty (20) seconds after the burner has ignited.
8) Check that the burner is lit by looking for the rotisserie
burner to glow red.
WARNING: If the rotisserie burner does not light,
turn the burner control knob to OFF and wait 5
minutes to let the gas clear before you try again or try
to light with a match.
To Extinguish
Push down and turn the rotisserie burner control knob
clockwise to OFF position. Turn gas supply OFF at the
source.
1
8
3
4
6
3
5,7
*The grill illustrated may have slight differences than the
model purchased.
Summary of Contents for Summit Gold D 42080
Page 12: ...12 2 b a ATTENTION Only start these bolts Do not tighten yet ...
Page 13: ...13 3 ...
Page 16: ...16 1 2 3 b 6 ...
Page 17: ...17 7 1 2 1 2 c ...
Page 18: ...18 8 b a Matchlight Holder ...
Page 19: ...19 9 1 2 3 a b ...
Page 20: ...20 a b a b 10 ...
Page 21: ...21 1 2 a b 1 11 NOTE Igniter Wire 1 is located up under right side of control panel ...
Page 22: ...22 c d 1 2 CAUTION Hold burner cap 1 down while pushing side burner ignition wire 2 on ...
Page 23: ...23 a b 12 13 ...
Page 24: ...24 14 15 ...
Page 25: ...25 16 17 ...
Page 26: ...26 6 ...


