background image

12

OPERATION

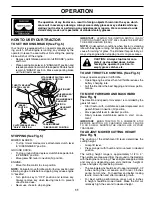
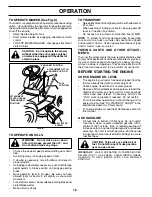
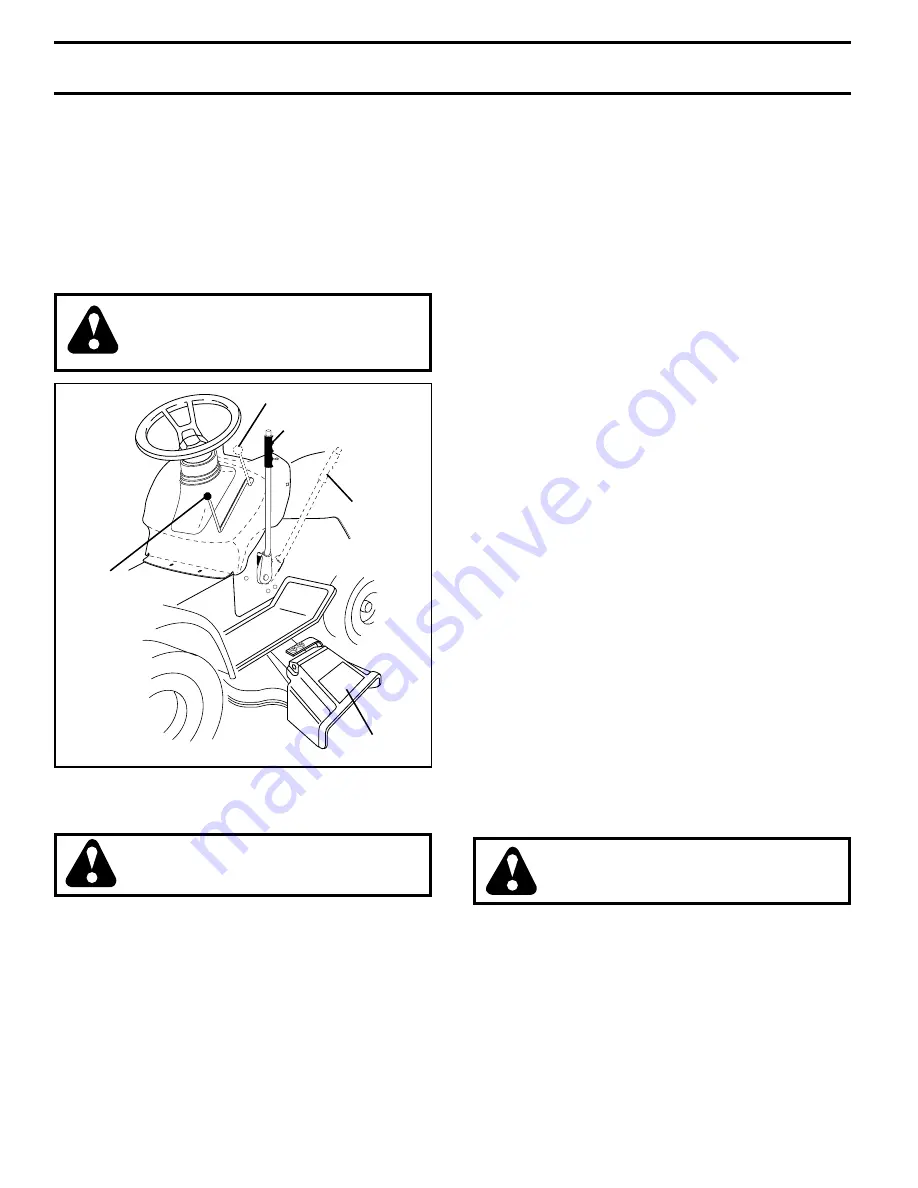
 TO OPERATE MOWER (See Fig. 6)

Your tractor  is equipped with an operator presence sens ing 
switch.  Any attempt by the operator to leave the seat with 
the engine running and the attachment clutch engaged will 
shut off the engine.
•      Select desired height of cut.
•     Start mower blades by engaging attachment clutch 

control.

•      TO STOP MOWER BLADES - disengage attachment 

clutch con trol.

CAUTION:  Do not operate the mower 
without either the en tire grass catcher, 
on mowers so equipped, or the defl ector 
shield in place.

TO OPERATE ON HILLS 

WARNING:  Do not drive up or down 
hills with slopes great er than 15° and 
do not drive across any slope.

•      Choose the slowest speed  before starting up or down 

hills.

•      Avoid stopping or changing speed on hills.
•     If slowing is necessary, move throttle control lever to 

slower position.

•      If stopping is absolutely necessary, push clutch/brake 

pedal quickly to brake position and engage parking 
brake.

•     Move gearshift  lever to 1st gear.  Be sure you have 

allowed room for tractor to roll slightly as you restart 
movement.

•         To restart movement, slowly release parking brake and 

clutch/brake pedal.

•      Make all turns slowly.

FIG. 6

LOW
POSITION

ATTACHMENT LIFT LE-
VER HIGH PO SI TION

"ENGAGED" POSITION

DE FLEC TOR 
SHIELD

TOWING CARTS AND OTHER AT 

TACH -

MENTS

Tow only the attachments that are recommended by and 
comply with specifi cations of the manufacturer of your trac-
tor. Use common sense when towing. Too heavy of a load, 
while on a slope, is dangerous. Tires can lose traction with 
the ground and cause you to lose control of your tractor.

 BEFORE STARTING THE ENGINE

CHECK ENGINE OIL LEVEL

•      The engine in your tractor  has been shipped, from the 

factory, already fi lled with sum mer weight oil.  

•      Check engine oil with tractor on level ground.  
•         Remove oil fi ll cap/dipstick and wipe clean, reinsert the 

dipstick and screw cap tight, wait for a few seconds, 
remove and read oil level.  If necessary, add oil until  
“FULL” mark on dipstick is reached.  Do not overfi ll.

•      For cold weather operation you should change oil for 

easier starting (See “OIL VISCOSITY CHART” in the 
Maintenance sec tion of this manual).   

•      To change engine oil, see the Maintenance section in 

this manual.


TO TRANSPORT

•         Raise attachment lift to highest position with at tach ment 

lift control. 

•      When pushing or towing your tractor, be sure gearshift 

lever is in neutral (N) position.

•      Do not push or tow tractor at more than fi ve (5) MPH.

NOTE

:  To protect hood from damage when transporting 

your tractor on a truck or a trailer, be sure hood is closed 
and secured to tractor.  Use an appropriate means of tying 
hood to tractor (rope, cord, etc.).

ADD GASOLINE 

•     Fill fuel tank to bottom of fi ller neck. Do not overfi ll.  

Use fresh, clean, regular un lead ed gasoline with a 
minimum of 87 octane.  (Use of  leaded gasoline will 
increase carbon and lead oxide deposits and reduce 
valve life).  Do not mix oil with gasoline.  Purchase fuel 
in quan ti ties that can be used within 30 days to assure 
fuel fresh ness.

CAUTION:  Wipe off any spilled oil or 
fuel.  Do not store, spill or use gasoline 
near an open fl ame.

IMPORTANT:

  WHEN OPERATING IN TEMPERATURES 

BELOW32°F(0°C), USE FRESH, CLEAN WINTER GRADE 
GAS O LINE TO HELP INSURE GOOD COLD WEATHER 
START ING.

AT TACH MENT 
CLUTCH LEVER
"DISENGAGED" 
PO SI TION

Summary of Contents for 184404

Page 1: ...38A 13 HP 38 Inch Lawn Tractor For Parts and Service contact our authorized distributor call 1 800 849 1297 For Technical Assistance call 1 800 829 5886 184404 Rev 1 03 26 03 RH TR PRINTED IN U S A 01...

Page 2: ...e manual and on the machine before starting Only allow responsible adults who are familiar with the instructions to operate the machine Clear the area of objects such as rocks toys wire etc which coul...

Page 3: ...ewatchful care of another responsible adult Be alert and turn machine off if children enter the area Before and when backing look behind and down for small children Mow up and down slopes 15 Max not a...

Page 4: ...e you to assemble and maintain your tractor properly Always observe the SAFETY RULES CUSTOMER RESPONSIBILITIES Read and observe the safety rules Follow a regular schedule in maintaining caring for and...

Page 5: ...ering Boot Steering Wheel Adapter 1 Bolt 1 Washer 17 32 x 1 3 16 x 12 Gauge Seat 2 Keys Slope Sheet Keys 1 Lock Washer 1 2 Steering Extension Shaft 1 Large Flat Washer 1 Oil Drain Tube For Future Use...

Page 6: ...M SKID ATTACH STEERING WHEEL See Fig 1 ASSEMBLE EXTENSION SHAFT AND BOOT Slide extension shaft onto lower steering shaft Align mountingholesinextensionandlowershaftsandinstall 1 4 hex bolt and locknut...

Page 7: ...f seat without moving its adjusted position Raise seat and tighten adjustment bolt securely 02466 02465 SEAT PAN SHOULDER BOLT FLAT WASHER SEAT TO DRIVE TRACTOR OFF SKID See Op eration section for loc...

Page 8: ...E FOLLOWING IMPORTANT ITEMS Engine oil is at proper level Fuel tank is filled with fresh clean regular unleaded gasoline Become familiar with all controls their location and function Operate them befo...

Page 9: ...ould result in serious injury or death The safety alert symbol is used to identify safety inform ation about hazards which can result in death serious injury and or property damage DANGER indicates a...

Page 10: ...off THROTTLE CHOKE CONTROL Used for starting and controlling engine speed CLUTCH BRAKE PEDAL Used for declutching and brak ing the tractor and starting the engine PARKINGBRAKE Locksclutch brakepedalin...

Page 11: ...s approximately 1 1 2 to 4 The heights are measured from the ground to the blade tip withtheenginenotrunning Theseheightsareapproximate and may vary depending upon soil conditions height of grass and...

Page 12: ...d cause you to lose control of your tractor BEFORE STARTING THE ENGINE CHECK ENGINE OIL LEVEL The engine in your tractor has been shipped from the factory already filled with summer weight oil Check e...

Page 13: ...estart the engine and allow it to warm up for one minute using the choke as described above COLD WEATHER STARTING 50 F and below When engine starts allow engine to run with the throttle control in the...

Page 14: ...out oil filter 1 2 maint_sch tractore new1 GENERAL RECOMMENDATIONS The warranty on this tractor does not cover items that have beensubjectedtooperatorabuseornegligence Toreceive full value from the wa...

Page 15: ...ith the ground If blade is balanced it should remain in a horizontal position If either end of the blade moves downward sharpen the heavy end until the blade is balanced TRACTOR Always observe safety...

Page 16: ...ing oil Remove yellow cap from end of drain valve and install the drain tube onto the fitting 02463 CLOSED AND LOCKED POSITION YELLOW CAP DRAIN TUBE OIL DRAIN VALVE FIG 11 Unlock drain valve by pushin...

Page 17: ...l not run properly using a dirty air filter Replace pre cleaner after every 25 hours of operation or every season Service paper cartridge every 100 hours of operation or every season whichever occurs...

Page 18: ...ilter and plug fuel line sec tions Place new fuel filter in position in fuel line with arrow pointing towards carburetor Be sure there are no fuel line leaks and clamps are properly positioned Immedia...

Page 19: ...e collar off and push housing guide out of bracket Disconnect anti swaybar from chassis bracket by re moving retainer spring Disconnect suspension arms from rear deck brackets by removing retainer spr...

Page 20: ...er one side of mower loosen lift link adjustment nut on that side NOTE Threefullturnsofadjustmentnutwillchangemower height about 1 8 Recheck measurements after adjusting NUT E D D MANDREL FIG 18 NUT F...

Page 21: ...tractor and roll around the top groove of engine pulley Install belt through stationary idler and clutching idler Make sure belt is in all pulley grooves and inside all belt guides and keepers Install...

Page 22: ...ACTOR IS EQUIPPEDWITH A 12VOLT SYSTEM THE OTHER VEHICLE MUST ALSO BE A 12 VOLT SYSTEM DO NOT USEYOUR TRACTOR BATTERY TO START OTHER VEHICLES TO ATTACH JUMPER CABLES Connect one end of the RED cable to...

Page 23: ...ROPER EQUIPMENT AND EXPERIENCE TO MAKE ANY NECESSARY ADJUSTMENTS CLAMP SCREW ENGINE TO ADJUST THROTTLE CONTROL CABLE See Fig 28 The throttle control has been preset at the factory and adjustment shoul...

Page 24: ...L FUEL SYSTEM PARTS SUCH AS CARBURETOR FUEL FILTER FUEL HOSE OR TANK DURING STORAGE ALSO EXPERIENCE INDICATES THAT ALCOHOL BLENDED FUELS CALLED GASOHOL OR USING ETHANOLORMETHANOL CANATTRACTMOISTUREWHI...

Page 25: ...ty ignition switch 7 Check replace ignition switch 8 Faulty solenoid or starter 8 Check replace solenoid or starter 9 Faulty operator presence switch es 9 Contact an authorized service center departme...

Page 26: ...Mower deck not level 4 Level mower deck 5 Low uneven tire air pressure 5 Check tires for proper air pressure 6 Worn bent or loose blade 6 Replace sharpen blade Tighten blade bolt 7 Buildup of grass le...

Page 27: ...RPM NOTE YOUR TRACTOR IS EQUIPPED WITH A SPECIAL ALTERNATOR SYSTEM THE LIGHTS ARE NOT CONNECTED TO THE BATTERY BUT HAVE THEIR OWN ELECTRICAL SOURCE BECAUSE OF THIS THE BRIGHTNESS OF THE LIGHTS WILL C...

Page 28: ...28 28 29 26 24 42 43 27 27 25 41 27 27 40 33 90 30 8 2 1 27 48 16 22 21 REPAIR PARTS TRACTOR MODEL NUMBER WE1338A PRODUCT NUMBER 954 56 93 56 ELECTRICAL 52 16...

Page 29: ...Unc 28 4207J Cable Ground 6 Ga 12 black 29 121305X Switch Plunger Nc Gray 30 175566 Switch Ign 33 140401 Key Ign 40 179720 Harness Ign 41 71110408 Bolt Blk Fin Hex 1 4 20 42 131563 Cover Terminal Red...

Page 30: ...ER WE1338A PRODUCT NUMBER 954 56 93 56 CHASSIS 3 2 35 3 26 3 35 26 33 10 34 1 208 11 17 29 28 208 13 12 51 57 53 52 54 55 24 26 25 26 25 31 24 30 209 8 209 6 16 9 15 209 209 209 5 5 145 37 37 18 205 2...

Page 31: ...25 19131312 Washer 13 32 x 13 16 x 12 Ga 26 73800600 Nut Lock Hex w Ins 3 8 16 Unc 28 179101 Grille Lens Asm 29 140273X599 Lens Grille Private Label 30 169465X550 Fender 31 136619 Bracket Fender Repl...

Page 32: ...VE 29 28 112 14 41 38 39 57 51 74 75 78 76 77 25 26 19 24 2 53 35 34 37 36 35 62 36 64 65 59 56 212 55 63 116 70 77 61 22 27 26 6 113 18 51 5 18 6 52 30 32 32 30 52 11 21 4 3 13 10 8 12 12 7 250 250 1...

Page 33: ...3 16 x 1 38 179114 Pulley Composite Flat 39 74760648 Bolt Fin Hex 3 8 16 x 3 41 175556 Keeper Belt Idler 47 127783 Pulley Idler V Groove Plastic 48 154407 Bellcrank Clutch Grnd Drv STL 49 123205X Ret...

Page 34: ...43 8 10 40 11 8 6 9 46 46 8 6 9 2 47 47 26 30 28 1 41 42 37 36 37 38 12 39 68 67 67 67 13 65 85 85 68 15 15 15 29 29 82 88 71 17 29 43 91 steering_pl lt_42 REPAIR PARTS TRACTOR MODEL NUMBER WE1338A P...

Page 35: ...5 Mech 36 155099 Bushing Strg 5 8 Id Dash 37 152927 Screw 38 140045X428 Cap Wheel Steer Ayp 39 19183812 Washer 9 16 x 2 3 8 40 7810H Nut Lock Center 3 8 24un 41 100711L Adaptor Wheel Strg 42 145054X42...

Page 36: ...36 2 1 OPTIONAL EQUIPMENT Spark Arrester 29 44 46 32 31 33 37 33 13 4 72 78 81 3 16 78 23 45 14 38 40 engine bs 1cyl_17 REPAIR PARTS TRACTOR MODEL NUMBER WE1338A PRODUCT NUMBER 954 56 93 56 ENGINE...

Page 37: ...Arrestor Flat Scrn 31 184900 Tank Fuel Front 32 140527 Cap Asm Fuel 33 123487X Clamp Hose 37 137040 Line Fuel 20 38 181654 Plug Drain Oil 40 124028X Bushing Snap Nyl Blk Fuel Line 44 17670412 Screw Th...

Page 38: ...Seat Blk 12 121246X Bracket Pnt Mounting Switch 13 121248X Bushing Snap Blk Nyl KEY PART NO NO DESCRIPTION 14 72050412 Bolt Rdhd Sht Nk 1 4 20 x 1 1 2 15 134300 Spacer Split 28 x 96 16 121250X Spring...

Page 39: ...2 Decal V Belt Sch 138311 Decal Handle Lft Height Adj 184404 Manual Owner s English 184405 Manual Owner s French KEY PART NO NO DESCRIPTION 1 59192 Cap Tire valve 2 65139 Stem Valve 3 106222X Tire Fro...

Page 40: ...40 REPAIR PARTS TRACTOR MODEL NUMBER WE1338A PRODUCT NUMBER 954 56 93 56 MOWER LIFT 15 20 16 1718 20 20 15 20 4 5 6 2 3 1 6 5 4 7 8 12 11 31 32 31 32 19 19 13 13 13 13 lift rh 1piece_3...

Page 41: ...9413X Grip Handle Bicycle Matte Blk 8 124526X Button Plunger Black 11 139865 Link Lift LH Fixed Length 12 139866 Link Lift RH Fixed Length 13 4939M Retainer Spring 15 173288 Link Front 16 73350800 Nut...

Page 42: ...56 MOWER DECK 19 86 3 8 4 2 2 15 14 13 11 10 9 8 1 21 2 96 97 29 27 23 26 28 25 24 21 87 88 21 146 31 40 150 45 32 33 69 55 56 36 36 89 123 113 53 30 109 89 122 40 89 108 107 68 4 3 5 6 2 21 149 16 21...

Page 43: ...ck 36 131494 Pulley Idler Flat 40 73680600 Nut Crownlock 3 8 16 Unc 45 4497H Retainer 53 130840 Brake Assembly 54 178515 Washer Hardened 55 133840 Idler Arm Assembly 56 165723 Spacer Retainer 67 10693...

Page 44: ...44 SERVICE NOTES...

Page 45: ...for rental or commercial purposes is limited to 90 days from the date of original purchase 5 This Warranty applies only to products which have been properly assembled adjusted operated and main taine...

Page 46: ...e operation of the Power Train Component and parts The cost of normal maintenance and replacement of service items which are not defective shall be paid for by the original purchaser C Securing Warran...

Page 47: ...he face Do not mow slopes greater than 15 degrees Make turns gradually to prevent tipping or loss of control Exercise extreme caution when changing direction on slopes 1 Fold this page along dotted li...

Page 48: ...01029 weedeater...
Reviews: