background image

11

MAX 1/3

MOWING TIPS

  CAUTION:  Do not use de-thatcher 

blade attachments on your mower. Such 
attachments are hazardous, will damage 
your mower and could void your warranty.
•   Under certain conditions, such as when 

mowing very tall grass, raise the mower 
height on the fi rst cut to reduce pushing 
effort, to avoid over heat ing the motor, 
and to avoid leaving clumps of grass 
clippings.  Make the second cut to the 
desired height.

•   For extremely heavy cutting, reduce the 

width of cut.

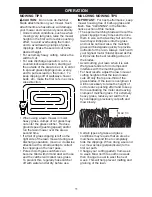
•   For side discharge operation, cut in a 

coun ter clock wise di rec tion, start ing at 
the outside of the area to be cut, in order 
to spread grass clip pings more evenly 
and to put less load on the motor.  To 
keep clip pings off of walkways, fl ower 
beds, etc., make the fi rst cuts in a clock-
 wise direction.

MULCHING MOWING TIPS

IMPORTANT:  For best performance, keep 
mower housing free of built-up grass and 
trash. See "CLEANING" in the Mainte-
nance section of this manual.
•  The special mulching blade will recut the 

grass clip pings many times and reduce 
them in size so that as they fall onto the 
lawn they will disperse into the grass 
and not be noticed. Also, the mulched 
grass will bio de grade quickly to provide 
nu tri ents for the lawn. Always mulch with 
your highest motor (blade) speed as this 
will provide the best recutting action of 
the blades.

•  Avoid cutting your lawn when it is wet. 

Wet grass tends to form clumps and 
in ter feres with the mulch ing action.

•  For best results, adjust the lawn mower 

cutting height so that the lawn mower 
cuts off only the top one-third of the 
grass blades. If the lawn is overgrown it 
will be necessary to raise the height of 
cut to reduce pushing effort and to keep 
from over load ing the motor and leaving 
clumps of mulched grass. For ex tremely 
heavy grass, reduce your width of cut 
by overlapping previously cut path and 
mow slowly.

•  Certain types of grass and grass 

con di tions may re quire that an area be 
mulched a second time to com pletely 
hide the clip pings. When doing a sec ond 
cut, mow across (per pen dic u lar) to the 
fi rst cut path.

•  Change your cutting pattern from week 

to week. Mow north to south one week 
then change to east to west the next 
week. This will help prevent matting and 
graining of the lawn.

•   When using a lawn mower in moist, 

heavy grass, clumps of cut grass may 
not enter the grass catcher.  Reduce 
ground speed (push ing speed) and/or 
run the lawn mower over the area a 
second time.

•   If a trail of grass clipping is left on the 

right side of the lawn mower during rear 
discharge operation, mow in a clockwise 
direction with a small overlap to collect 
the clippings on the next pass. 

•   Pores in cloth grass catchers can 

become fi lled with dirt and dust with use 
and the catcher will collect less grass.  
To prevent this, regularly hose catcher 
off with water and let dry before use.

OPERATION

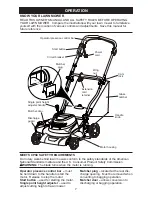
Summary of Contents for 438184

Page 1: ...OPERATOR S MANUAL MODEL NUMBER WE20C ELECTRIC POWERED 3 IN 1 20 ROTARY LAWN MOWER 438184...

Page 2: ...ot mow any slope that has an angle of greater than 15 MOWER SAFETY GUIDELINES The information this manual contains will alert you to potential hazards and prevent possible problems It may not be pract...

Page 3: ...light Do not operate the machine while under the influence of alcohol or drugs Never operate machine in rain or on wet grass Always be sure of your footing keep a firm hold on the handle and walk neve...

Page 4: ...damage and will void the war ranty This lawnmower is not to be used for commercial use Use only on personal property It should only be used on private lawns and should not be used to cut public parks...

Page 5: ...lawn mowers in damp or wet loca tions Don t Use In Rain Keep Children Away All visitors should be kept a safe distance from work area Dress Properly Do not wear loose clothing or jewelry They can be c...

Page 6: ...be stored in an indoor dry and locked up place out of reach of children Maintain Lawn Mower With Care Keep cutting edges sharp and clean for best and safest performance Follow instructions for lubrica...

Page 7: ...ve this manual for future reference OPERATION Operator presence control bar must be held down to the handle to start the motor Release to stop the motor Start button used for starting the motor Single...

Page 8: ...has been connected to the cord retainer and plugged into the mower Fold the extension cord in order to form a tight loop near the retainer Push the loop through the hole in the retainer Slide the loo...

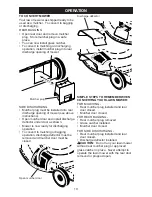
Page 9: ...1 Lift up on grass catcher using the frame handle 2 Remove grass catcher with clippings from under lawn mower handle 3 Empty clippings from bag NOTE Do not drag the bag when emptying It will cause unn...

Page 10: ...or as shown Mower is now ready for discharging operation To convert to mulching or bagging operation discharge deflector must be removed and mulcher door must be closed Open mulcher door Discharge def...

Page 11: ...he blades Avoid cutting your lawn when it is wet Wet grass tends to form clumps and interferes with the mulching action For best results adjust the lawn mower cutting height so that the lawn mower cut...

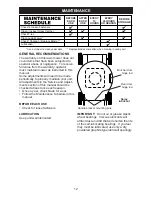
Page 12: ...ACH USE Check for loose fasteners LUBRICATION Keep unit well lubricated Spray lubricant Rear door hinge rod Handle bracket mounting pins Mulcher door hinge rod IMPORTANT Do not oil or grease plastic w...

Page 13: ...nut square washer insulator washer TO REPLACE BLADE 1 Be sure the trailing edge of blade op posite sharp edge is up toward the motor 2 Install the square washer and insulated washer secure with blade...

Page 14: ...ection of this manual Lubricate as shown in the Maintenance section of this manual Be sure that all nuts bolts screws and pins are securely fastened Inspect moving parts for damage breakage and wear R...

Page 15: ...height housing or cutting blade dragging in heavy grass 2 Cutting too much grass 2 Raise cutting height 3 Buildup of grass leaves 3 Clean underside of mower and trash under mower housing 4 Walking sp...

Page 16: ...l or commercial purposes is limited to 45 days from the date of original purchase 5 This Warranty applies only to products which have been properly assembled adjusted operated and maintained in accord...

Reviews: