12
OPERATION
TO OPERATE ON HILLS
CAUTION: Do not drive up or down hills
with slopes greater than 15° and do not
drive across any slope.
•
Choose the slowest speed before starting up or down
hills.
•
Avoid stopping or changing speed on hills.
•
If slowing is necessary, move throttle control lever to
slower position.
•
If stopping is absolutely necessary, push clutch/brake
pedal quickly to brake position and engage parking
brake.
•
Move motion control lever to neutral (N) position.
IMPORTANT:
THE MOTION CONTROL LEVER DOES
NOT RETURN TO NEUTRAL (N) POSITION WHEN THE
CLUTCH/BRAKE PEDAL IS DEPRESSED.
•
To restart movement, slowly release parking brake and
clutch/brake pedal.
•
Slowly move motion control lever to slowest setting.
•
Make all turns slowly.
ATTACHMENT
CLUTCH LEVER
"DISENGAGED"
POSITION
ATTACHMENT
LIFT LEVER
HIGH POSI-
TION
"ENGAGED" POSITION
LOW
POSITION
FIG. 8
TOWING CARTS AND OTHER ATTACHMENTS
Tow only the attachments that are recommended by and
comply with specifications of the manufacturer of your
tractor. Use common sense when towing. Too heavy of a
load, while on a slope, is dangerous. Tires can lose traction
with the ground and cause you to lose control of your tractor.
FIG. 6
TO TRANSPORT (See Figs. 4 and 8)
When pushing or towing your tractor, be sure to disengage
transmission by placing freewheel control in freewheeling
position. Free wheel control is located at the rear drawbar of
tractor.
•
Raise attachment lift to highest position with attach-
ment lift control.
•
Pull freewheel control out and down into the slot and
release so it is held in the disengaged position.
•
Do not push or tow tractor at more than two (2) MPH.
•
To reengage transmission, reverse above procedure.
NOTE: To protect hood from damage when transporting
your tractor on a truck or a trailer, be sure hood is closed and
secured to tractor. Use an appropriate means of tying hood
to tractor (rope, cord, etc.).
DEFLECTOR
SHIELD
TO OPERATE MOWER (See Fig. 7)
Your tractor is equipped with an operator presence sensing
switch. Any attempt by the operator to leave the seat with
the engine running and the attachment clutch engaged will
shut off the engine.
•
Select desired height of cut.
•
Start mower blades by engaging attachment clutch
control.
•
TO STOP MOWER BLADES - disengage attachment
clutch control.
CAUTION: Do not operate the mower
without either the entire grass catcher,
on mowers so equipped, or the deflector
shield in place.
FIG. 7
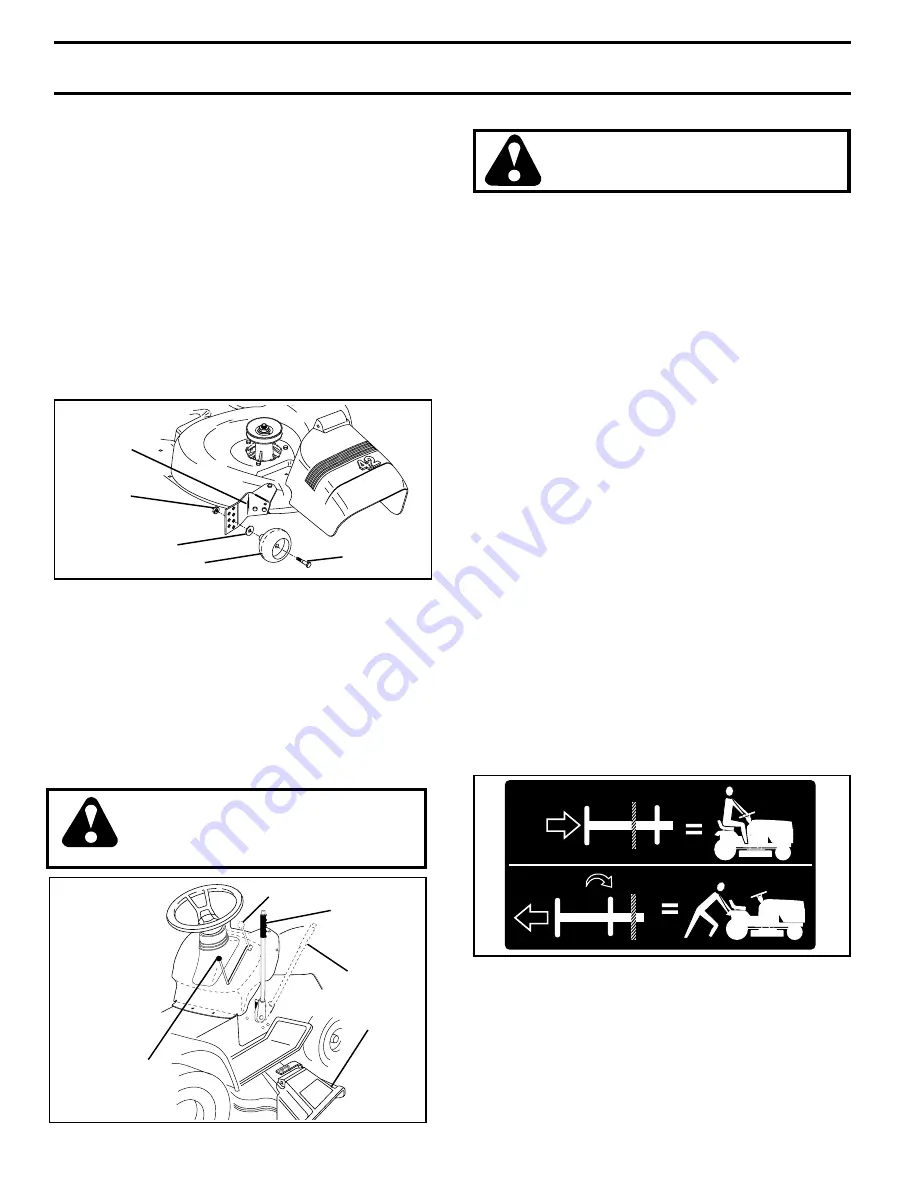
GAUGE WHEEL
GAUGE
WHEEL
MOUNTING
BRACKET
3/8-16
LOCKNUT
3/8 WASHER
SHOULDER
BOLT
TO ADJUST GAUGE WHEELS (See Fig. 6)
Gauge wheels are properly adjusted when they are slightly
off the ground when mower is at the desired cutting height in
operating position. Gauge wheels then keep the deck in
proper position to help prevent scalping in most terrain
conditions.
•
Adjust gauge wheels with tractor on a flat level surface.
•
Adjust mower to desired cutting height (See “TO AD-
JUST MOWER CUTTING HEIGHT” in the Operation
section of this manual).
•
With mower in desired height of cut position, gauge
wheels should be assembled so they are slightly off the
ground. Install gauge wheel in appropriate hole with
shoulder bolt, 3/8 washer, and 3/8-16 locknut and tighten
securely.
•
Repeat for opposite side installing gauge wheel in same
adjustment hole.
Summary of Contents for S165H42A
Page 44: ...44 SERVICE NOTES...
Page 48: ......

