background image

www.weedrazers.com

Important Information:

2

Please read these instructions thoroughly before use. Failure to follow instructions 

may result in equipment damage or failure, losses, injury or death.


WARNING:


To reduce the risk of injury:
• The Weed Razer is designed for cutting submerged, partially emergent, 

or emergent aquatic vegetation from underwater. Any other use is strictly 

prohibited. Before using the Weed Razer, please read this manual carefully to 

understand the proper use of the unit. 

• The Weed Razer blade(s) are razor sharp. The blade covers should be on while 

assembling the tool and when tool is not in use. Failing to comply can result in 

severe lacerations, dismemberment, and even death.


SAFETY FIRST:


Instructions containing a warning within this manual are marked with a symbol.
Keep out of reach of children. 
Do not use with children in immediate area.
IMPORTANT:  Jenlis, Inc

®

 is not responsible for equipment damage or failure, 

losses, injury or death resulting from failure to follow safety 

precautions, misuse or abuse of equipment.
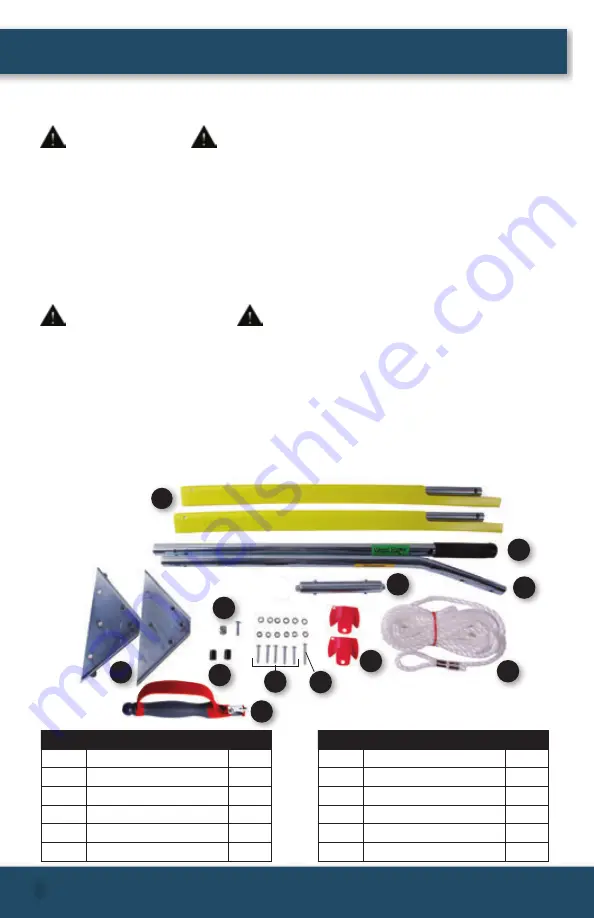
C

L

D

G

I

A

B

F

E

K

H

J

PART

QTY

A

Handle

1

B

Angled Handle

1

C

Blades

2

D

Support Bracket

2

E

Handle Connector

1

F

Weed Deflector

2

PART

QTY

G

Nylon Spacer

2

H

1.5" Bolt & T-Nut

1 ea.

I

1.5" Bolt, Nut, Washer

1 ea.

J

1.2" Bolt, Nut, Washer

5 ea.

K

Rope 25'

1

L

Blade Sharpener

1

PRODUCT CONTENTS:

Summary of Contents for 580110

Page 1: ...ct Contents 2 Assembly Instructions 3 4 Operating Instructions 4 Blade Sharpening Instructions 5 6 Safety Instructions 7 Replacement Parts 8 Product Warranty 8 Table of Contents Item 580110 Product Ma...

Page 2: ...ile assembling the tool and when tool is not in use Failing to comply can result in severe lacerations dismemberment and even death SAFETY FIRST Instructions containing a warning within this manual ar...

Page 3: ...end of the triangular bracket Next seat the second triangular Support Bracket D over the assembly with the domed side facing up and place a washer and nut on each of the four bolts be sure to simply h...

Page 4: ...the spring loaded buttons on one end of the Handle Connector E slide into the open end of the Handle B and turn until the buttons snap into the holes in the handle Repeat this process for the second h...

Page 5: ...while standing or leaning over the cutting edge Step 4 Grip the handle of the Sharpener L so that the guard is between your hand and the blade surface Step 5 To remove burs from the blade surface use...

Page 6: ...times with consistent pressure Repeat this process for the other side of the blade NOTE We recommend using the process in STEP 6 for greater consistency in sharpening Step 8 In the end of the sharpen...

Page 7: ...als are present within 100 feet from the launch point 5 Do not place or use near electrical wires or cords 6 Never touch the sharp edges of the blades with bare hands at any time 7 Leave blade covers...

Page 8: ...from use in commercial environment misuse abuse negligence and or accidents The manufacturer agrees at its option during the warranty period to repair any defect in material or workmanship or to furn...

Reviews: