background image

10

11

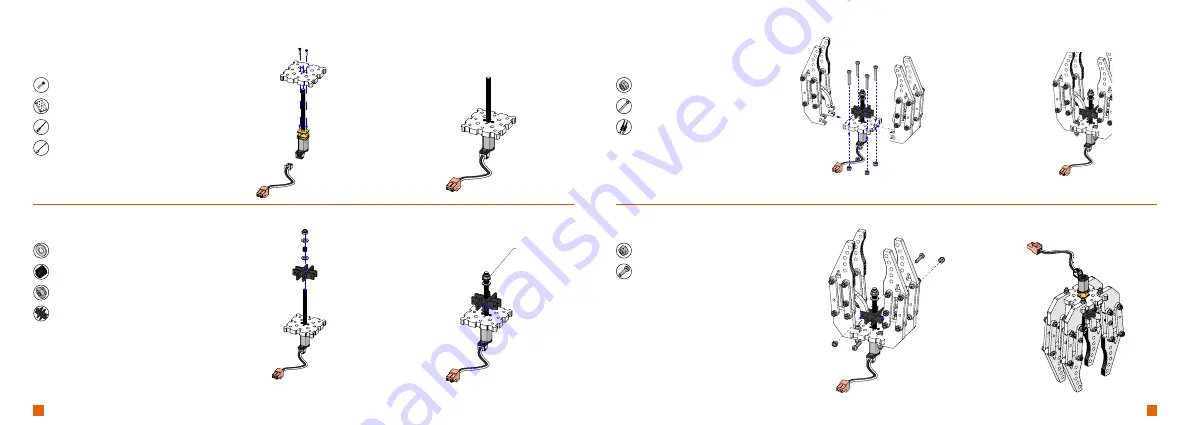
Note:

1. Please assemble in order.

2. The installation of nylon locknut needs 

to be screwed in with a wrench.

「 3 in 1 Robot Gripper—Parallel Four Finger Gripper 」

「 3 in 1 Robot Gripper—Parallel Four Finger Gripper 」

4xNylon Locknut M3

4xScrew M3*20

2xParallel Finger Assembly

2xScrew M1.6*8

1xN30 Motor Bracket

1xN30 DC Screw Motor

1xMotor Cord=35cm

2xFlat Gasket 4*9*0.8

1xSpring 0.5*5*5

1xNylon Locknut M4

1xCross Slider

▶   04:Fix Gripper Fingers

▶   02:Install N30 Motor

2xNylon Locknut M3

2xScrew M3*14

▶   05:Fix Traction Arm

▶   03:Install Cross Slider

Note:

Please tighten the locknut with proper 

force so that the installation is firm. In the 

meantime, DO NOT crush the acrylic.

Screw the nylon locknut M4 to the 

motor’s threaded shaft, make the top of 

nut aligning at the end of shaft.

Summary of Contents for 3 in 1 Robot Gripper

Page 1: ...o Ltd Address C210 212 Shiwai Taoyuan Originality Park Pingshan 1st Rd Nanshan District Shenzhen Guangdong China 518055 Product Standard GB T 2423 8 1995 Q WMZX 001 2018 Hotline 86 400 9923 520 or 86 755 8653 2012 Email support weeemake com Website www weeemake com ...

Page 2: ...ew M1 6 8 4xScrew M3 14 20xScrew M3 16 4xScrew M3 20 2xScrew M3 45 8xScrew M4 10 28xNylon Locknut M3 1xNylon Locknut M4 4xAluminum Column 4 6 6 2xFlat Gasket 4 9 0 8 1xSpring 0 5 5 5 4xNylon Stud M4 35 1xMotor Cord 35cm 1xPH1 Screw Drive 1xPH000 Screw Drive 1xM1 6 M4 Multifunction Wrench 1x2 5mm Hex Key Parts List ...

Page 3: ...tor Cord 35cm 01 Assemble the Gripper Finger 02 Install N30 Motor Tips The direction of the towing arm needs to be installed as shown Note 1 Please remove the protective paper on acrylic before assemble 2 Assemble the tow arm and pay attention to the direction as shown 3 Lock nylon locknut M3 as shown do not screw too tight in avoid of locking the finger joints The locknut should be attached to th...

Page 4: ... The installation of nylon locknut needs to be screwed in with a wrench Note Please tighten the locknut with proper force so that the installation is firm In the meantime DO NOT crush the acrylic Screw the nylon locknut M4 to the motor s threaded shaft make the top of nut aligning at the end of shaft 3 in 1 Robot Gripper Four Cross Finger Gripper 2xScrew M3 14 2xNylon Locknut M3 4xScrew M4 10 4xNy...

Page 5: ...r Cross Finger Gripper Note If you need a robot gripper with only two fingers install it to this step Congratulations the two finger gripper robot is installed 3 in 1 Robot Gripper Four Cross Finger Gripper Congratulations the four cross finger Gripper robot is installed 2x Screw M3 20 2x Screw M3 14 Note Please tighten the locknut with proper force so that the installation is firm In the meantime...

Page 6: ... the tow arm and pay attention to the direction as shown 3 Lock nylon locknut M3 as shown do not screw too tight in avoid of locking the finger joints The locknut should be attached to the acrylic and the screw can rotate freely Note 1 Please remove the protective paper on acrylic before assemble 2 Assemble the tow arm and pay attention to the direction as shown 3 Lock nylon locknut M3 as shown do...

Page 7: ... 8 1xN30 Motor Bracket 1xN30 DC Screw Motor 1xMotor Cord 35cm 2xFlat Gasket 4 9 0 8 1xSpring 0 5 5 5 1xNylon Locknut M4 1xCross Slider 04 Fix Gripper Fingers 02 Install N30 Motor 2xNylon Locknut M3 2xScrew M3 14 05 Fix Traction Arm 03 Install Cross Slider Note Please tighten the locknut with proper force so that the installation is firm In the meantime DO NOT crush the acrylic Screw the nylon lock...

Page 8: ...lling this step it can be fixed to the robot with screws 4xScrew M4 10 4xNylon Stud M4 35 06 Install Nylon Stud 4xScrew M4 10 1xN30 Motor Bracket 07 Install the Bottom N30 Motor Bracket 3 in 1 Robot Gripper Parallel Four Finger Gripper Congratulations the parallel four cross finger Gripper robot is installed ...

Reviews: