44 l
Installation, operation and maintenance manual – Synchronous Alternator – AG10 line - Horizontal 12638144
6.10.3
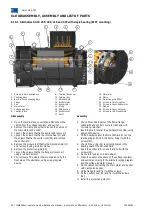
Alternators AG10 400 with single bearing (B15T mounting)
1.
Screws to fix coupling discs
2.
Coupling discs
3.
Coupling bush
4.
Flange
5.
Fan
6.
Main stator
7.
Voltage regulator
8.
Terminal block
9.
Terminal box cover
10.
Terminal box
11.
ND-endshield
12.
Exciter stator
13.
Exciter rotor
14.
O’ring
15.
NDE bearing
16.
Exciter cover
17.
Shaft
18.
Main rotor
19.
Frame
20.
Protection grille (IP23)
21.
Screws to fix rotor cables
22.
Screws to fix the bush
23.
Diodes
24.
Screws to fix exciter cover
25.
Screws to fix ND-endshield
26.
Neutral terminal
27.
Bush
Disassembly
1.
Open the terminal box cover (9) and disconnect the
cables from the voltage regulator and exciter;
2.
Remove the clamp and spiral to loosen the cables of
the main stator and exciter;
3.
Loosen the screws that fix the exciter cover (24) and
remove it;
4.
Loosen the screws that fix the rotor cables (21) and
the screws (22) that fix the bush (27) and remove the
bush along with the diodes;
5.
Remove the screws (25) that fix the ND-endshield (11)
and remove it along with the exciter stator (12), using a
rubber hammer;
6.
Remove the protection grille (20);
7.
Loosen the screws that fix the D-endshield (4) remove
it using a rubber hammer;
8.
The removal of the whole rotor must be done by the
front side of the alternator, using an appropriate
device.
Assembly
1.
Check if machined parts of the frame, flange,
endshields and exciter cover are clean and with
corrosion protection;
2.
Insert the main rotor at the alternator front side, using
appropriate device;
3.
Fit the bearing seat of the ND-endshield (11) on the
rear bearing and fit it in the frame, fixing it with the
screws (25);
4.
Check if the o'ring (14) is correctly placed in the
bearing seat of the ND-endshield;
5.
Install the bush (27) along with the diodes, fixing it on
shaft with the screws (22);
6.
Fix the rotor cables in the screws (21) of the diode
wheel;
7.
Make the cable connections of the voltage regulator
and exciter according to the alternator wiring diagram
and the voltage regulator manual;
8.
Fix the cables connecting the main stator and exciter
with clamps and spiral;
9.
Fit the D-endshield (4) and fix it with the screws;
10.
Fit the exciter cover (16) and fix it with the screws (24);
11.
Install the protection grille (20).
2
3
1
4
5
6
7
8
9
10
11
12
13
14
15
16
19
18
17
20
21
22
23
24
25
26
27


