background image

English

HMI

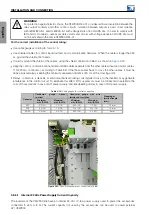
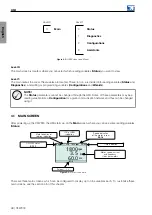
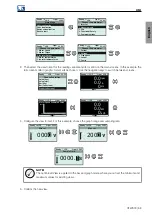
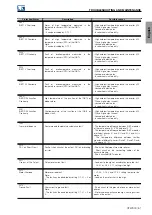
pressed, a text about this parameter will be displayed; if it is pressed on a main screen, the coding of the parameters
present in this screen will be displayed.

The figures below show some examples of the use of the help key.

Ready

LOC

0rpm 00:00

Inverter Output

S2.3.1 Corrente

0.0 A

Ready

LOC

0rpm 00:00

Help

It indicates the inverter

output current in Amperes

(A)

Ready

LOC

0rpm 00:00

0.0

0.0

0

rpm

A

Hz

Ready

LOC

0rpm 00:00

Motor Speed

Reference

S2.3.3

Inverter Output

Current

S2.3.1

Inverter Output

Frequency

S2.3.2

Figure 4.9:

Example of the use of the help key

4.4 DATE AND TIME SETTING

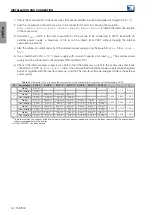
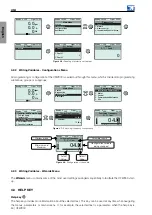
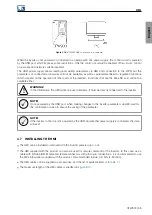
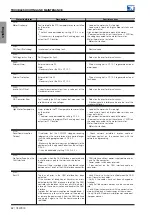
Set the date and time in the configurations menu, as illustrated below.

Ready

LOC

0rpm 00:00

0.0

0.0

0

rpm

A

Hz

Ready

LOC

0rpm 00:00

Main Menu

Status

Diagnostics

Configurations

Assistants

Ready

LOC

0rpm 00:00

Configurations

7. Protections

8. Functional Safety
9. Communications

10. SoftPLC

11. HMI

Ready

LOC

0rpm 00:00

C11 HMI

1. Configuration

2. Main Screen

Ready

LOC

0rpm 00:00

C11.1 Configuration

1. Date/Hour

2. Language

3. Screen Brightness

1970-01-01 00:00:00

English

Ready

LOC

0rpm 00:00

Configuration

C11.1.1 Date/Hour

1970-01-01

00:00:00

00

Figure 4.10:

Date and time setting

4.5 MAIN SCREEN SETTING

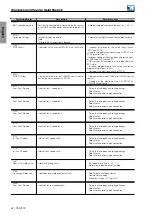
Customizing the main screens allows you to define what will always be displayed when powering up the CFW900.
Three easy-to-access main screens are available. Each screen can be configured among 3 view modes.

4.5.1 View Modes

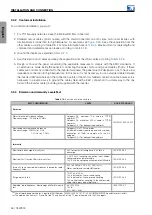
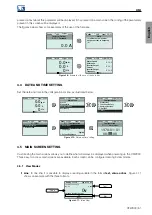
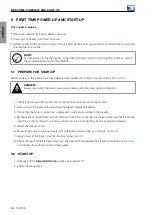
Line

: In one line, it is possible to display a reading variable in the format

text, value or bar

. Figure 4.11

shows an example with the three formats.

Ready

LOC

0rpm 00:00

Frequency Inverter Output

S2.3.3

0.0Hz

0v

Voltage Inverter Output

0%

Text

Bar

Value

Figure 4.11:

Inline View

CFW900 | 51

Summary of Contents for CFW900

Page 1: ...Motors Automation Energy Transmission Distribution Coatings Frequency Inverter CFW900 User s Manual...

Page 2: ......
Page 3: ...User s Manual Series CFW900 Language English Document 10008985516 01 Models Frame Sizes A B C D and E Publication Date 04 2022...

Page 4: ...UMMARY OF REVISIONS The information below describes the revisions made to this manual Version Revision Description R00 First edition R01 Update of tables gures and identi cation labels and general cor...

Page 5: ...17 3 2 1 Identi cation of the Power and Grounding Terminals 18 3 2 2 Power and Grounding Wiring 20 3 2 3 Fuses Circuit Breakers and Power Supply Capacity 25 3 2 3 1 Pre charge Circuit Control Fuses 2...

Page 6: ...AUSES 59 6 3 PROTECTION FAULT AND ALARM TABLE 59 6 4 SOLUTIONS FOR THE MOST FREQUENT PROBLEMS 89 6 5 INFORMATION FOR CONTACTING TECHNICAL SUPPORT 89 6 6 PREVENTIVE MAINTENANCE 90 6 7 CLEANING INSTRUCT...

Page 7: ...08 8 3 4 Standards and Certi cations 108 8 4 MECHANICAL DATA 109 8 4 1 Frame Size A 109 8 4 2 Frame Size B 110 8 4 3 Frame Size C 111 8 4 4 Frame Size D 112 8 4 5 Frame Size E 113 8 4 6 Frames A B and...

Page 8: ...injury and equipment damage WARNING Failure to follow the recommended procedures listed in this warning may result in equipment damage NOTE This warning provides important information for the proper...

Page 9: ...ion always connect the grounding point of the inverter to the protection earth PE NOTE Frequency inverters may cause interference in other electronic devices Follow the recommendations listed in Chapt...

Page 10: ...he use of the CFW900 which is not based on this manual For more information about other functions accessories and communication refer to the following manuals CFW900 Programming Manual CFW900 ENC enco...

Page 11: ...component of the output inverter bridge in inch k kilo 103 kg kilogram 1000 grams l liters lb pound m If isolated indicates meter together with another unit of measurement indicates milli 10 3 Frame d...

Page 12: ...erformance Thermal Management Function that acts on the inverter to protect the equipment integrity and functionality Speci c PWM Modulation function for use with Long Cables at the inverter output to...

Page 13: ...e HMI Smartphone with WEG WPS PC CFW900 ED300 CLP Ethernet dual port USB MicroSD card not included MicroSD card slot RTC CR2032 battery Application module and user interface CFW900 4SLOTS included Bac...

Page 14: ...OTS backplane F CFW900 REL accessory board module G front cover H HMI A B C D E F G H Figure 2 2 Main components 2 3 1 1 2 3 USB Connector Communication LED Off communication inactive On ashing commun...

Page 15: ...ze 7 Degree of protection 8 Rated operating temperature 9 Manufacturer s address 10 Nominal input voltage range 11 Number of input phases 12 Rated input frequency 13 Inverter input current rated ND an...

Page 16: ...ety functions IX HMI Blank HMI without Bluetooth B HMI with Bluetooth X Product with special hardware version Blank Standard hardware HEC Product with extra coating board Hx Hxx or Hxxx Other types of...

Page 17: ...ry location temperature between 25 C and 60 C 13 F and 140 F with a cover to prevent dust accumulation inside it WARNING When the inverter is stored for a long period it becomes necessary to perform t...

Page 18: ...ion 8 1 4 Humidity from 5 to 95 non condensing Maximum altitude up to 1000 m 3 300 ft rated conditions Operation at an altitude of up to 4000 m is possible however in these cases the rated output curr...

Page 19: ...mm in mm in mm in mm in mm in mm in mm in mm in mm in mm in mm in mm in Frame A 145 5 7 245 9 65 222 8 74 65 2 56 269 10 59 333 5 13 13 115 4 53 250 9 84 124 4 88 120 4 72 120 4 72 138 5 43 228 8 97 F...

Page 20: ...mm in mm in IP20 25 0 98 25 0 98 10 0 39 0 0 A IP21 UL type 1 25 0 98 25 0 98 10 0 39 30 1 18 IP20 40 1 57 45 1 77 10 0 39 0 0 B IP21 UL type 1 40 1 57 45 1 77 10 0 39 30 1 18 IP20 110 4 33 130 5 12...

Page 21: ...holes according to Figure 3 1 WARNING UL type 1 inverters support surface mounting only 3 1 4 2 Flange Mounting In the ange mounting type the back of the inverter which contains the heatsink and fan i...

Page 22: ...4 Repositioning of the mounting brackets 3 1 5 Access to Control and Power Terminals In CFW900 inverters of frames A B C and D it is necessary to remove the HMI and the front cover to access the cont...

Page 23: ...e of inverters of frame size E it is necessary to remove the HMI and control rack cover to access the control connectors see Figure 3 6 In order to access the power connectors remove the lower front c...

Page 24: ...I in these places 1 38 4 0 5 0 1 38 35 0 0 79 20 0 4 06 103 0 0 20 0 16 35 0 Self tapping screw for plastic 3mm 7mm of maximum length 65 0 2 56 25 9 1 02 20 0 0 79 113 0 4 45 Figure 3 8 Data for the H...

Page 25: ...single phase power supply may be connected to two of any input terminals The power terminals can be of different sizes and con gurations depending on the inverter model The location of the power and...

Page 26: ...V T2 W T3 c Frame Size E Figure 3 9 Power terminals To ensure the IP20 protection rating in frame C when powered by the DC link without using the braking resistor break the aps of the cover protectin...

Page 27: ...verters and cables connecting the inverter to the motor DANGER Wrong cable connection The inverter will be damaged in case the input power supply is connected to the output terminals U T1 V T2 or W T3...

Page 28: ...lips 1 2 10 6 4 0 12 Lug Power 1 M4 phillips slotted 2 5 6 3 14 10 3 Fork CFW900A10P0B2 Grounding 2 M4 phillips 1 2 10 6 6 0 10 Lug Power 1 M4 phillips slotted Fork CFW900A04P6T2 Grounding 2 M4 philli...

Page 29: ...illips 1 2 10 6 6 0 8 Lug Power 1 M4 phillips slotted Wire ferrule CFW900B34P0T2 Grounding 2 M4 phillips 1 2 10 6 10 0 8 Lug Power 1 M4 phillips slotted Wire ferrule CFW900B45P0T2 Grounding 2 M4 phill...

Page 30: ...8 Hexagonal Phillips screw M5 3 5 31 0 M8 15 132 8 50 1 0 Lug Power 1 M10 Hexagonal screw 30 265 5 HD 95 ou 2x35 ND 120 ou 2x50 HD 3 0 ou 2x3 ND 250 ou 2x1 CFW900E0195T2 Grounding 2 M5 e M8 Hexagonal...

Page 31: ...ing 2 M4 phillips 1 2 10 6 4 0 10 Lug Power 1 M4 phillips slotted Wire ferrule CFW900B26P0T4 Grounding 2 M4 phillips 1 2 10 6 6 0 8 Lug Power 1 M4 phillips slotted Wire ferrule CFW900B33P0T4 Grounding...

Page 32: ...5 e M8 Hexagonal Phillips screw M5 3 5 31 0 M8 15 132 8 95 2 0 Lug 1 R L1 S L2 T L3 U T1 V T2 W T3 DC DC 2 PE 3 2 3 Fuses Circuit Breakers and Power Supply Capacity The CFW900 is suitable for use in c...

Page 33: ...FNH00 250K A 10711445 250 Mersen A70QS250 4 CFW900D0150T2 Yes 1 2 25313 200 1 FNH1 250K A 10809489 250 Mersen A70QS250 4 CFW900E0172T2 101250 250 1 FNH1 350K A 10814896 400 Mersen A70QS400 4 CFW900E0...

Page 34: ...T2 200 Mersen A100P200 4 250 Mersen A70QS250 4 CFW900D0150T2 Yes 1 250 Mersen A100P250 4 250 Mersen A70QS250 4 CFW900E0172T2 400 Mersen A70QS400 4 CFW900E0195T2 400 Mersen A70QS400 4 CFW900E0250T2 10...

Page 35: ...A ACW250H ATU250 3 CFW900D0135T2 400 UBW400H FTU400 3A ACW400H ETS400 3 CFW900D0150T2 400 UBW400H FTU400 3A ACW400H ETS400 3 500x1000x500 19 7x39 3x19 7 CFW900E0172T2 500 UBW600H FTU500 3A ACW400H ETS...

Page 36: ...n Figure 3 11 In case replacement is required use control fuses as speci ed below or equivalent 0 5 A 600 V time delay fuse Manufacturer Cooper Bussmann Commercial reference FNQ R 1 2 WEG Item materia...

Page 37: ...rocessed by the user i e the user shall decide whether to indicate the fault and or block the inverter operation or both Contact the RCD manufacturer for selecting the most appropriate device to be us...

Page 38: ...obtained from the frequency inverter without braking resistors varies from 10 to 35 of the motor rated torque Braking resistors shall be used to obtain higher braking torques In this case the energy...

Page 39: ...the dynamic braking function is de ned in parameter C3 6 1 DC link level The power of the braking resistor is a function of the deceleration time the load inertia and the load torque For most applicat...

Page 40: ...94 124 51 3 CFW900D0146T4DB 243 194 124 51 3 CFW900E0200T4DB 400 320 205 84 2 CFW900E0240T4DB 400 320 205 84 2 1 The effective braking current shown is just a reference value as it depends on the brak...

Page 41: ...oltage exceeds the maximum permissible value PE R S T BR DC R S T PE Fuses Contactor Thermal Relay Thermostate Control Power Figure 3 14 Braking resistor connection NOTE DC current ows through the the...

Page 42: ...European directive of electromagnetic compatibility IEC 61800 3 The emission of the cables may be reduced by installing them inside a metal conduit which shall be grounded at both ends It is necessar...

Page 43: ...a protective ground it shall have at least 50 of the power cables conductivity Otherwise add an external ground conductor and use the shield as an EMC protection Note 3 Shielding conductivity at high...

Page 44: ...he ground by using a single conductor copper cable with a minimum wire gauge of 10 mm2 or a two conductor cable with the same wire gauge of the grounding cable speci ed in Table 3 4 since the leakage...

Page 45: ...TION AND CONNECTION Internal panel grounding bar Panel 1 Panel 2 Figure 3 18 Grounding connections with multiple inverters 3 2 6 Control Connections 4 1 2 6 8 5 7 3 9 Figure 3 19 CFW900 control connec...

Page 46: ...4SLOTS provides four slots to connect accessories By default slot A is taken by the CFW900 REL 01 It can be replaced by the CFW900 7SLOTS which has seven slots for accessories 8 XC30 CFW900 REL 01 Re...

Page 47: ...tal output 2 1 For more information see the detailed speci cation in Table 8 11 NOTE The digital outputs of the CFW900 IOS have freewheeling diodes for the 24 Vdc power supply of the inverter control...

Page 48: ...30 connector pinout with example of AC load connection Table 3 14 XC30 connector CFW900 REL 01 Accessory XC30 connector Pin Name Description Default Function if any 1 1 NF1 1A Digital Relay Output No...

Page 49: ...3 9 If the those cables have to cross the other cables it must be done perpendicularly keeping the minimum separation distance of 5 cm at the crossing point Relays contactors solenoids or electromecha...

Page 50: ...AN W ENC 01 IOAI 01 IOD 01 IOD 01 0 40 A 0 40 A Consumption 0 05 A 0 05 A 0 00 A 0 20 A 0 10 A 0 00 A 0 00 A 4 Model REL 01 TEMP 01 ENC 01 ENC 01 IOAI 01 IOAI 01 IOAI 01 0 80 A 0 00 A Consumption 0 05...

Page 51: ...ot ensure that the external power supply will be energized before or together with the inverter power up and that the inverter will be de energized before the external power supply Table 3 17 Examples...

Page 52: ...udes all establishments other than those directly connected to a low voltage power supply which supplies buildings used for domestic purposes Categories Category C1 inverters with a voltage rating les...

Page 53: ...and Immunity Levels Met Table 3 18 Emission and immunity levels EMC PHENOMENON LEVEL BASIC STANDARD Emission Mains terminal disturbance voltage Frequency range 150 kHz to 30 MHz Category C2 maximum 1...

Page 54: ...nt values Navigate the menus Switch between screens Move selection for editing values Navigate the menus Enter key Save changes Enter the menus Control the motor direction of rotation if programmed fo...

Page 55: ...meters may be a reading variable from a Con guration for a given communication network and thus can be changed using it 4 1 MAIN SCREEN After powering up the CFW900 the HMI starts up on the Main scree...

Page 56: ...C2 1 C2 1 4 Con gurations Motor Motor Data Rated Voltage 440V 4 2 1 Reading Variables Status and Diagnostics Menus All reading variables for the HMI are available in two main menus Status and Diagnos...

Page 57: ...Commands and Reference 5 I Os Ready LOC 0rpm 00 00 C1 Inverter and Power Supply 1 Power Supply 2 Inverter Use 3 Switching Frequency 4 PWM Modulation 5 Fans Configuration Ready LOC 0rpm 00 00 C1 3 Swit...

Page 58: ...nostics Configurations Assistants Ready LOC 0rpm 00 00 Configurations 7 Protections 8 Functional Safety 9 Communications 10 SoftPLC 11 HMI Ready LOC 0rpm 00 00 C11 HMI 1 Configuration 2 Main Screen Re...

Page 59: ...4 13 shows a view example Ready LOC 0rpm 00 00 0 0rpm 0 0A 0 0V 00 0Hz 00 0V 00 0 0 0kW 0 C 00 0 Value Figure 4 13 View in Slot NOTE The Line and Slot view modes can be merged if there is space in the...

Page 60: ...s example the full screen mode in graphic format will be chosen Use the navigation keys to switch between screens Ready LOC 0rpm 00 00 Choose Exhibition Value line Value slot Bar line Bar full screen...

Page 61: ...e 12 0 0 C 0 0 C 0 0 C Figure 4 14 Main screen examples Example 2 Figure 4 15 is an example of a main screen with parameter readings displayed in the Line mode showing in the rst line the inverter out...

Page 62: ...ot be used remotely It must be directly connected to the inverter NOTE Once powered by the USB port when making changes to the inverter parameters via HMI wait for the con rmation screen to ensure the...

Page 63: ...ck if power grounding and control connections are correct and rmly secured 2 Remove from the inside of the inverter all installation material left behind 3 Check that the motor connections voltage and...

Page 64: ...protective ground PE Use an isolated notebook for the USB connection or a desktop connected to the same protective ground PE of the inverter To control the motor speed and to view and program the inv...

Page 65: ...l memory Speed references via HMI and Electronic Potentiometer if the Speed backup function is enabled Code of the protection fault or alarm occurred Status of the motor overload function integrator S...

Page 66: ...rotection Alarm Description Possible causes F006 Grid Unbal Phase Loss Unbalance or phase loss in the power supply Note In case the motor has no load on the shaft or the load is low this fault may not...

Page 67: ...try again Motor is disconnected or motor is small in relation to the rated current of the inverter connected to the output Possible defect on the inverter internal circuits Problems in the circuit of...

Page 68: ...junction of the IGBTs or diodes alarm High ambient temperature around the inverter 50 C and high output current Locked or defective fan Inverter heat sink too dirty F061 IGBT DRL Junction Overtemp Ov...

Page 69: ...nute High ambient temperature around the motor Poor contact or short circuit resistance 100 on the wiring connected to the motor thermistor Motor thermistor not installed Motor shaft locked A128 Seria...

Page 70: ...P It indicates that the device stopped receiving valid telegrams for a period longer than the setting in C9 6 3 The time counting starts as soon as it receives the rst valid telegram Check network ins...

Page 71: ...rol F171 Pow Fan 1 Speed Heat sink fan 1 speed fault Dirt on the fan blades and rolling bearings Defective fan Defective fan power supply connection F172 Pow Fan 2 Speed Heat sink fan 2 speed fault Di...

Page 72: ...face without power supply between pins 1 and 5 of the connector Power cables switched or reversed Poor contact on the CAN interface cable or connector F234 Bus Off The bus off error in the CAN interfa...

Page 73: ...inverter output A351 IGBT P W B1 High Load Alarm of overload on IGBT 1 of phase W High current at the inverter output F352 IGBT P W B1 Overload Fault of overload on IGBT 1 of phase W High current at...

Page 74: ...Slot AI1 cable disconnection Analog input signal set to actual mode is out of the range 4 to 20 mA AI cable broken the read value was less than 2 mA for 5 seconds Poor contact on the signal connection...

Page 75: ...gnal cable Encoder connection error Encoder without power supply A1110 Slot A enc Z cable disconnection Encoder signal Z not detected correctly Broken or disconnected signal cable Encoder connection e...

Page 76: ...easured by the sensor close to the threshold level Monitored equipment at a high temperature Fault actuation level con guration error F1129 Slot A sensor 1 overtemperature Temperature measured by the...

Page 77: ...Temperature measured by the sensor close to the threshold level Monitored equipment at a high temperature Fault actuation level con guration error F1145 Slot A sensor 5 overtemperature Temperature mea...

Page 78: ...gnal cable Encoder connection error Encoder without power supply A1210 Slot B enc Z cable disconnection Encoder signal Z not detected correctly Broken or disconnected signal cable Encoder connection e...

Page 79: ...easured by the sensor close to the threshold level Monitored equipment at a high temperature Fault actuation level con guration error F1229 Slot B sensor 1 overtemperature Temperature measured by the...

Page 80: ...Temperature measured by the sensor close to the threshold level Monitored equipment at a high temperature Fault actuation level con guration error F1245 Slot B sensor 5 overtemperature Temperature mea...

Page 81: ...gnal cable Encoder connection error Encoder without power supply A1310 Slot C enc Z cable disconnection Encoder signal Z not detected correctly Broken or disconnected signal cable Encoder connection e...

Page 82: ...easured by the sensor close to the threshold level Monitored equipment at a high temperature Fault actuation level con guration error F1329 Slot C sensor 1 overtemperature Temperature measured by the...

Page 83: ...Temperature measured by the sensor close to the threshold level Monitored equipment at a high temperature Fault actuation level con guration error F1345 Slot C sensor 5 overtemperature Temperature mea...

Page 84: ...gnal cable Encoder connection error Encoder without power supply A1410 Slot D enc Z cable disconnection Encoder signal Z not detected correctly Broken or disconnected signal cable Encoder connection e...

Page 85: ...easured by the sensor close to the threshold level Monitored equipment at a high temperature Fault actuation level con guration error F1429 Slot D sensor 1 overtemperature Temperature measured by the...

Page 86: ...Temperature measured by the sensor close to the threshold level Monitored equipment at a high temperature Fault actuation level con guration error F1445 Slot D sensor 5 overtemperature Temperature mea...

Page 87: ...gnal cable Encoder connection error Encoder without power supply A1510 Slot E enc Z cable disconnection Encoder signal Z not detected correctly Broken or disconnected signal cable Encoder connection e...

Page 88: ...easured by the sensor close to the threshold level Monitored equipment at a high temperature Fault actuation level con guration error F1529 Slot E sensor 1 overtemperature Temperature measured by the...

Page 89: ...Temperature measured by the sensor close to the threshold level Monitored equipment at a high temperature Fault actuation level con guration error F1545 Slot E sensor 5 overtemperature Temperature mea...

Page 90: ...gnal cable Encoder connection error Encoder without power supply A1610 Slot F enc Z cable disconnection Encoder signal Z not detected correctly Broken or disconnected signal cable Encoder connection e...

Page 91: ...easured by the sensor close to the threshold level Monitored equipment at a high temperature Fault actuation level con guration error F1629 Slot F sensor 1 overtemperature Temperature measured by the...

Page 92: ...Temperature measured by the sensor close to the threshold level Monitored equipment at a high temperature Fault actuation level con guration error F1645 Slot F sensor 5 overtemperature Temperature mea...

Page 93: ...gnal cable Encoder connection error Encoder without power supply A1710 Slot G enc Z cable disconnection Encoder signal Z not detected correctly Broken or disconnected signal cable Encoder connection e...

Page 94: ...easured by the sensor close to the threshold level Monitored equipment at a high temperature Fault actuation level con guration error F1729 Slot G sensor 1 overtemperature Temperature measured by the...

Page 95: ...n an extremely low temperature environment F1743 Slot G temperature sensor 5 error Value measured by the temperature sensor out of the expected range Sensor cable is broken Short circuited sensor Sens...

Page 96: ...anual Motor speed too high or too low Incorrect settings reference limits 1 Check if the content of C4 3 1 1 1 minimum speed and C4 3 1 1 2 maximum speed are according to the motor and application Con...

Page 97: ...on 2 3 1 Power inverter with single phase or three phase voltage between 208 and 240 Vac 50 or 60 Hz for at least 1 hour Then de energize and wait at least 24 hours before using the inverter energize...

Page 98: ...sing compressed air Electronic boards Disconnect the inverter power supply and wait at least 10 minutes Remove the plastic cover as shown in Chapter 3 Remove the dust from the electronic board by usin...

Page 99: ...r remote HMI 3 m 15693042 CFW900 CCHMIR05M Serial cable for remote HMI 5 m 15693044 CFW900 CCHMIR07M Serial cable for remote HMI 7 5 m 15693045 CFW900 CCHMIR10M Serial cable for remote HMI 10 m Miscel...

Page 100: ...E CONTROL ACCESSORY The control accessories are easy and quickly installed on the inverters using the plug and play concept They may be ordered separately and will be shipped in individual packages co...

Page 101: ...ower up the CFW900 and check that the accessory has been correctly identi ed in parameter S1 4 n 1 where n indicates the slot to which the accessory has been connected A B C D E Figure 7 2 Installing...

Page 102: ...nections Maximum 1 per minute Types of power supply 4 Frame Size A TT TN IT Except grounded by resistor slash voltage Frame Sizes B C D E TT TN IT Delta earthed straight voltage Ef ciency Ef ciency cl...

Page 103: ...he factory settings e g rated switching frequency It is possible to operate with higher output frequencies limited to 1000 Hz but the rated switching frequency must be increased In these cases WEG mus...

Page 104: ...HMI installed on metal panel using the CFW900 RHMIF kit IP65 UL type 12 Altitude Rated 1000 m Maximum 4000 m with derating factor Heatsink fan ow at the operation point CFM 20 40 130 190 270 I s 9 19...

Page 105: ...10 6 3 3 3 3 3 111 36 4 2 2 7 CFW900A13P0T2 13 4 3 5 3 3 130 39 5 2 2 5 CFW900A19P0T2 19 6 5 5 7 5 5 5 168 45 7 6 2 3 CFW900B26P0T2 26 10 7 5 10 7 5 7 5 251 64 10 4 2 5 CFW900B34P0T2 34 12 5 9 2 10 1...

Page 106: ...1 5 2 1 5 2 85 33 2 7 3 2 CFW900A10P6T2 9 6 3 2 2 3 2 3 102 35 3 8 2 7 CFW900A13P0T2 11 3 3 3 3 3 111 37 4 4 2 6 CFW900A19P0T2 16 5 4 5 3 5 143 42 6 3 2 3 CFW900B26P0T2 22 7 5 5 5 7 5 5 7 5 212 59 8...

Page 107: ...5 10 10 236 54 11 8 2 0 CFW900B26P0T4 26 15 11 20 20 15 366 82 18 0 2 1 CFW900B33P0T4 33 20 15 25 25 20 409 87 22 9 1 8 CFW900B39P0T4 39 25 18 5 30 30 25 473 97 27 0 1 8 CFW900C50P0T4 50 30 22 40 40 3...

Page 108: ...900C74P0T4 62 40 30 40 50 40 708 146 42 9 1 7 CFW900D96P0T4 75 50 37 60 60 50 862 158 51 9 1 7 CFW900D0124T4 103 60 55 75 75 75 1152 198 71 4 1 7 CFW900D0146T4 124 75 55 75 100 100 1379 232 85 9 1 7 C...

Page 109: ...mal management function enabled 1 The thermal management function protects the inverter during overloads through a smart control that limits the maximum temperature of the IGBTs If it is not possible...

Page 110: ...rame A D Frame E 1 With the inverter thermal management function enabled if disabled see note 2 below or fsw 2 kHz to frame size A D and fsw 1 5 kHz to frame size E in this case regardless of the inve...

Page 111: ...0T2 CFW900B26P0T4 CFW900C80P0T2 CFW900C50P0T4 CFW900D0150T2 CFW900D0146T4 CFW900E0203T4 CFW900E0242T4 1 ID 1 NAL 2 NAL 2 NAL 2 100 1 5 ID 1 100 100 100 100 Enabled 100 100 100 100 2 Disabled 100 100 1...

Page 112: ...rent derating as a function of the installation altitude 8 2 5 Other Derating Factors There are factors related to the inverter application that require rated current derating In these cases WEG must...

Page 113: ...the motor braking resistor and IGBTs External Fault Alarm Output phase ground short circuit Functions Built in STO and SS1 t functions See the safety manual Integral Keypad HMI 12 operator keys Run St...

Page 114: ...on mode voltage 10 V Digital outputs 2 transistor digital outputs NPN Isolated from power circuits Maximum current 40 mA Protected against short circuit to the GND Maximum voltage 24 Vdc With freewhee...

Page 115: ...2 electrostatic discharge immunity test EN 61000 4 3 Electromagnetic compatibility EMC Part 4 testing and measurement techniques Sec 3 radiated radio frequency electromagnetic eld immunity test EN 61...

Page 116: ...English TECHNICAL SPECIFICATIONS 8 4 MECHANICAL DATA 8 4 1 Frame Size A Model Weight mass kg lb CFW900A 4 5 9 9 Figure 8 5 Dimensions for frame A mm in CFW900 109...

Page 117: ...English TECHNICAL SPECIFICATIONS 8 4 2 Frame Size B CFW900B 10 0 22 0 Model Weight mass kg lb Figure 8 6 Dimensions for frame B mm in 110 CFW900...

Page 118: ...English TECHNICAL SPECIFICATIONS 8 4 3 Frame Size C CFW900C 20 5 45 2 Model Weight mass kg lb Figure 8 7 Dimensions for frame C mm in CFW900 111...

Page 119: ...1 6 22 186 7 32 90 3 54 211 2 8 31 294 11 56 559 8 22 04 602 23 69 135 4 5 33 158 2 6 23 700 27 55 174 9 6 89 200 7 87 200 7 87 600 23 62 M8 4X A B 14 0 55 17 3 0 68 15 0 59 R10 0 39 R4 6 0 18 DETALH...

Page 120: ...34 200 7 87 200 7 87 650 25 59 A B M8 4X C 314 12 36 286 3 11 27 333 4 13 13 358 14 1 28 5 1 12 3X 86 6 3 41 157 6 18 KNOCK OUT 3X 14 0 55 R4 6 0 18 R10 0 39 52 5 2 07 DETALHE DETAIL A 52 5 2 07 10 0...

Page 121: ...4 6 Frames A B and C with IP21 kit a Frame A with IP21 kit CFW900 IP21A accessory b Frame B with IP21 kit CFW900 IP21B accessory c Frame C with IP21 kit CFW900 IP21C accessory Figure 8 10 Inverter hei...

Page 122: ...kit 250 9 84 289 11 38 623 3 24 54 622 5 24 51 19 0 75 a Frame D with IP21 kit CFW900 IP21D accessory 95 6 3 77 381 4 15 02 335 13 19 733 6 28 88 51 8 2 04 b Frame E with IP21 kit CFW900 IP21E access...

Page 123: ...A B and C with UL Type 1 kit a Frame A with UL Type 1 kit CFW900 KN1A accessory b Frame B with UL Type 1 kit CFW900 KN1B accessory c Frame C with UL Type 1 kit CFW900 KN1C accessory Figure 8 12 Invert...

Page 124: ...PECIFICATIONS 8 4 9 Frames D and E with UL type 1 kit a Frame D with UL Type 1 kit CFW900 KN1D accessory b Frame E with UL Type 1 kit CFW900 KN1E accessory Figure 8 13 Inverter height with UL Type 1 k...

Page 125: ...WEG Drives Controls Automation LTDA Jaragu do Sul SC Brazil Phone 55 47 3276 4000 Fax 55 47 3276 4020 S o Paulo SP Brazil Phone 55 11 5053 2300 Fax 55 11 5052 4212 automacao weg net www weg net...

Reviews: