background image

 24


until engine has been disabled. Switch off engine and then remove spark plug wire. Be 
sure to wear personal protective equipment. 

Do not let the drive belt is too loose!


Adjust the relative position of cable screw tube attached to the cable bracket to improve the 

transmission effect, in case the drive belt is too loose when the tensional pulley is engaging.   

If the drive belt is still too loose when the tensional pulley is engaging, adjust engine’s 

position as follows: 

i. Remove belt guard bolts, spacers, and outer belt guard (see Figure 16) 


ii. 

Loosen engine’s mounting hardware.


iii. 

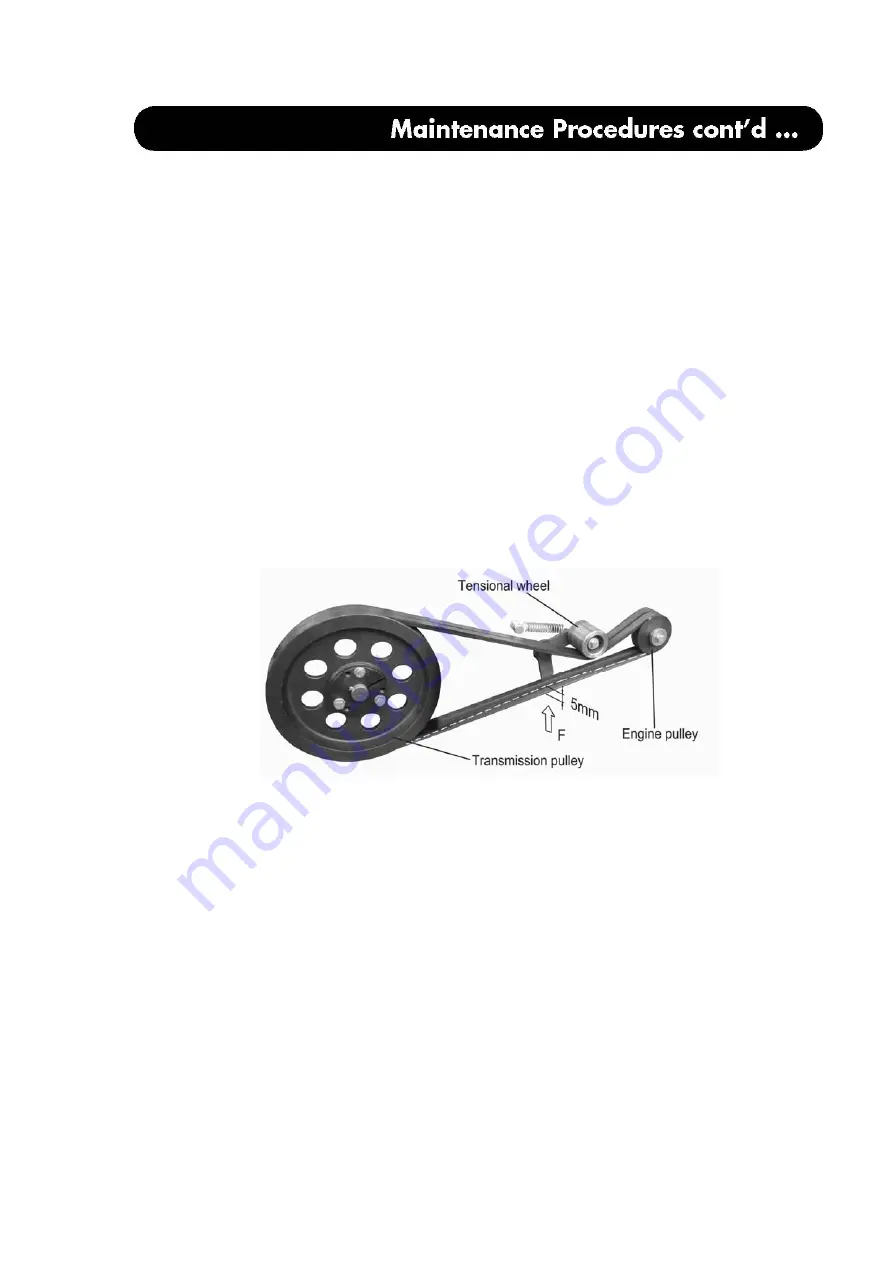
Move the engine forward to desired position. Check the tension at the center of the span 

on the bottom side of the lower half of the belt when the tensional wheel is engaging, and insure 
the belt will deflect 3/16” (about 5mm) with 13 pounds (about 6kg) of pressure applied to it. 

iv. 

Check alignment of pulleys with a straight edge (see Figure 19) 

v. 

Once proper tension and alignment are achieved, (see Figure 18). Tighten all 

engine-mounting hardware.


Vi. 

Reassemble outer belt guard, spaces, and belt guard hardware. Tighten securely. 

Reconnect spark plug wire.


 New belts have a break-in period and must be checked after 15 hours of use. 

We do not recommend adjusting or replacing the drive belt by customers. Please contact 
local Authorized Service Centre or WEIBANG’s exclusive national distributor to complete 

this work or for details. 

REPLACING DRIVE V-BELT AND PULLEY 

          1). Remove belt guard bolts, spacers, and outer belt guard (see Figure 16) 
          2). Remove old v-belt and both the 3“V-pulley and 10” V-pulley. 
          3). Discard belt and inspect both pulleys and belt keeper kit for any wear or damage. 
       Pivot arm should be free with no more than 0.25”/0.635 cm side play. Roller bearing 

should rotate smoothly and freely. Replace complete kit if necessary.   

4). Check that both 10”and 3”pulleys are aligned with each other. Install new v-belt by 

looping over 6.8”v-pulley on the bottom, then over 3”v-pulley on top.   


Ensure that belt is in proper position inside both belt idler and keeper. (Fig.7 & 8).   

5). 

Replace belt guard, reconnect spark plug wire and reattach handle prior to operation.


We do not recommend replacing the drive belt or pulleys by customers. Please contact   

Summary of Contents for WBSC457LC

Page 1: ...erates this equipment until you have read and understood all enclosed Operator s Manual READ ALL the sections in this manual PRIOR to attempting to service maintain or operate this equipment 775 Glenn...

Page 2: ...19 10 1 Inspection schedule 19 10 2 Preventative maintenance procedures 20 10 3 General service procedures 21 10 3 1 General safety procedures 21 10 3 2 Pre maintenance 22 10 3 3 Maintenance Contents...

Page 3: ...ct operation procedures safety precautions maintenance and troubleshooting tips as well as other advisories Please keep this manual nearby when operating the lift as a reference should any questions a...

Page 4: ...m Cutting speed 0 9 1 1m s machine size LxWxH 69x29 5x37 4 inches 175x75x95cm Net weight 387 Pound 176 Kg Gross weitht 440 Pound 200 Kg SAFETY REGULATIONS 1 This machine may only be operated by respon...

Page 5: ...ed off Machine and engine temperatures may exceed 150 F or 66 Machine must be allowed to cool before touching it or attempting to perform any maintenance Do not tamper with the engine governor setting...

Page 6: ...often attracted to the chipper shredder and to the operation activity Never assume that children will remain where you last saw them a Keep children out of the working area and under the watchful care...

Page 7: ...rom the sparkplug and place where it cannot come in contact with plug Do not run this machine until all guards and deflectors in place and in good working condition The sod cutter is a heavy unit DO N...

Page 8: ...cals Below are the decals available for re ordering to facilitate maintenance All decals are available for replacement except that with the serial number of the unit for each number serves as an uniqu...

Page 9: ...7 Qty Required 1PCS PART No XYJLP070 OPERATOR Qty Required 1PCS PART No L0106040Z FUEL TANK Qty Required 2PCS PART No L0106080Z SERVICE Qty Required 1PCS PART No L0203000 WARNING...

Page 10: ...ion in it s entirely before beginning assembly NOTE All references to left right front and rear of the machine are determined by standing behind the handlebars and facing the direction of forward trav...

Page 11: ...ed securely 3 Check the tensional spring to ensure the clutch cable connected correctly The cable travel should be 1 9 2 54cm and the cable is easy to reset 4 Check and make sure the engine has enough...

Page 12: ...iving wheel used for short distance less than 1000m transferr ing from another Remove the wheel before cutting sod 13 Starting knob used for recoil starting the engine Engine lubrication oil For oil t...

Page 13: ...individually NEVER ATTEMPT TO LIFT THE MACHINE WITH ONLY ONE or TWO PERSON Working with partners lift the unit to the transportation vehicle ALWAYS use safe lifting techniques to avoid back or muscle...

Page 14: ...e for the following i Is the handle properly and securely attached to the machine ii Is the handle set in the correct operating position c Consult the Recommended Maintenance Schedule section of this...

Page 15: ...ventilation To start the engine 1 Move the machine to a level area 2 Move the engine chock control lever to choke setting to start a cold engine WARNING To avoid injury look behind you to be sure ther...

Page 16: ...lt clutch handle back slowly until the belt is semi engaged and then shift the gear selecting lever to engage slow speed gears rapid speed is only for travelling 6 Lift the handle bar pull the belt cl...

Page 17: ...ng cutting depth Adjust blade angle Blade controling lever Lower locking lever Lossen Tight 1 For precise adjustment set blade angle and keep the solt A in vertical direction 2 Turn star knob to relea...

Page 18: ...re test the watering effect and make lawn drying to reduce the resistance of soil CUTTING SOD ON SLOPES WARNING THIS MACHINE IS NOT DESIGNED FOR USE ON INCLINES OF MORE THAN 20 GRADE Cutting sod on in...

Page 19: ...he carburetor has been preset at the factory and adjustment should not be necessary However minor adjustment may be required to compensate for differences in fuel temperature altitude or load The air...

Page 20: ...S THE CARBURETTOR FUEL FILTER FUEL HOSE OR FUEL TANK EXPERIENCE ALSO INDICATES THAT ALCOHOL BLENDED FUELS ALSO CALLED GASOHOL OR THE USE OF ETHANOL OR METHANOL CAN ATTRACT MOISTURE WHICH LEADS TO SEPA...

Page 21: ...s such as changing blade and adjusting the drive belt that are to be performed as needed By following the Inspection Schedule below BEFORE and AFTER each use of the sod cutter appropriate actions can...

Page 22: ...the blade should be cleaned Scrape the bottom of gear box and blade to remove accumulations of leaves or trash ii Clean the engine often to keep trash from accumulating A clogged engine runs hotter a...

Page 23: ...re performing any service and maintenance procedures consult these general safety procedures for a safe working environment 1 Make sure that both the engine and sod cutter are cool prior to any servic...

Page 24: ...wn at reduced sizes before All decals are available for replacement except that with the serial number of the unit for each number serves as an unique identifier for warranty and support purposes If y...

Page 25: ...lades The blade can be sharpened with a file or on a grinding wheel Do not attempt to sharpen the blade while attached to the sod cutter When the blade is sharpened with a grinding wheel please pay at...

Page 26: ...mounting hardware Vi Reassemble outer belt guard spaces and belt guard hardware Tighten securely Reconnect spark plug wire New belts have a break in period and must be checked after 15 hours of use W...

Page 27: ...gine and after each five 5 hours of continuous use Retighten the oil plug securely each time you check the oil level LUBRICATION CHART SAE VISCOSITY GRADES CHANGING ENGINE OIL 1 Disconnect sparkplug c...

Page 28: ...her questions or concerns please do not hesitate to contact your local dealer for assistance Problem Suggested solutions Blade connecting rod broken 1 Clean and make sure the drive shaft or transmissi...

Page 29: ...properly if all fasteners is tightened securely Adjust any components on request Belt fall off 1 Adjust belt tensional pulley 2 Check the belt tensioner and replace with new one please contact you lo...

Page 30: ...our 4 Engine Consult with engine manufacturer To make a warranty claim within this time period please contact WEIBANG S local dealer or WEIBANG s exclusive national distributor who will advise the val...

Reviews: