background image

8

ADJUSTING THE BACKREST

The Backrest (7) can be used in a declined, a level,
or any of four inclined positions. To adjust the
Backrest, remove the Locking Pin (21) from the
Frame (1). Move the Backrest to the desired position
and reinsert the Locking Pin into the Frame and an
adjustment hole in the Pivot Bracket (6).

7

21

6

1

Adjustment

Holes

ADJUSTMENTS

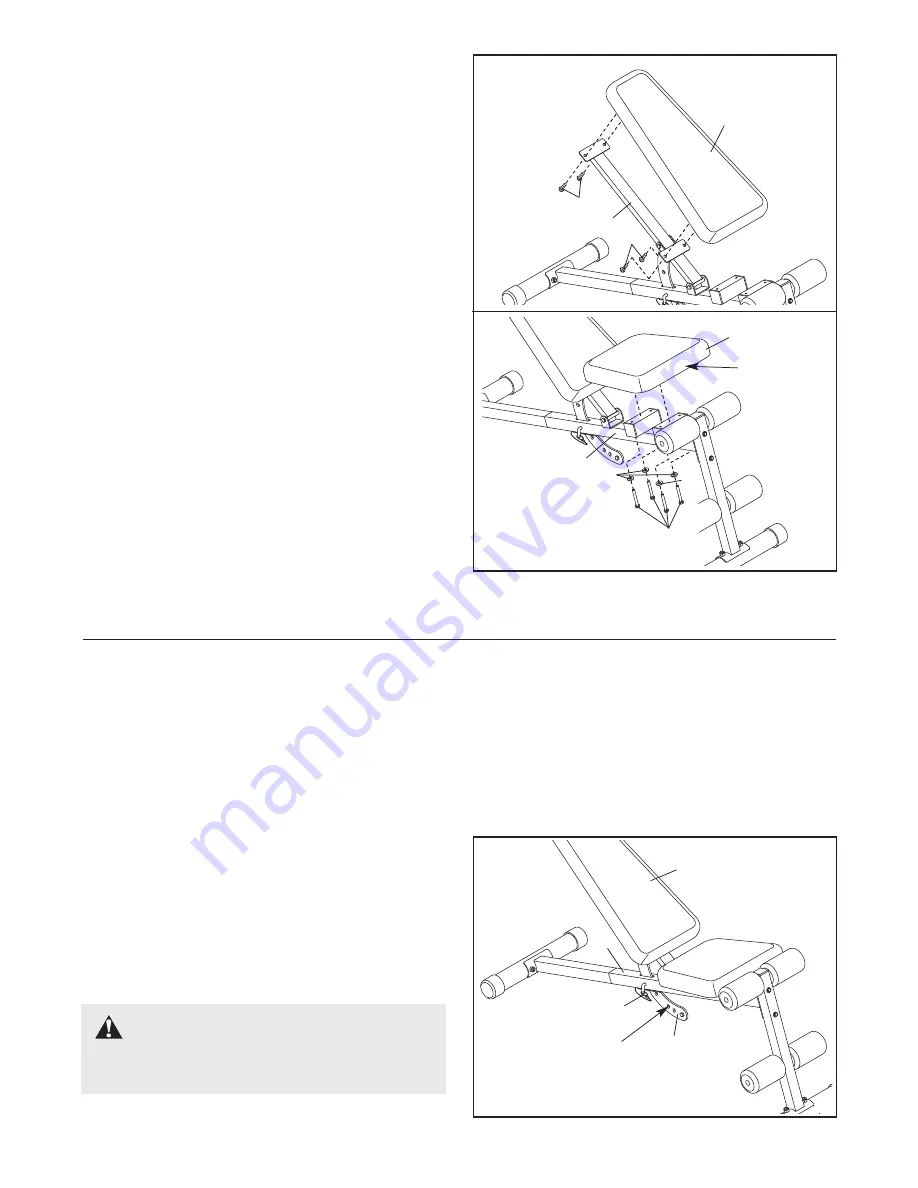
7.

Attach the Backrest (7) to the Backrest Frame (5)
with four M6 x 16mm Bolts (24). 

Make sure the

Backrest is oriented as shown.

7

7

5

24

24

This section explains how to adjust the weight bench. See the EXERCISE GUIDELINES on page 9 for important
information about how to get the most benefit from your exercise program. Also, refer to the accompanying exer-
cise guide to see the correct form for each exercise. 

Make sure all parts are properly tightened each time the weight bench is used. Replace any worn parts immediate-
ly. The weight bench can be cleaned with a damp cloth and a mild, non-abrasive detergent. Do not use solvents.

WARNING:

Always make sure the

Locking Pin (21) is fully inserted through the
Frame (1) and the Pivot Bracket (6).

8.

Attach the Seat (8) to the Frame (1) with four M6
x 60mm Bolts (17) and four M6 Washers (22).

Make sure the wide end of the Seat is on the
side shown.

9.

Make sure all parts are properly tightened
before you use the weight bench.

8

1

22

22

8

Wide

End

17

Summary of Contents for 831.15600.0

Page 1: ...ent Save this manual for future reference Model No 831 15600 0 Serial No Write the serial number in the space above for reference Serial Number Decal under seat Sears Roebuck and Co Hoffman Estates IL...

Page 2: ...T LIST EXPLODED DRAWING 11 ORDERING REPLACEMENT PARTS Back Cover FULL 90 DAY WARRANTY Back Cover TABLE OF CONTENTS The decal shown here has been placed on the weight bench If the decal is missing or i...

Page 3: ...7 Keep children under 12 and pets away from the weight bench at all times 8 Always wear athletic shoes for foot protec tion while exercising 9 The weight bench is designed to support a maximum of 410...

Page 4: ...fic results you want For your benefit read this manual carefully before using the weight bench If you have questions after reading this manual call 1 800 4 MY HOME 1 800 469 4663 To help us assist you...

Page 5: ...Washer 27 PART IDENTIFICATION CHART See the drawings below to identify small parts used in assembly The number in parentheses by each drawing is the key number of the part from the PART LIST on page 1...

Page 6: ...convenient if you have a socket set a set of open end or closed end wrenches or a set of ratchet wrenches Make Things Easier for Yourself This manual is designed to ensure that the weight bench can b...

Page 7: ...est Frame 5 with two M10 x 70mm Bolts 26 and two M10 Nylon Locknuts 19 Do not tighten the Locknuts yet Insert the Pivot Bracket 6 into the slot in the Frame 1 6 Lubricate the M10 x 85mm Bolt 23 with g...

Page 8: ...S on page 9 for important information about how to get the most benefit from your exercise program Also refer to the accompanying exer cise guide to see the correct form for each exercise Make sure al...

Page 9: ...se will reshape and strengthen your body plus devel op your heart and lungs PERSONALIZING YOUR EXERCISE PROGRAM Determining the exact length of time for each workout as well as the number of repetitio...

Page 10: ...ut List the date the exercises performed the resistance used and the numbers of sets and repetitions completed Record your weight and key body measurements at the end of every month Remember the key t...

Page 11: ...2 1 Front Leg 3 1 Rear Leg 4 2 Stabilizer 5 1 Backrest Frame 6 1 Pivot Bracket 7 1 Backrest 8 1 Seat 9 4 Foam Pad 10 2 Pad Tube 11 4 19mm Square Inner Cap 12 4 50mm Round Outer Cap 13 4 50mm Square In...

Page 12: ...ntact the nearest Sears Service Center throughout the United States and Sears will repair or replace the WEIGHT BENCH EXERCISER free of charge This warranty does not apply when the WEIGHT BENCH EXERCI...

Reviews: