background image

8

6.

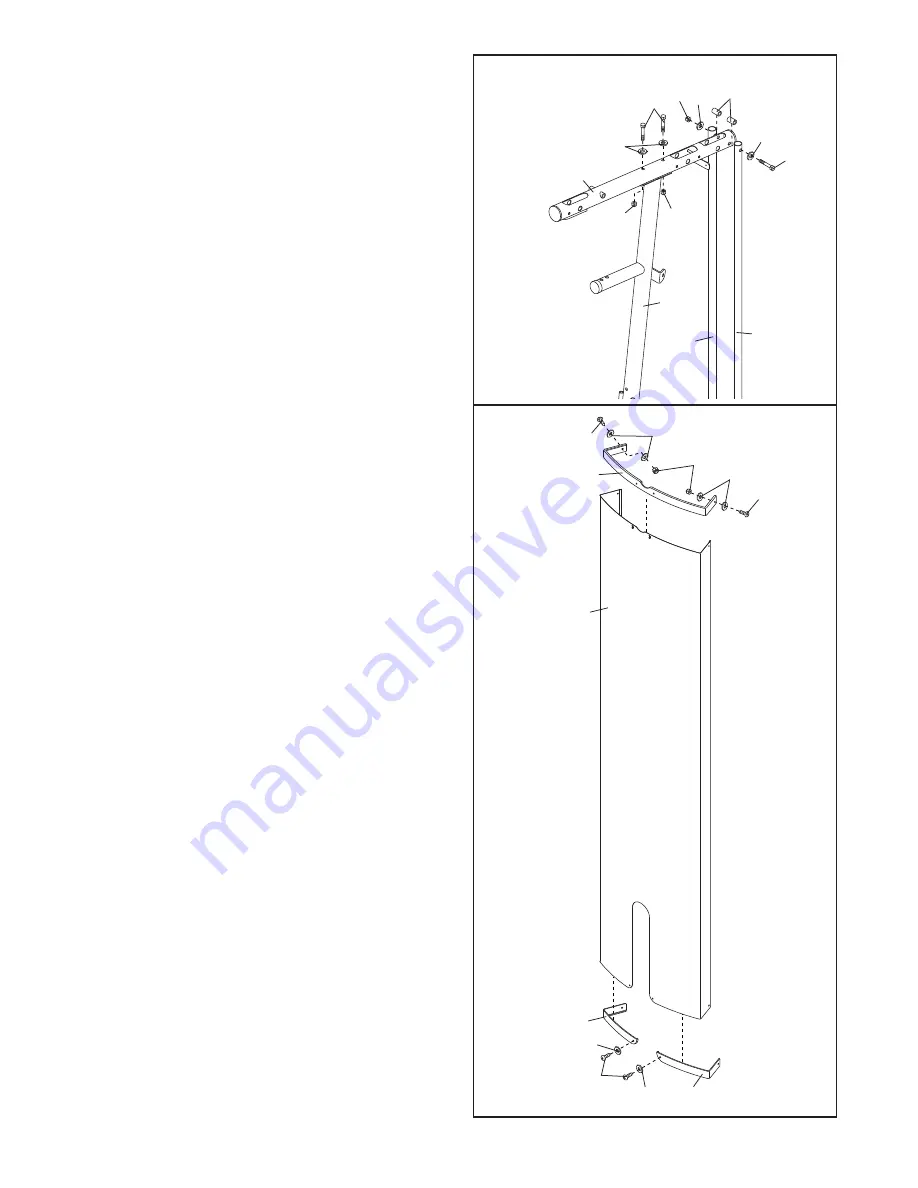
Attach the Top Frame (4) to the Upright (3) with
two M8 x 65mm Bolts (68), two M8 Washers (59),
and two M8 Nylon Locknuts (58). 

Do not tighten

the Locknuts yet.

Attach the Top Frame (4) between the Weight
Guides (21) with an M10 x 155mm Bolt (74), two
M10 Washers (57), two 19mm Spacers (76), and
an M10 Nylon Locknut (56). 

Do not tighten the

Locknuts yet.

7.

Attach the Left Cap (19) and the Right Cap (20)
to the bottom of the Shroud (17) with two M5 x
20mm Self-tapping Screws (64) and two M5
Washers (72).

Attach the Top Cap (18) to the top of the Shroud
(17) with two M6 x 16mm Screws (62), four M6
Washers (82), and two M6 Locknuts (87).

6

7

56 

58 

74 

21 

21 

59 

57 

76 

57 

68 

58 

18 

62 

62 

82 

87 

82 

17 

20 

19 

64 

72 

72 

Summary of Contents for Pro 2220

Page 1: ...te customer satisfaction If you have questions or if there are missing or damaged parts we will guarantee complete satis faction through direct assis tance from our factory TO AVOID DELAYS PLEASE CALL...

Page 2: ...shown Decal 1 Keep hands and fingers clear of this area Decal 2 Decal 1 This decal is placed on both sides of the upright Decal 2 WARNING DECAL PLACEMENT 2 IMPORTANT PRECAUTIONS 3 BEFORE YOU BEGIN 4...

Page 3: ...vent unauthorized use of the weight system see LOCKING THE WEIGHT STACK on page 18 11 Make sure that the cables remain on the pul leys at all times If the cables bind as you are exercising stop immedi...

Page 4: ...is to tone your body build dramatic muscle size and strength or improve your cardiovascular system the weight system will help you to achieve the specific results you want For your benefit read this m...

Page 5: ...setting aside plenty of time and by deciding to make the task enjoyable assembly will go smoothly You may want to assemble the weight system over a couple of evenings Select a Location for the Weight...

Page 6: ...two M8 x 63mm Carriage Bolts 78 and two M8 Nylon Locknuts 58 Do not tighten the Locknuts yet 1 Insert four M8 x 63mm Carriage Bolts 78 up through the Base 1 Note It may be helpful to place a piece of...

Page 7: ...cknuts yet Attach the Seat Frame 6 to the Front Leg 7 in the same manner 5 Slide the two Weight Bumpers 27 onto the Weight Guides 21 Oriente the six Weights 22 with the pin holes on the bottom as show...

Page 8: ...M10 Washers 57 two 19mm Spacers 76 and an M10 Nylon Locknut 56 Do not tighten the Locknuts yet 7 Attach the Left Cap 19 and the Right Cap 20 to the bottom of the Shroud 17 with two M5 x 20mm Self tap...

Page 9: ...r to the Front Leg 7 with the Bolt and an M10 Nylon Locknut 56 Do not overtighten the Locknut the Leg Lever must be able to pivot easily 10 Grease the M10 x 77mm Bolt 79 Attach the Pivot Frame 5 to th...

Page 10: ...acers 52 and an M10 Nylon Locknut 56 Tighten the M10 x 45mm Button Bolt 77 Assemble the Left Arm 10 in the same manner 12 Grease an M10 x 85mm Bolt 67 and two Arm Bushings 44 Attach the Right Arm 9 to...

Page 11: ...ght 3 with an M10 x 63mm Bolt 75 and an M10 Nylon Locknut 56 Make sure the Cable Trap is oriented to hold the Cable in the groove of the V pulley 17 Grease an M8 x 22mm Shoulder Bolt 65 Attach the Arm...

Page 12: ...wo M10 Washers 57 two 12mm Spacers 52 and an M10 Nylon Locknut 56 21 Route the Low Cable 53 over a 90mm Pulley 48 Attach the Pulley and two Half Finger Guards 43 to the Double U Bracket 63 with an M10...

Page 13: ...M10 Nylon Locknut 56 25 Route the High Cable 55 over a 90mm Thin Pulley 47 and down through the Top Frame 4 Attach the Pulley inside of the Top Frame with an M10 x 67mm Bolt 71 an M10 Washer 57 and an...

Page 14: ...ith an M10 x 67mm Bolt 71 two M10 Washers 57 two 12mm Spacers 52 and an M10 Nylon Locknut 56 29 Thread an M12 Nut 84 all the way onto the High Cable 55 Place a Large Washer 85 on top of the Weight Tub...

Page 15: ...n M4 x 20mm Self tapping Screw 69 Insert the Leg Lever Pin through the Leg Lever 8 and the Lock Plate 73 33 Insert the Pad Tube 29 through the Front Leg 7 Slide two Small Foam Pads 28 onto the ends of...

Page 16: ...page Before using the weight system pull each cable a few times to make sure that the cables move smoothly around the pulleys If one of the cables does not move smoothly find and correct the problem...

Page 17: ...vary from the weight setting Use the WEIGHT RESISTANCE CHART on page 19 to find the approximate amount of resistance at each weight station 37 37 26 22 25 90 ATTACHING THE ACCESSORIES TO A PULLEY STA...

Page 18: ...ight stack by inserting the Lock Pin 89 through a Weight Guide 21 and securing the Lock 88 onto the Lock Pin 13 61 14 7 30 USING THE CURL PAD To use the Curl Pad 14 remove the 50mm Round Inner Cap 30...

Page 19: ...the butterfly arm sta tion is for each arm Note The actual resistance at each station may vary due to differences in individual weight plates as well as friction between the cables pulleys and weight...

Page 20: ...guards have been assem bled correctly If the cables have not been correctly routed the weight system will not function properly and dam age may occur The numbers show the correct route for each cable...

Page 21: ...ove the M10 Nylon Locknut 56 and the M10 x 51mm Bolt 66 from the Cable Trap 51 90mm Pulley 48 the two Half Finger Guards 43 and U bracket 45 Reattach the Pulley Cable Trap and Finger Guards to the oth...

Page 22: ...and aerobic exer cise will reshape and strengthen your body plus devel op your heart and lungs PERSONALIZING YOUR EXERCISE PROGRAM Determining the exact length of time for each workout as well as the...

Page 23: ...ut List the date the exercises performed the resistance used and the numbers of sets and repetitions completed Record your weight and key body measurements at the end of every month Remember the key t...

Page 24: ...rew 62 M4 x 20mm Self tapping Screw 69 M10 x 77mm Bolt 79 M5 Washer 72 M8 x 63mm Carriage Bolt 78 M10 Washer 57 M5 x 20mm Self tapping Screw 64 M10 Large Washer 80 M12 Nut 84 Large Washer 85 PART IDEN...

Page 25: ...Large Foam Pad 43 8 Half Finger Guard 44 4 Arm Bushings 45 1 U bracket 46 2 V pulley 47 2 90mm Thin Pulley 48 9 90mm Pulley 49 2 11mm Spacer 50 2 Large Cable Trap 51 1 Cable Trap 52 14 12mm Spacer 53...

Page 26: ...6 35 36 37 15 6 70 70 68 68 68 68 61 58 58 56 57 30 28 34 34 29 28 69 33 30 56 79 52 57 56 52 48 57 30 71 34 28 53 28 69 57 56 52 48 58 58 52 73 86 71 30 78 78 81 43 43 56 48 71 71 8 34 60 57 9 10 7 4...

Page 27: ...6 4 56 57 57 49 52 48 30 52 49 57 57 71 18 17 62 53 43 66 43 48 56 51 58 59 45 19 62 64 20 62 32 16 70 82 56 56 41 57 46 50 41 75 41 58 58 57 46 59 59 68 50 41 75 58 59 57 57 56 52 52 71 58 58 48 56 5...

Page 28: ...of revenues or profits loss of enjoyment or use costs of removal or installation or other consequential damages of whatsoever nature Some states do not allow the exclusion or limitation of incidental...

Reviews: