background image

7

4.

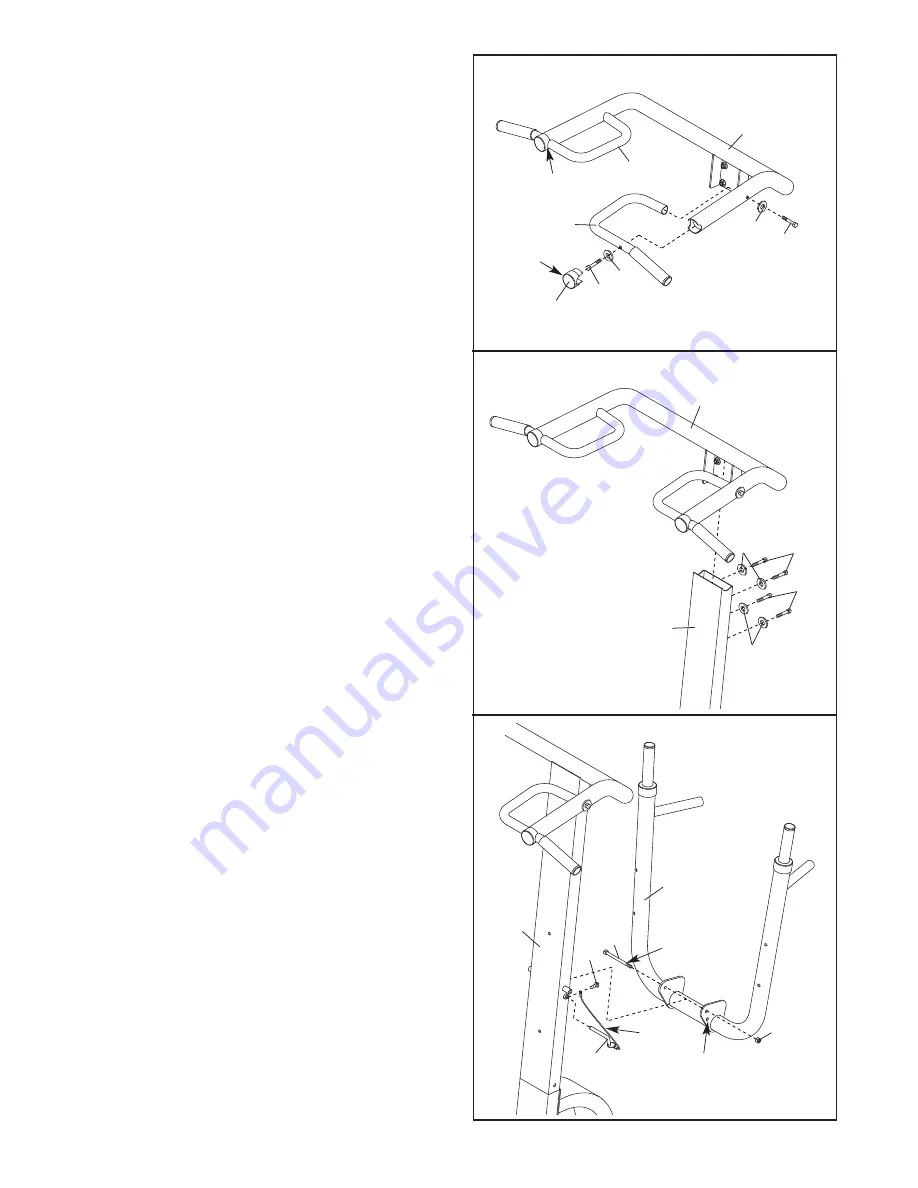
Attach the Left Handle (9) to the Pull-up Arm (7)
with an M10 x 65mm Screw (29), an M10 x
70mm Screw (31), and two M10 Washers (30).
Press a 50mm Round Inner Cap (12) into the
Pull-up Arm. 

Make sure that the thick side of

the Cap is on the side shown.

Attach the Right Handle (8) in the same man-
ner. 

5.

Insert the Pull-up Arm (7) into the Upright (3).
Attach the Pull-up Arm to the Upright with four
M10 x 30mm Screws (20) and four M10 Washers
(30).

20

20

30

30

9

8

7

30

31

30

29

12

Thick

Side

Thick

Side

3

4

6.

Lubricate the M10 x 200mm Bolt (22) with the
included grease. Attach the Dip Arm (6) to the
Upright (3) with the Bolt and an M10 Nylon
Locknut (25).

Do not overtighten the Locknut;

the Dip Arm must be able to pivot easily.

Attach the tether on the Pin (23) to the Upright (3)
with an M4 x 16mm Self-tapping Screw (24).
Insert the Pin into the hole in the Dip Arm (6) and
into the Upright.

7

5

6

23

Hole

Grease

Tether

22

6

3

25

24

Summary of Contents for Pro 315

Page 1: ...s or if a part is damaged or missing PLEASE CONTACT OUR CUSTOMER SERVICE DEPARTMENT DIRECTLY CALL TOLL FREE 1 877 992 5999 Mon Fri 6 a m 6 p m MST ON THE WEB www weiderservice com Model No WEBE1494 1...

Page 2: ...attached in the center of this manual Remove the PART IDENTIFICATION CHART and PART LIST EXPLODED DRAWING before begin ning assembly The decal shown here has been placed on the exer cise rack in the...

Page 3: ...at all times 6 Inspect and properly tighten all parts regular ly Replace any worn parts immediately 7 Always wear athletic shoes for foot protec tion while exercising 8 The exercise rack is designed t...

Page 4: ...se rack If you have questions after reading this manual see the front cover of this manual To help us assist you please note the product model number and serial number before calling The model number...

Page 5: ...PART IDENTIFICATION CHART Place all parts in a cleared area and remove the packing materials Do not dispose of the packing materials until assembly is completed Tighten all parts as you assemble them...

Page 6: ...hten the Locknuts yet Insert the Upright 3 into the Upright Base 2 Attach the Upright and Support 5 to the Upright Base with four M10 x 30mm Screws 20 Tighten the M10 Nylon Locknuts 25 used in steps 1...

Page 7: ...up Arm to the Upright with four M10 x 30mm Screws 20 and four M10 Washers 30 20 20 30 30 9 8 7 30 31 30 29 12 Thick Side Thick Side 3 4 6 Lubricate the M10 x 200mm Bolt 22 with the included grease At...

Page 8: ...the exercise rack is used 3 11 21 21 15 15 6 7 Attach an Arm Pad 10 to the Dip Arm 6 with two M6 x 65mm Screws 21 and two M6 Washers 15 Wet a Short Foam Grip 16 and the indicated handle on the Dip Arm...

Page 9: ...rack is used Replace any worn parts immediate ly The exercise rack can be cleaned with a damp cloth and a mild non abrasive detergent Do not use solvents ADJUSTING THE DIP ARM To adjust the Dip Arm 6...

Page 10: ...ing and aerobic exer cise will reshape and strengthen your body plus devel op your heart and lungs PERSONALIZING YOUR EXERCISE PROGRAM Determining the exact length of time for each workout as well as...

Page 11: ...ut List the date the exercises performed the resistance used and the numbers of sets and repetitions completed Record your weight and key body measurements at the end of every month Remember the key t...

Page 12: ...ome small parts may have been pre attached If a part is not in the parts bag check to see if it has been pre attached PART IDENTIFICATION CHART M10 x 90mm Bolt 19 M10 x 30mm Screw 20 M10 x 200mm Bolt...

Page 13: ...81...

Page 14: ...p Arm 8 1 Right Handle 9 1 Left Handle 10 2 Arm Pad 11 1 Backrest 12 2 50mm Round Inner Cap 13 6 Long Foam Grip 14 8 28mm Round Inner Cap 15 6 M6 Washer 16 2 Short Foam Grip 17 2 50mm Round Arm Cap 18...

Page 15: ...12 8 29 13 14 31 7 9 31 29 13 14 21 22 25 24 23 3 20 20 25 25 19 13 14 28 1 20 25 5 19 20 30 30 30 21 16 13 14 18 14 13 14 17 17 10 16 18 14 10 21 6 30 30 30 30 30 30 30 15 15 15 15 15 15 27 EXPLODED...

Page 16: ...p charge This warranty does not extend to any product or dam age to a product caused by or attributable to freight damage abuse misuse improper or abnormal usage or repairs not provided by an ICON aut...

Reviews: