The WeiShi No.2000 User Manual
Table of Contents
1.
INSTRUMENT FUNCTION..............................................................................................2
2.
KEYS AND DISPLAY.......................................................................................................3
2.1
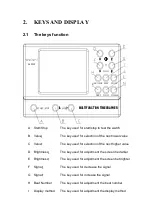
The keys function............................................................................................................3
2.2
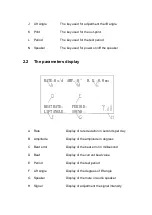
The parameters display................................................................................................... 4
2.3
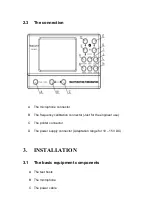
The connection................................................................................................................5
3.
INSTALLATION................................................................................................................5
3.1
The basic equipment components...................................................................................5
3.2
The instrument installation............................................................................................. 6
3.2.1
The power supply installation
....................................................................................6
3.2.2
The microphone connection
......................................................................................6
3.2.3
The printer connection
............................................................................................. 6
4.
OPERATION...................................................................................................................... 6
5.
THE USAGE OF KEYS.....................................................................................................7
5.1
The start and stop key..................................................................................................... 7
5.2
The value key
↓
............................................................................................................7
5.3
The value key
↑
............................................................................................................7
5.4
The brightness key
↓
.................................................................................................... 7
5.5
The brightness key
↑
.................................................................................................... 7
5.6
The signal key
↓
........................................................................................................... 8
5.7
The signal key
↑
........................................................................................................... 8
5.8
The beat number key.......................................................................................................8
5.9
The display mode key..................................................................................................... 8
5.10 The lift angle key............................................................................................................ 8
5.11 The printer key................................................................................................................ 8
5.12 The period key.................................................................................................................9
5.13 The speaker key...............................................................................................................9
6.
THE PARAMETERS......................................................................................................... 9
6.1
The beat number (Frequency number) Manual and Automatic selection......................9
6.2
The lift angle................................................................................................................. 10
6.3
The test period...............................................................................................................10
7.
THE TECHNICAL DATA...............................................................................................10
8.
THE INSTRUMENT MATAINCE..................................................................................11
8.1
There is no reaction for the instrument after power on................................................ 11
8.2
The instrument can start the test state after the sound of “DI”, but it can't work after
installing the sensor...................................................................................................................11
8.3
The LED signal is in red, but the shown lines is scattered or appear many lines........11


