background image

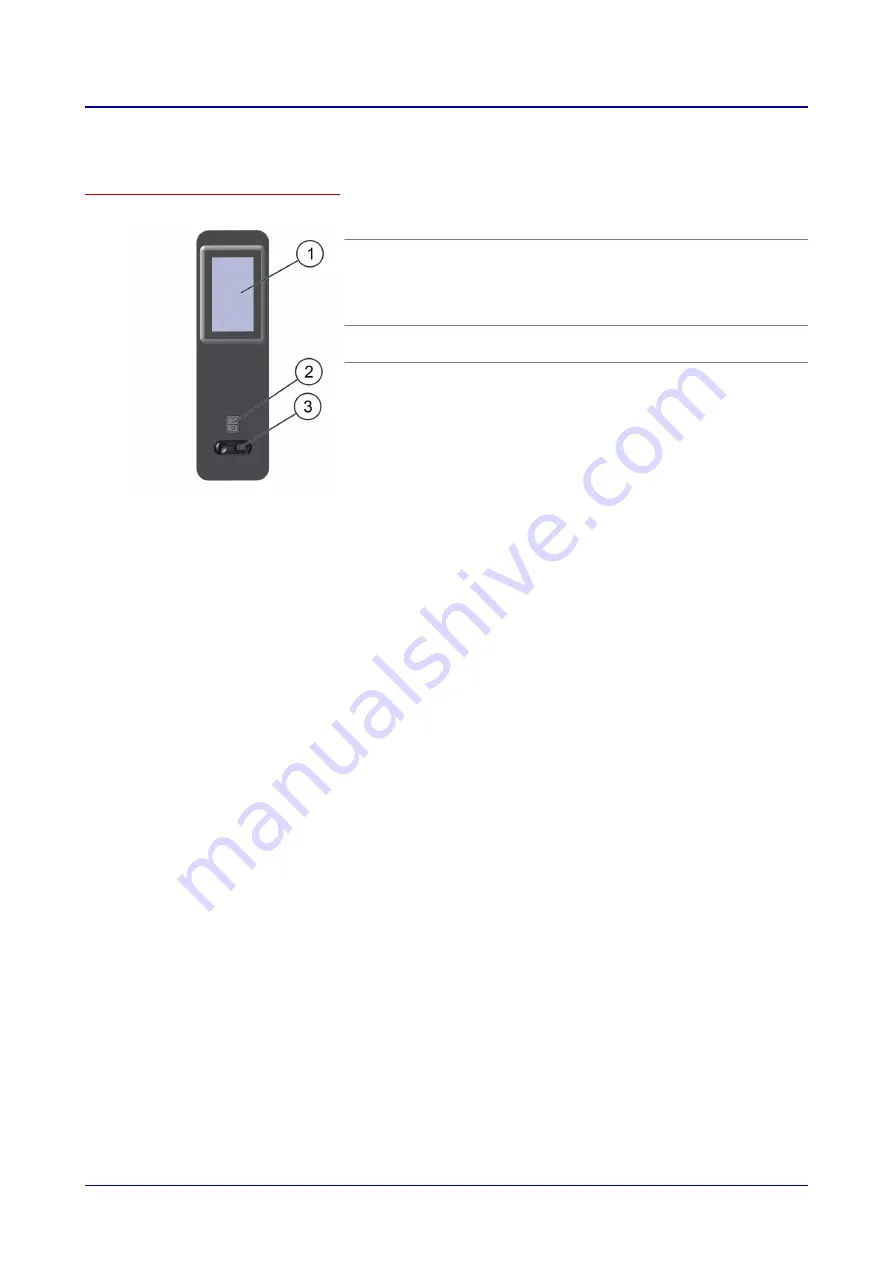
2.3  Layout and function of the operating panel

Layout and elements of the operating panel

Item

Name

Function

1

Full touch

screen display

Central controls for appliance

Appliance operated by touching icons

on the control panel (full touch screen

display)

Status displays

2

Appliance

ON/OFF switch

Switches the combi oven on and off

3

USB port

For connecting a USB stick

2 Design and function

User manual

12

Summary of Contents for Convotherm maxx Cmx eT 10.10 ES

Page 1: ...Combi oven Cmx eT 6 10 ES Cmx eT 10 10 ES User manual Original ENG Advancing Your Ambitions ...

Page 2: ......

Page 3: ... 1 2 Loading capacity for the combi oven 28 4 2 Operating principles and instructions for cooking 29 4 2 1 Turning the combi oven on and off 29 4 2 2 How to cook 31 4 3 Specific Cooking Instructions 33 4 3 1 Opening and closing the appliance door safely 33 4 3 2 Loading and removing food 35 4 3 3 Putting away and retrieving the core temperature probe 37 4 3 4 Using a USB stick 38 4 3 5 Inserting a...

Page 4: ...e hygienic plug in gasket 63 5 3 5 Removing and fitting the interior glass panel of the triple glass door 64 5 3 6 Removing and fitting the intermediate glass panel of the triple glass door 66 6 Servicing procedures 68 6 1 Basic principles for servicing 68 6 1 1 Contact customer service 68 6 1 2 Warranty information 69 6 1 3 Servicing schedule 70 6 2 Troubleshooting 71 6 2 1 Error codes 71 6 2 2 E...

Page 5: ...ve complies with the following directives and the requirements in the following European standards 2006 42 EC EC CE Machinery Directive DIN EN 60335 2 42 2012 The safety objectives of European Directive 2014 35 EU Low Voltage Directive have been met in ac cordance with Annex I Section 1 5 1 of the Machinery Directive 2014 53 EU CE Radio Equipment Directive EN 301 489 1 V2 2 3 2019 EN 301 489 17 V3...

Page 6: ...nd laws but also commits us to continuous improvement of our green credentials We have developed a quality and environmental management system in order to guarantee the con tinued manufacture of high quality products and to be sure of meeting our environmental targets This system satisfies the requirements of ISO 9001 2015 and ISO 14001 2015 Environmental protection procedures We observe the follo...

Page 7: ...eries eT easyTouch controls numbers xx yy Appliance size ES Electric appliance with water injec tion N for appliances with an NSK certifi cate 3 Electrical values 4 Serial number Element Meaning Heating method Electric appliance T Steam generation meth od Injection S Appliance size 6 10 1 10 10 3 Year of manufacture 2020 20 2021 21 Month of manufacture January 01 February 02 March 03 Sequential nu...

Page 8: ...he accessory 1 5 About this user manual Who should read this manual Name of target group Tasks Owner of the combi oven or owner s member of staff who is responsible for the appliance and for the operating personnel Bears the responsibility for transferring knowledge to all other users about how to work safely and correctly with the appliance during opera tion cleaning and servicing Is responsible ...

Page 9: ...ual must always be observed when performing tasks that go beyond merely operating the software Parts of this document that must be read without fail If you do not follow the information in this document you risk potentially fatal injury and property dam age To guarantee safety all people who work with the combi oven must have read and understood the following parts of this document before starting...

Page 10: ...ng Steaming Poaching Grilling Gratinate Stew Braising Baking Defrosting Cooking profiles and cookbook A cooking profile is a combination of cooking parameters such as cooking temperature and cooking time You can create your own cooking profiles and manage them in the Cookbook You can also find ready made cooking profiles in the Cookbook Oven cleaning The following options are available for cleanin...

Page 11: ...he cooking chamber Separates the fan compartment from the cooking chamber Protects against touching the fan 7 Core temperature probe optional Measures the core temperature of the food being cooked 8 Rack Holds standard sized food containers 9 Door drip tray Collects condensate running down the inside of the appliance door 10 Oven light LED Illuminates the cooking chamber 11 Cooking chamber Contain...

Page 12: ...unction 1 Full touch screen display Central controls for appliance Appliance operated by touching icons on the control panel full touch screen display Status displays 2 Appliance ON OFF switch Switches the combi oven on and off 3 USB port For connecting a USB stick 2 Design and function User manual 12 ...

Page 13: ...r reference Pass on the user manuals included in the customer documentation with the combi oven if it changes ownership Working with the combi oven Follow the instructions below Only those persons who satisfy the requirements stipulated in this user manual are permitted to use the combi oven Only use the combi oven for the specified use Never under any circumstances use the combi oven for other pu...

Page 14: ... fixed properly in place The manufacturer regulations for operating and servicing the combi oven must be observed The combi oven must not be loaded over the maximum permissible loading weight for the given model see Loading capacity for the combi oven on page 28 Requirements relating to the operating environment of the combi oven Specified operating environment for the combi oven The ambient tempe...

Page 15: ...warning signs Obligatory warning signs The following warning signs must be attached to the combi oven and optional accessories in the area indicated so as to be easily visible at all times Range Warning sign Description 1 High voltage electric shock hazard warning There is a risk of electric shock from live parts if the safety cover is opened 2 Hot steam and vapour hazard warning There is a risk o...

Page 16: ...liquid foods can result in scalds if the upper shelf levels are loaded with liquids or foods that produce liquid during cooking Do not use shelf levels that lie above your sightline for liquid foodstuffs or food that will liquefy during cooking 2 Warning of corrosive cleaning agents injected into oven There is a risk of chemical burns or irritation to skin eyes and respira tory system from contact...

Page 17: ...that generally exist in the kitchen environment in accordance with national regulations and requirements please refer to General hazards on page 18 Working with the safety devices see Safety devices on page 23 Using personal protective equipment see Personal protective equipment on page 26 Hygiene requirements respecting national regulations and requirements Dealing with the hazards arising specif...

Page 18: ...the water to vaporize rapidly How can I avoid the hazard Wear specified protective clothing in particular protective gloves Do not spray into hot fat Spraying water onto hot surfaces In the kitchen water spray and splashing for instance when using a water jet or spray can cause the following hazards Risk of scalding from splashing water When If water is sprayed onto hot surfaces e g into a cooking...

Page 19: ... How can I avoid the hazard Wear personal protective equipment Do not let cleaning agents come into contact with your skin or eyes Do not breathe in spray Always use the specified cleaning products Moving heavy loads In the kitchen lifting heavy weights can result in tiredness discomfort and problems with the moving equipment Risk of injury from overstressing your body When When lifting heavy cont...

Page 20: ...ty to flammable materials On top of the appliance 2 Hot surfaces Air vent ventilation port appliance door and cooking chamber 3 Hot steam vapour Air vent ventilation port cooking chamber 4 Hot liquids Cooking chamber 5 Contact with cleaning agents Cooking chamber cleaning fluid connection 6 Spraying down the appliance with water Appliance case cover for electrical parts 7 Break in the cold chain n...

Page 21: ...ing liquid or liquefying food into shelf levels that allow a proper view inside the container and always hold horizontally when removing Insert the food containers correctly as stipulated in Positioning the food containers on page 27 To prevent spillage of hot liquid place a cover on food containers after removing from the appliance and before moving them further Wear specified protective clothing...

Page 22: ...wing hazards if food is eaten Risk from microbiological contamination of food When When cooking is manually interrupted When the food cold chain is broken by loading the cooking chamber in advance When cooking is interrupted because of a power failure How can I avoid the hazard Make sure that the cold chain is not broken Never deliberately interrupt the cooking process Do not store food temporaril...

Page 23: ...ks indenta tions etc and replace it if any are found Magnetic door switch electri cal door sensor When the appliance door is opened the switch stops rotation of the fan wheel comes to a stop after a few seconds operation of the heating element Distribution of the clean ing products by the fully automatic oven cleaning system Prompt to close the appli ance door Check magnetic door switch at low tem...

Page 24: ...t in the event of a fault Please contact an authorized service company to reset the safety thermostat 9 no picture Restart after power failure in case clean ing agent was left in the appliance Restarts fully automatic oven cleaning in a defined state af ter power failure None 10 installed by customer Disconnector Installed by the customer close to the appliance easi ly visible and accessible all p...

Page 25: ...bligations on page 17 Essentially performs organizational tasks such as Entering the cooking profile data Editing existing cooking profiles in the cookbook Developing new cooking profiles Adjusting appliance settings May also perform all user actions if appli cable User Semi skilled Trained in how to operate the combi oven Works under supervision Knows the regulations associ ated with handling hea...

Page 26: ...ent Oven cleaning of any kind ConvoClean forte ConvoClean new ConvoCare K con centrate The protective equipment required will depend on the cleaning products being used and the selec ted cleaning method and may include Breathing mask Safety goggles Protective gloves Protective clothing apron The EC safety datasheet for the relevant cleaning agent contains a more precise specification of these item...

Page 27: ...he containers or the shelf grill must be inser ted as far as they will go BETWEEN the two arms of each U rail 1 The containers or the shelf grill must be inser ted in the U rails at the same height on the left and right sides The containers or shelf grill must NOT rest on the top arm of a U rail Containers must not be placed on the shelf grill 4 Cooking procedures User manual 27 ...

Page 28: ...10 10 Maximum load per appliance kg 30 50 Maximum load per shelf kg 15 15 Maximum number of food containers for cooking GN rack shelf spacing 68 mm 6 10 10 10 Number of GN 1 1 food containers Qty 7 11 Number of GN 1 1 food containers when making full use of the shelf spacing Qty 6 10 4 Cooking procedures User manual 28 ...

Page 29: ...o signs of damage are fixed securely are not leaking from any point and appear safe and in working order on visual inspection The Requirements relating to the operating condition of the combi oven on page 14 are met The Requirements relating to the operating environment of the combi oven are met All warning signs are in their designated position Rules for safe operation of the appliance To avoid h...

Page 30: ...ecified in the cleaning and servicing schedule 2 Switch off the combi oven 3 Leave the appliance door ajar in order to let moisture es cape Switching off the combi oven before prolonged breaks in use Switch off the water and power on site before prolonged breaks in use 4 Cooking procedures User manual 30 ...

Page 31: ...g chamber The oven drain is not blocked or clogged with any residues The filter is fitted in place on the oven drain The interior and intermediate glass panels of the appliance door are fitted properly The suction panel is fitted and secured in place The USB sliding cover is covering the USB port If the appliance sits on an open stand there is no hot food in the stand giving off steam The racks ar...

Page 32: ...ait for the cooking operation to finish 7 An audible signal is given when the cooking operation is finished Follow the prompts displayed by the software 8 Open the appliance door 9 Take out the food 10 Close the appliance door again 4 Cooking procedures User manual 32 ...

Page 33: ... that the appliance is secured against slipping if placed on a work surface Opening the appliance door safely 1 Turn the door handle to the right Result The appliance door is released 2 Risk of scalding from hot steam and vapour Always open the appliance door slowly and carefully Always use the latch position of the appliance door Open the appliance door by the door handle as far as its latch posi...

Page 34: ...e door with a gentle slam You can make sure that the appliance door is properly closed when a cooking profile or cleaning profile is in progress by checking that the cooking profile or cleaning profile is still running 4 Cooking procedures User manual 34 ...

Page 35: ... 33 Requirements The racks are fitted and secured The weight of the food does not exceed the maximum loading weight The food containers have the correct GN dimensions to fit Placing food in the combi oven 1 Open the appliance door 2 Risk of scalding from hot liquids Makes sure you insert the containers baking trays and shelf grills correctly into the right rails as specified in Positioning the foo...

Page 36: ...Removing food 1 Open the appliance door 2 Keep the food containers horizontal when removing 4 Cooking procedures User manual 36 ...

Page 37: ... core temperature probe must be stowed away when it is not needed for the cooking operation Otherwise the probe risks getting damaged Putting away the core temperature probe 1 Slide the core temperature probe into the holder on the left hand rack NOTICE Keep the cable tidy Do not let the cable get trapped between the appliance door and the hygienic plug in gasket when closing the ap pliance door R...

Page 38: ...urpose of the USB sliding cover The sliding cover protects the USB port so that no water vapour can get into the control electronics during cooking or cleaning During cooking and cleaning make sure that any USB stick has been removed and that the USB port is closed by the sliding cover Inserting the USB stick 1 Slide the sliding cover on the USB port to the left 2 Plug in the USB stick If the USB ...

Page 39: ...perations Opening and closing the appliance door safely 33 Putting away and retrieving the core temperature probe 37 Requirements All food containers and other accessories used for cooking have been removed from the cooking chamber Remove the core temperature probe option from the left hand rack Removing the rack 1 Lift up 1 the rack until you are able to pivot it away 2 from the two bottom fixing...

Page 40: ...n fully over the bottom fixing studs 2 Insert a food container just to check that you have fitted both racks correctly Check that the food container is sitting correctly in the rails as specified in Positioning the food containers on page 27 Stow away the core temperature probe option on the left hand rack 4 Cooking procedures User manual 40 ...

Page 41: ...en cleaning only us ing rinse aid from con nected canister ConvoCare A fully automatic process in which the temperature program length use of rinse aid and rinsing are software controlled The rinse aid is dispensed auto matically into the cooking chamber from the connected canister As an extra cleaning process after fully automatic oven cleaning if some of the dirt still remains If there is a whit...

Page 42: ...Use an external water spray ConvoClean new or forte Outside of appliance case in cluding control panel exterior Clean by hand with a soft cloth Rules to be observed Never clean the outer case of the appliance with a water jet or water spray Disconnect the appliance from the power supply when clean ing the outside of the appli ance Standard household stainless steel cleaner Containers baking trays ...

Page 43: ...soft cloth and cleaning agent Wipe off thoroughly with a soft cloth and clean water Dry with a soft cloth ConvoClean new or forte Monthly cleaning tasks More frequent cleaning may be necessary depending on the degree of soiling What must be cleaned Procedure Cleaning agents Intermediate glass panel of the triple glass door How to clean the intermediate glass panel of the triple glass door on page ...

Page 44: ...trays shelf grills or other accessories Fully automatic oven cleaning Oven cleaning using only rinse aid ConvoCare cleaning profile Cleaning fluid canisters located under the combi oven and con nected to the cleaning system Manual aftercare of cooking chamber interior Spray bottle Standard household stainless steel cleaner Caring for the external surfaces of the combi oven Common household glass c...

Page 45: ...ConvoCare Canister Connect the canisters containing the cleaning agents to the combi oven cleaning system Before every fully automatic oven cleaning pro gram check that there is enough cleaning agent in each canister Do not store the spare canisters containing cleaning agents in the immediate vicinity of the combi oven but keep in dedicated storage areas away from food ConvoClean new ConvoClean fo...

Page 46: ... have been removed from the cooking chamber The oven drain is not blocked or clogged with any residues The filter is fitted in place on the oven drain The interior and intermediate glass panels of the appliance door are fitted properly The suction panel is fitted and secured in place The USB sliding cover is covering the USB port The appliance door is closed You have provided the necessary cleanin...

Page 47: ...e prompts displayed by the software 7 Open the appliance door and check the cleaning result The cooking chamber should look clean and not smell of leftover food or cleaning agents Check the cooking chamber for any foreign matter that may have entered with the rinse water Remove any foreign matter If the cleaning result is not good enough either clean and rinse the cooking chamber manually or run a...

Page 48: ...esidues The filter is fitted in place on the oven drain The interior and intermediate glass panels of the appliance door are fitted properly The suction panel is fitted and secured in place The USB sliding cover is covering the USB port The appliance door is closed How to clean the cooking chamber without using cleaning agents 1 Select the cleaning profile and start the cleaning process 2 Follow t...

Page 49: ...xpec ted cleaning result has been achieved Check the cooking chamber for any foreign matter that may have entered with the rinse water Remove any foreign matter If necessary either clean and rinse the cooking cham ber manually or run another cleaning profile 8 Leave the appliance door ajar to let the cooking chamber dry out 5 Cleaning procedures User manual 49 ...

Page 50: ...ts in the cooking chamber All containers baking trays shelf grills and any other accessories have been removed from the cooking chamber The oven drain is not blocked or clogged with any residues The filter is fitted in place on the oven drain The interior and intermediate glass panels of the appliance door are fitted properly The suction panel is fitted and secured in place The USB sliding cover i...

Page 51: ...e 45 The oven drain is not blocked or clogged with any residues The USB sliding cover is covering the USB port The racks are removed How to clean the cooking chamber by hand 1 Remove the suction panel 2 Use the spray bottle to spray cleaning agent around the cooking chamber on the suction panel and in the area behind the suction panel 3 Leave the cleaning agent to work for 10 to 20 minutes 4 Rinse...

Page 52: ...ilable as the necessary cleaning product You have several at least three soft clean cloths available for use How to clean the interior glass panel of the triple glass door 1 Open the appliance door and remove the interior glass panel 2 Use a soft clean cloth and the cleaning product to clean both sides of the interior glass panel and the external sur face of the exterior glass panel of the triple ...

Page 53: ...hold glass cleaner available as the necessary cleaning product You have several at least three soft clean cloths available for use The appliance door is open and the interior glass panel of the triple glass door has been removed How to clean the intermediate glass panel of the triple glass door 1 Remove the intermediate glass panel 2 Use a soft clean cloth and the cleaning product to clean both si...

Page 54: ...The oven drain is not blocked or clogged with any residues The left hand rack has been removed How to clean the cooking chamber behind the suction panel 1 Remove the suction panel 2 Use the spray bottle to spray the cleaning agent onto all sides of the suction panel and onto the area behind the suction panel 3 Leave the cleaning agent to work for 10 to 20 minutes 4 Rinse out the suction panel from...

Page 55: ...0 C after its last use You have household detergent available as the necessary cleaning product You have several at least three soft clean cloths available for use How to perform intensive cleaning of the hygienic plug in gasket 1 Open the appliance door and remove the hygienic plug in gasket 2 Use a soft clean cloth and the cleaning product to clean the hygienic plug in gasket in a sink 3 Use a s...

Page 56: ...he ConvoCare rinse aid in the canister To avoid excessive foaming follow the procedure below when mixing the ConvoCare K concentrate with soft water to produce the rinse aid 1 Open the empty canister 1 2 Fill the canister with soft water 2 until it reaches just be low the 10 litre mark 4 3 Then pour 0 33 l of the ConvoCare K concentrate 3 carefully into the canister 1 4 Check the fluid level in th...

Page 57: ...ister 2 Locate the canister that is connected by the green tube to the rinse aid connector F underneath the appli ance on the left hand side Unscrew the green supply tube 2 plus suction nozzle from the located canister Remove the empty rinse aid canister 5 Cleaning procedures User manual 57 ...

Page 58: ...ructed 4 Check the position of the canisters The surface on which the canisters sit must not lie above the level at which the appliance feet meet the appliance case The surface on which the canisters sit must not lie more than 1 metre below this level Check that you have connected the tube to the correct connector The rinse aid must be attached to appliance connec tor F The colour green is used th...

Page 59: ...re Materials required ConvoClean new or ConvoClean forte replacement canister Replacing the cleaning agent canister 1 Remove the seal on the replacement canister for the ConvoClean new or ConvoClean forte cleaning agent 2 Locate the canister that is connected by the red tube to the cleaning agent connector G underneath the ap pliance on the left hand side Unscrew the red supply tube 2 plus suction...

Page 60: ...ructed 4 Check the position of the canisters The surface on which the canisters sit must not lie above the level at which the appliance feet meet the appliance case The surface on which the canisters sit must not lie more than 1 metre below this level Check that you have connected the tube to the correct connector The cleaning agent must be attached to appliance connector G The colour red is used ...

Page 61: ...ening and closing the appliance door safely 33 Inserting and removing racks 39 Materials required Wide flat blade screwdriver Requirements The appliance is off and entirely without power The cooking chamber has cooled down to 60 C after its last use The left hand rack has been removed Removing the suction panel 1 Use the tool to release the fasteners top and bottom 2 Pull the suction panel away sl...

Page 62: ...tting the suction panel 1 To fit the suction panel follow the steps for removal in the reverse order 2 Make sure that the top and bottom fasteners are secured in place 5 Cleaning procedures User manual 62 ...

Page 63: ...cooking chamber has cooled down to 60 C after its last use The appliance door is open Removing the hygienic plug in gasket 1 Pull off the hygienic plug in gasket from around the mouth of the appliance door starting from the corners Fitting the hygienic plug in gasket 1 Refit the hygienic plug in gasket first in the four corners starting from one of the top corners 2 Once all the corner sections ar...

Page 64: ...e required You need to know these operations Opening and closing the appliance door safely 33 Requirements The cooking chamber has cooled down to ambient temperature after its last use Your hands are clean and dry so that you can grip the interior glass panel securely Removing the interior glass panel 1 Open the appliance door 2 Rotate upwards the catch for the interior glass panel on the top righ...

Page 65: ...e door drip tray and place it down safely Fitting the interior glass panel 1 To fit the interior glass panel follow the steps for removal in the reverse order 2 Check that the spring clips are securing the interior glass panel again correctly at the top left and right and that the catch on the top right bracket is closed The appliance door cannot close until this is the case 5 Cleaning procedures ...

Page 66: ...has cooled down to ambient temperature after its last use Your hands are clean and dry so that you can grip the intermediate glass panel securely The appliance door is open and the interior glass panel of the triple glass door has been removed Removing the intermediate glass panel 1 Unscrew the retaining screw in the top right bracket us ing the Allen key Pull the top right bracket away from the i...

Page 67: ...r drip tray and place it down safely Fitting the intermediate glass panel 1 Make sure you fit the intermediate glass panel the correct way round The two notches in the intermediate glass panel face upwards and have a different contour 2 To fit the intermediate glass panel follow the steps for re moval in the reverse order 5 Cleaning procedures User manual 67 ...

Page 68: ... e mail info convotherm de Internet www convotherm com www welbilt com Application support Hotline 49 0 8847 67 899 e mail convotherm chefshotline welbilt com Sales Phone appliances accessories 49 0 8847 67 890 e mail appliances accessories convotherm order welbilt com Phone spare parts 49 0 8847 67 821 49 0 8847 67 822 49 0 8847 67 827 e mail spare parts convotherm spares welbilt com Customer ser...

Page 69: ...com 6 1 2 Warranty information Warranty information Warranty claims involving your combi oven will only be honoured if the unit has been installed by a qualified Service Engineer from an authorized service company in accordance with the instructions in the installation manual The manufacturer must be in receipt of a fully completed checklist enclosed with the appliance before a warranty claim can ...

Page 70: ...k Servicing tasks that the user can perform What must be serviced When Parts required Replacing the hygienic plug in gasket If the hygienic plug in gasket is cracked or greasy As listed in the spare parts list 1 hygienic plug in gasket Keeping the core temperature probe option in working order Perform a weekly test in boiling water checking the reading on the temperature display Servicing tasks th...

Page 71: ...at the bottom of the appliance Clear air intake in base of appliance E10 Error from water filter Replace the water treatment cartridge E58 0 Error from cleaning agent dispensing pump Fill canister with the correct cleaning agent and restart the appliance Repeat as necessary until the tubes are filled with cleaning agent E59 0 Error from rinse aid dispensing pump Fill canister with rinse aid and re...

Page 72: ...tic oven cleaning may not be possible or only have limited functions available The core temperature probe option may not work Only those functions can be selected that will not be impaired by the active fault in question Functions available in emergency mode The following table lists the errors under which the appliance can still work albeit with limitations in emergency mode when the error cannot...

Page 73: ... only affects fully automatic oven cleaning using connected canisters E59 0 All functions Error only affects fully automatic oven cleaning using connected canisters E61 0 All functions EXCEPT Fully automatic oven cleaning Only affects the cleaning process E62 0 All functions EXCEPT Fully automatic oven cleaning Only affects the cleaning process E63 0 Convection Cleaning not possible E72 x All func...

Page 74: ...contact with this water Blockage or constriction in the drain pipe or wastewater system Check the drain pipe and custom er s wastewater system and clean out if necessary Fit funnel waste trap if necessary Permanent drain connection on appliances equipped with fully automatic oven cleaning Air vent blocked or covered Remove obstruction Appliance drain clogged Clean appliance drain Water standing in...

Page 75: ...s automatically if the downtime is less than 5min Any build up of bacteria in the food is prevented During a fully automatic cleaning operation After a power failure the cleaning process resumes automatically in a defined state No cleaning product mix is left in the cooking chamber 6 Servicing procedures User manual 75 ...

Page 76: ...ng the appliance door safely 33 Removing and fitting the hygienic plug in gasket 63 Spare parts contents Spare part required as listed in the spare parts list 1 hygienic plug in gasket Requirements The cooking chamber has cooled down to 60 C after its last use The appliance door is open The newly supplied gasket has been checked for damage and is intact Replacing the hygienic plug in gasket To rem...

Page 77: ......

Page 78: ...tional technical documentation can be found in the download center at www convotherm com Welbilt offers fully integrated kitchen systems and our products are backed by KitchenCare aftermarket parts and service Welbilt s portfolio of award winning brands includes Cleveland Convotherm Crem Delfi eld fit kitchenSM Frymaster Garland Kolpak Lincoln Manitowoc Merco Merrychef and Multiplex 9762801_00 ENG...

Reviews: