background image

SERVICIO POSVENTA

866-694-5085

USA

16

platinumcs@drivemedical.com

Your details 

Name

Address

WARRANTY CARD
ADJUSTABLE ROLLATOR

E mail

Date of Purchase*

We reccomend you keep the receipt with this warranty card

Location of purchase

Description of malfunction:

If 

after contacting the manufacturer 

you are requested to return the faulty 

product please return the completed 

warranty card together with it.

Drive Medical

99 Seaview Boulevard

Port Washington, NY 11050, USA

866-694-5085

2

YEAR WARRANTY


866-694-5085

platinumcs@drivemedical.com

AFTER SALES SUPPORT 

Phone lines available 

Monday to Friday, 

8:30am - 8pm.

MODEL: 7734     02/2016

Summary of Contents for 7734

Page 1: ...AFTER SALES SUPPORT 866 694 5085 USA 1 platinumcs drivemedical com Adjustable Rollator Andador ajustable User Guide Manual del usuario English Page 2 Español Página 17 ...

Page 2: ...m Contents Introduction 3 Parts List 4 Parts Diagram 5 SafetyPrecautions 6 Assembly 7 Height Adjustment 8 Operation 9 Loop Lock Operation 9 Measuring 10 Preparing to Sit 11 Preparing to Stand 12 Preparing to Walk 13 Maintenance 14 Hand Brake Adjustment 14 Warranty 15 ...

Page 3: ...ring and are manufactured to meet our own highly rigid specifications and will surpass all your expectations In this manual you will find the assembly use and safety instructions for the adjustable rollator The rollator is suitable for a single user with limited mobility The rollator is ideal for indoor and outdoor use Adjustable Rollator Adjustable Rollator Introduction ...

Page 4: ...medical com Parts List Adjustable Rollator Hand Grips 2 Loop Locks 2 Handle Height Adjustment Knobs 2 Backrest 1 Folding Hinge Seat 1 Hanging Bag 1 Leg Height Adjustment Knobs 4 Rear Wheels With Locks 2 Front Swivel Wheels 2 1 2 3 4 5 6 7 8 9 10 Parts List ...

Page 5: ...AFTER SALES SUPPORT 866 694 5085 USA 5 platinumcs drivemedical com 1 2 3 4 5 6 7 8 9 10 Adjustable Rollator Parts List Parts Diagram ...

Page 6: ... locks are released the wheels should turn freely 4 Always lock loop locks before sitting and do not use seat when unit is on an incline or uneven ground 5 Replace tires when significantly worn or damaged 6 Do not have anyone push you while you are seated on the Rollator This is a walking aid only and is not to be used as a transportation device 7 Check that the nuts and bolts are secure on a regu...

Page 7: ... 3 Attach back legs with brakes using the same process making sure the wheels are on the outside of the rollator and are at the same height as the front wheels Figure 2 Affix brake cable to the black portion of the leg using the S shaped clamp provided 4 Insert handle tube into frame and set to desired height Secure in placed using tightening knob threading the knob in from the outside Repeat for ...

Page 8: ...eplace tightening knob into handle making sure to insert knob from the outside 4 Repeat for second handle making sure both handles are set to the same height setting Leg Height Adjustment 1 Remove tightening knob from leg 2 Depress push pin and slide leg to desired height 3 Replace tightening knob into leg making sure to insert knob from the outside 4 Repeat for second third and fourth legs making...

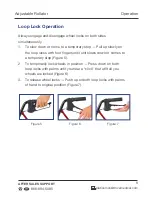
Page 9: ... Pull up slowly on the loop locks with four fingers until unit slows down or comes to a temporary stop Figure 5 2 To temporarily lock wheels in position Press down on both loop locks with palms until you hear a click that will tell you wheels are locked Figure 6 3 To release wheel locks Push up on both loop locks with palms of hand to original position Figure 7 Loop Lock Operation Figure 5 Figure ...

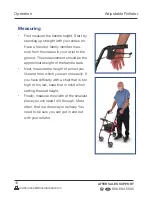
Page 10: ...rist to the ground This measurement should be the approximate height of the handle bars Next measure the height of a chair you like and from which you can rise easily If you have difficulty with a chair that is too high or too low keep that in mind when setting the seat height Finally measure the width of the smallest place you will need to fit through Most often that is a doorway or hallway You n...

Page 11: ...ightly forward as you sit down Engage the brakes by pushing down on the loop locks until they lock in the down position Refer to loop lock operation for complete instructions Reach behind for the chair with both hands preferred or with one hand and one hand on the rollator Do not tip the rollator by placing too much weight one side as you sit Slowly lower yourself using your legs as much as you ca...

Page 12: ... below the edge of the chair Place both hands on the arms seat of your chair OR one hand on the chair and one hand on the rollator Do not tip the rollator by placing too much weight on one side of the rollator as you stand Lean forward until you feel some of your weight on your feet Use your legs to stand as much as possible your arms should only lift what your legs cannot Use your arms mostly to ...

Page 13: ...s best to shorten your longer step rather than work to lengthen your shorter step The shorter step is usually the step where you have less balance To turn around stay within the width of the rollator even if you are slightly behind Roll the rollator around you without twisting your back you should always be facing the front of the rollator When standing in the kitchen and bathroom use the counters...

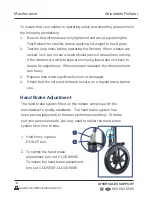
Page 14: ...unit back to dealer for adjustment When locks are released the wheels should turn freely 3 Replace tires when significantly worn or damaged 4 Check that the nuts and bolts are secure on a regular basis before use Hand Brake Adjustment The hand brake system fitted on this rollator complies with the manufacturer s quality standards The hand brake system has been pre set adjusted to the best performa...

Page 15: ...er damage caused by Accident or unanticipated events e g lightning water fire Improper use or transport Disregard of the safety and maintenance instructions Other improper treatment or modification After the expiry of the warranty period you still have the possibility to have your product repaired at you own expense If the repair or the estimate of cost is not free of charge you will be informed a...

Page 16: ...cation of purchase Description of malfunction If after contacting the manufacturer you are requested to return the faulty product please return the completed warranty card together with it Drive Medical 99 Seaview Boulevard Port Washington NY 11050 USA 866 694 5085 2 YEAR WARRANTY 866 694 5085 platinumcs drivemedical com AFTER SALES SUPPORT Phone lines available Monday to Friday 8 30am 8pm MODEL 7...

Page 17: ...19 Diagrama de las piezas 20 Medidas de seguridad 21 Ensamblaje 22 Ajuste de la altura 23 Operación 24 Operación del freno de mano 24 Mediciones 25 Preparación para sentarse 26 Preparación para pararse 27 Preparación para caminar 28 Mantenimiento 29 Ajuste del freno de mano 29 Garantía 30 Contenido ...

Page 18: ...rica dos para satisfacer nuestras especificaciones propias muy rígidas y superarán a todas sus expectativas En este manual puede encontrar las instrucciones de montaje utilización y de seguridad del caminador ajustable El andador es adecuado para un solo usuario con movilidad limitada El andador es ideal para el uso en interiores y al aire libre Andador ajustable Andador ajustable Introducción ...

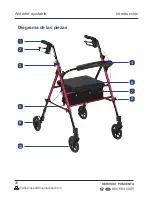
Page 19: ...dador ajustable Agarraderas 2 Frenos de mano 2 Perillas de ajuste de altura del mango 2 Respaldo 1 Bisagra plegable Asiento 1 Bolso colgante 1 Perillas de ajuste de altura de las patas 4 Ruedas traseras con tranques 2 Ruedas delanteras giratorias 2 1 2 3 4 5 6 7 8 9 10 Lista de piezas ...

Page 20: ...SERVICIO POSVENTA 866 694 5085 USA 20 platinumcs drivemedical com Andador ajustable Introducción 1 2 3 4 5 6 7 8 9 10 Diagrama de las piezas ...

Page 21: ...apoyo posventa Cuando los frenos se liberan las ruedas deben girar libremente 4 Siempre aplique los frenos antes de sentarse y no se siente cuando la unidad está en una pendiente o terreno irregular 5 Reemplace las ruedas cuando estén desgastadas o dañadas significativamente 6 No deje que nadie lo empuje mientras está sentado en el andador Este es sólo una ayuda para caminar y no es para utilizar ...

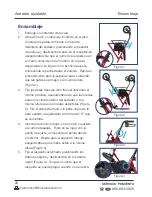
Page 22: ...as patas traseras con frenos utilizando el mismo proceso asegurándose de que las ruedas estén en el lado exterior del andador y a la misma altura que las ruedas delanteras Figura 2 Fije el cable del freno a la parte negra de la pata usando la agarradera en forma de S que se suministra 4 Inserte el tubo del mango en el marco y ajústelo a la altura deseada Fíjelo en su lugar con la perilla de ajuste...

Page 23: ...go asegurándose de insertar la perilla desde el exterior 4 Repita para el segundo mango asegurándose de que ambos se fijen a la misma altura Ajuste de la altura de las patas 1 Quite la perilla de apriete de la pata 2 Oprima el pasador de empuje y deslice la pata a la altura deseada 3 Vuelva a colocar la perilla de apriete en la pata asegurándose de insertar la perilla desde el exterior 4 Repita el...

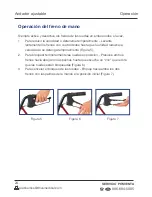
Page 24: ...cuatro dedos hasta que la unidad reduzca la velocidad o se detenga temporalmente Figura 5 2 Para bloquear temporalmente las ruedas en posición Presione ambos frenos hacia abajo con las palmas hasta que escuche un clic que le dirá que las ruedas están bloqueadas Figura 6 3 Para cancelar el bloqueo de las ruedas Empuje hacia arriba los dos frenos con las palmas de la manos a la posición inicial Figu...

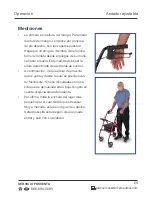
Page 25: ...de su muñe ca hasta el suelo Esta medida debe ser la altura aproximada de las barras de control A continuación mida la altura de una silla que le gusta y desde la cual se puede levan tar fácilmente Si tiene dificultades con una silla que es demasiada alta o baja téngalo en cuenta al fijar la altura del asiento Por último mida la anchura del lugar más pequeño por el cual tendrá que atravesar Muy a ...

Page 26: ...lante según se sienta Aplique los frenos presionándolos hasta que encajen en la posición hacia abajo Consulte la operación del freno de mano para obtener las instrucciones completas Alcance por detrás la silla con las dos manos opción preferida o con una mano y una mano en el andador No incline el andador poniendo demasiado peso en un lado según se sienta Descienda lentamente utilizando sus pierna...

Page 27: ... de la silla Coloque ambas manos en los brazos asiento de su silla O una mano en la silla y una mano en el andador No incline el andador poniendo demasiado peso sobre un lado del andador mientras está de pie Inclínese hacia delante hasta que sienta un poco de su peso en sus pies Use sus piernas para levantarse tanto como sea posible sus brazos sólo deben levantar lo que sus piernas no puedan Use s...

Page 28: ...r acortar el paso más largo en lugar de alargar su paso más corto El paso más corto suele ser el paso en el que se tiene menos equilibrio Para dar la vuelta permanezca dentro de la anchura del andador incluso si está un poco por detrás Ruede el andador a su alrededor sin girar su espalda usted siempre debe estar de frente a la parte delantera del andador Al estar de pie en la cocina y el baño Util...

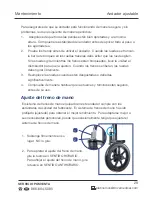
Page 29: ...sten Cuando los frenos se liberan las ruedas deben girar libremente 3 Reemplace las ruedas cuando estén desgastadas o dañadas significativamente 4 Compruebe de manera habitual que las tuercas y tornillos están seguros antes de su uso Ajuste del freno de mano El sistema de frenos de mano equipado en este andador cumple con los estándares de calidad del fabricante El sistema de frenos de mano ha sid...

Page 30: ...je Esta garantía no cubre los daños causados por Accidentes o eventos imprevistos por ejemplo rayos agua fuego Uso o transporte inadecuados Incumplimiento de las instrucciones de seguridad y mantenimiento Otro tratamiento o modificación inadecuados Después del vencimiento del período de garantía todavía tiene la posibilidad de mandar a reparar su producto si usted corre con los gastos Si la repara...

Page 31: ...antía Lugar de la compra Descripción de la avería Si después de contactar al fabricante se le pide que devuelva el producto defectuoso por favor devuelva la tarjeta de garantía completada junto con él Drive Medical 99 Seaview Boulevard Port Washington NY 11050 USA 866 694 5085 2 AÑOS DE GARANTÍA 866 694 5085 platinumcs drivemedical com SERVICIO POSVENTA Líneas telefónicas disponibles de lunes a vi...

Page 32: ...TER SALES SUPPORT SERVICIO POSVENTA 866 694 5085 USA YEAR WARRANTY AÑOS DE GARANTÍA DISTRIBUTED BY DISTRIBUIDO POR ALDI INC BATAVIA IL 60510 www aldi us platinumcs drivemedical com USA MODEL 7734 02 2016 ...

Reviews: