
Minimum System Requirements
●
Available USB3.0 host port
●
Windows XP / VISTA / 7 / 8
●
MAC OS 10.5 or above
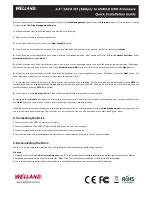
Product Overview
1. USB3.0 Port
2. Access LED
3. Power LED
4. DC Power Jack
5. Power Switch
1. Getting Started
Kit Contents
●
3.5" SATA 6G to USB3.0 Enclosure
●
USB3.0 Cable
●
SATA Data Cable
●
SATA Power Cable
●
IDE Flat Cable
●
IDE Power Cable
●
Power Adapter
●
Screw Pack
●
Stand
●
QIG
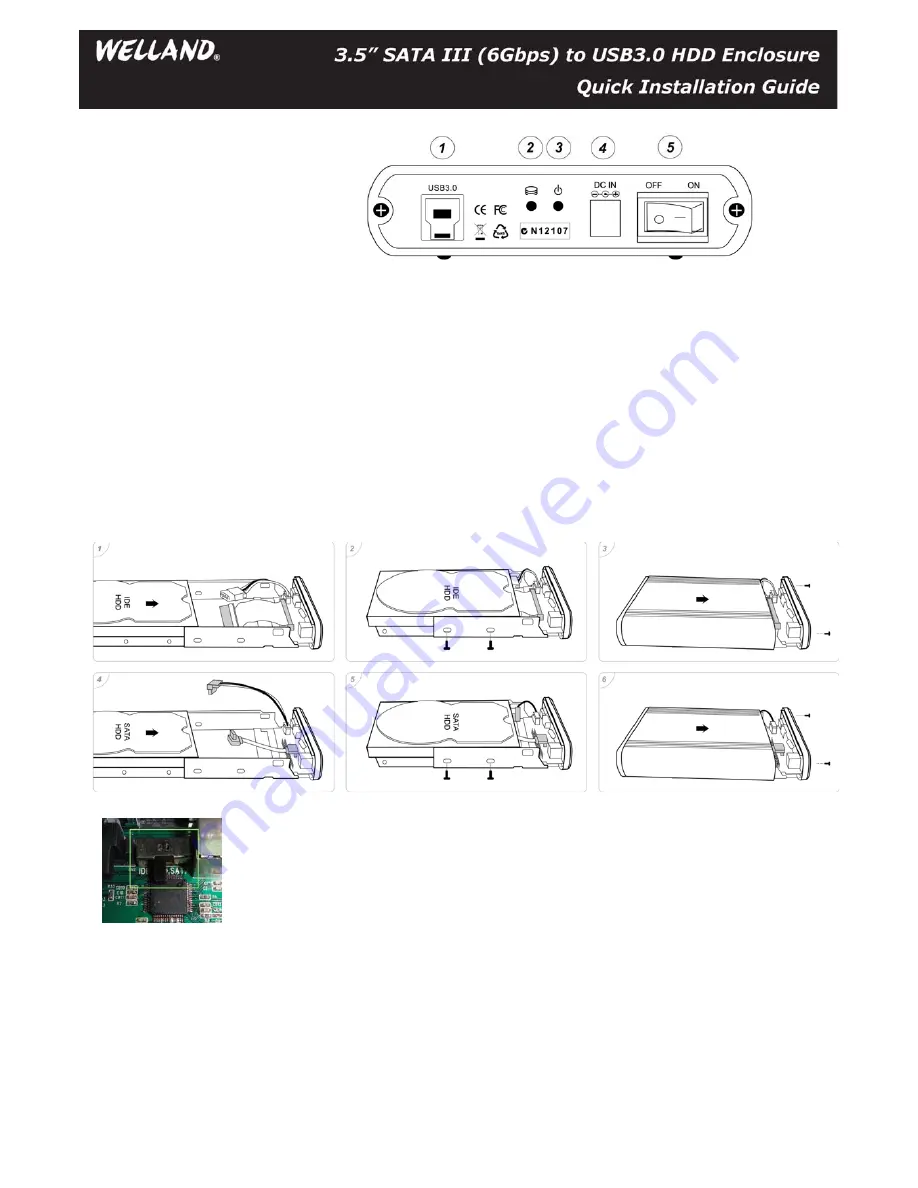
2. Assembling the 3.5" HDD
IDE :
Step 1 : Take out the metal tray and put the IDE HDD in it at correct direction.
Step 2 : Connect IDE HDD to the IDE flat cable and the power cable of IDE HDD. Also put screws in the metal tray.
Step 3 : Position the PCB and HDD set carefully into the aluminum casing, put the screws in and tighten them.
SATA :
Step 4 : Take out the metal tray and put the SATA HDD in it at correct direction.
Step 5 : Connect SATA HDD to the SATA data cable and the power cable of SATA HDD. Also put screws in the metal tray.
Step 6 : Position the PCB and HDD set carefully into the aluminum casing, put the screws in and tighten them.
Note :
Please note there is a switch on the board which is used to control the priority of using the IDE or SATA
transmission. When installing IDE hard drive, please adjust the switch to “ IDE” side, and when
installing SATA hard drive, please adjust the switch to “SATA” side.
3. Formatting Hard Drive
In order to use a hard drive, or a portion of a hard drive, in Windows you need to first partition it and then format it. This process will then assign a drive
letter to the partition allowing you to access it in order to use it to store and retrieve data.
All hard disk management is done in the Disk Management Administrative Tool. Follow these steps to open this tool:
1. Click on the Start button and select the Control Panel option.
2. If in Classic control panel mode, double-click on the Administrative Tools icon and then double-click on Computer Management icon. If
your control panel is in the Category view, click on Performance and Maintenance, then click on Administrative Tools, and finally
double-click on the Computer Management icon.


