background image

6-8 

                   WRK


A 1

B 1

5.2


Mounting the tripod 

1.  Check the pick-up (dia. 4.5 mm) to ensure that the components 

(clamping sleeve (5), marker ring (7) and suction insert with heat 

shield (10)) are correctly seated.  

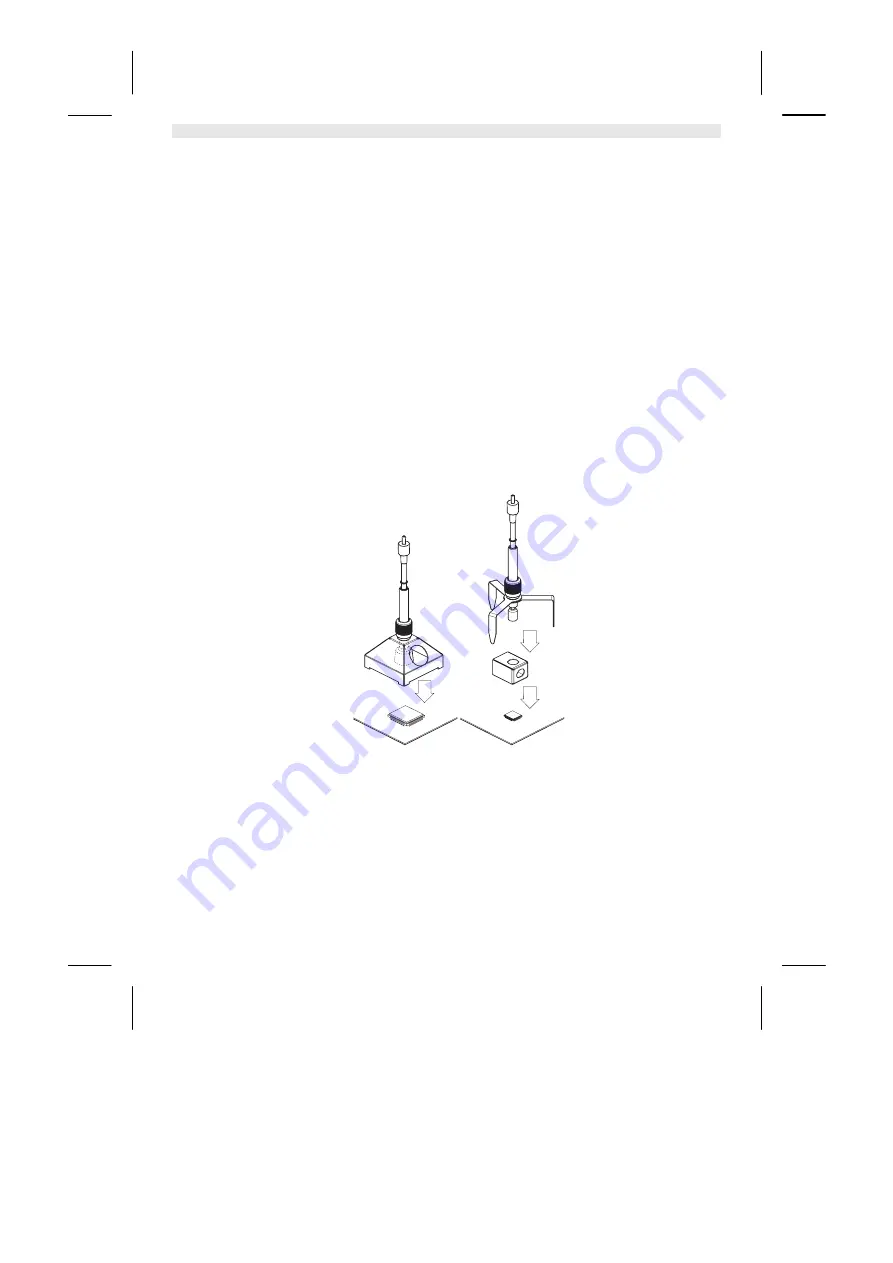
2.  Screw tripod (4) to pick-up (6) with the aid of clamping sleeve (5). 
You can use the pick-up (dia. 4.5 mm) mounted in this way with a 

small reflow nozzle (A) or without a reflow nozzle (B). When working 

without a reflow nozzle, you can also use a 10 mm dia. pick-up. 

6


Operating the WRK 

WRK operation during the desoldering procedure is divided into  
3 steps: 
 
1.  Positioning the pick-up 
2.  Preparing the pick-up 
3.  Desoldering and lifting off the workpiece 

6.1


Positioning the pick-up 


The workpiece to be raised must be at least 2 mm smaller than the 

diameter of the reflow nozzle used, otherwise the raised workpiece 

may be damaged. 

Z


Carefully position large reflow nozzle (A) or tripod with small 

reflow nozzle (B) with the correctly mounted and prepared pick-

up over the workpiece and set down. 


Summary of Contents for WRK

Page 1: ...EN FR IT ES PT NL SV DK FI GR TR CZ PL HU SK SL EE LV LT DE WRK Betriebsanleitung...

Page 2: ...WRK WRK Ger te bersicht 1 Ablage 2 Reflow D se gro 3 Reflow D se klein 4 Dreibein 5 Spannh lse 6 Pick Up 7 Markierungsring 8 Anschlussnippel 9 Vakuumschlauch 10 Saugeinsatz mit Hitzeschild...

Page 3: ...n Z Lesen Sie diese Anleitung vollst ndig bevor Sie mit dem WRK arbeiten Z Bewahren Sie diese Anleitung so auf dass sie f r alle Benutzer zug nglich ist 1 1 Mitgeltende Dokumente Betriebsanleitung Ihr...

Page 4: ...und klein 18x18 mm 15 5x15 5 mm 12 5x12 5 mm 10x10 mm Je 3 Saugeins tze f r 4 5 mm und 10 mm 2 Vakuumschl uche mit Anschlussnippel Betriebsanleitung WRK Entl tset 4 Beschreibung WRK Das Weller WRK Ent...

Page 5: ...ige Anschlussbuchse der Reparaturstation einstecken und durch kurze Rechtsdrehung verriegeln HAP 1 nur mit Adapter anschlie en 5 Pick Up 6 mit Vakuumschlauch an den Pick Up Nippeln des Steuerger tes a...

Page 6: ...n Sie auch ein Pick Up mit 10 mm verwenden 6 WRK bedienen Die Bedienung des WRK w hrend des Entl tvorgangs gliedert sich in 3 Schritte 1 Pick Up positionieren 2 Pick Up vorbereiten 3 Werkst ck entl te...

Page 7: ...st ck positionieren 2 Pick Up vorsichtig bis auf 3 5 mm ber das Werkst ck herunterdr cken 1 ohne dieses zu besch digen 3 Vakuum am Steuerger t einschalten und Bauteil ansaugen 4 Markierungsgummi in di...

Page 8: ...ten Reinigen Sie das WRK regelm ig mit einem milden Edelstahlreinigungsmittel 8 Zubeh r 005 15 154 99 Ablage WRK 005 87 617 30 Entl tset 33x33 24x24 mit Pick Up 005 87 617 31 Entl tset 27x27 20x20 mit...

Page 9: ...EN FR IT ES PT NL SV DK FI GR TR CZ PL HU SK SL EE LV LT DE WRK Operating Instructions...

Page 10: ...WRK WRK Device Overview 1 Holder 2 Reflow nozzle large 3 Reflow nozzle small 4 Tripod 5 Clamping sleeve 6 Pick up 7 Marker ring 8 Connecting nipple 9 Vacuum hose 10 Suction insert with heat shield...

Page 11: ...structions in their entirety before working with the WRK Z Keep these instructions in a place that is accessible to all users 1 1 Documents also applicable Operating instructions of your control unit...

Page 12: ...5 mm 10x10 mm 3 suction inserts each for dia 4 5 mm and dia 10 mm 2 vacuum hoses with connecting nipple Operating Instructions for WRK desoldering set 4 Description of the WRK The Weller WRK desolderi...

Page 13: ...socket of the repair station and lock by turning clockwise slightly connect HAP 1 with adapter only 5 Connect pick up 6 with vacuum hose to the pick up nipples of the control unit 6 Secure a suitable...

Page 14: ...without a reflow nozzle you can also use a 10 mm dia pick up 6 Operating the WRK WRK operation during the desoldering procedure is divided into 3 steps 1 Positioning the pick up 2 Preparing the pick...

Page 15: ...ce 2 Carefully press the pick up down 3 5 mm over the workpiece 1 without damaging the workpiece 3 Switch on the vacuum on the control unit and subject the component to suction 4 Slide the rubber mark...

Page 16: ...ild special steel cleaning agent 8 Accessories 005 15 15 499 WRK holder 005 87 617 30 Desoldering set 33x33 24x24 with pick up 005 87 617 31 Desoldering set 27x27 20x20 with pick up 005 87 617 32 Deso...

Page 17: ...EN ES IT ES PT NL SV DK FI GR TR CZ PL HU SK SL EE LV LT DE WRK Manual de uso...

Page 18: ...rte 2 Boquilla de reflujo grande 3 Boquilla de reflujo peque a 4 Tr pode 5 Casquillo de sujeci n 6 Extractor 7 Anilla de referencia 8 Boquilla de empalme 9 Tubo flexible de aspiraci n vac o 10 Ventosa...

Page 19: ...marcha y manejar de forma segura y adecuada la estaci n WRK as como para realizar las tareas de mantenimiento adecuadas e incluso reparar peque as aver as Z Lea el manual de uso completo antes de com...

Page 20: ...extractor 4 5 mm extractor 10 mm tr pode boquilla de reflujo grande 33x33 mm 27x27 mm 24x24 mm 20x20 mm y peque a 18x18 mm 15 5x15 5 mm 12 5x12 5 mm 10x10 mm 3 ventosas de aspiraci n para 4 5 mm y 10...

Page 21: ...la estaci n de reparaci n y fijarla gir ndola ligeramente hacia la derecha conectar el HAP 1 nicamente con un adaptador 5 Conectar el extractor 6 con el tubo flexible de aspiraci n en la boquilla del...

Page 22: ...la de reflujo tambi n podr utilizar un extractor de 10 mm 6 Manejo de la estaci n WRK El manejo de WRK para desoldar consiste en tres pasos 1 Posicionar el extractor 2 Preparar el extractor 3 Desoldar...

Page 23: ...ontada o con el tr pode 2 Presionar cuidadosamente el extractor a unos 3 5 mm por encima de la pieza que se desea retirar 1 sin da arla 3 Conectar la aspiraci n en la unidad de control y aspirar la pi...

Page 24: ...i n WRK con un producto de limpieza para acero inoxidable 8 Accesorios 005 15 154 99 Soporte WRK 005 87 617 30 Set de desoldar 33x33 24x24 con extractor 005 87 617 31 Set de desoldar 27x27 20x20 con e...

Page 25: ...de la Roseli re 8 1400 Yverdon les Bains Phone 41 0 24 426 12 06 Fax 41 0 24 425 09 77 A U S T R A L I A Apex Tools Australia P O Box 366 519 Nurigong Street Albury N S W 2640 Phone 61 2 6058 0300 Fax...

Reviews:

Related manuals for WRK