background image

INSTALLATION 

    3. 

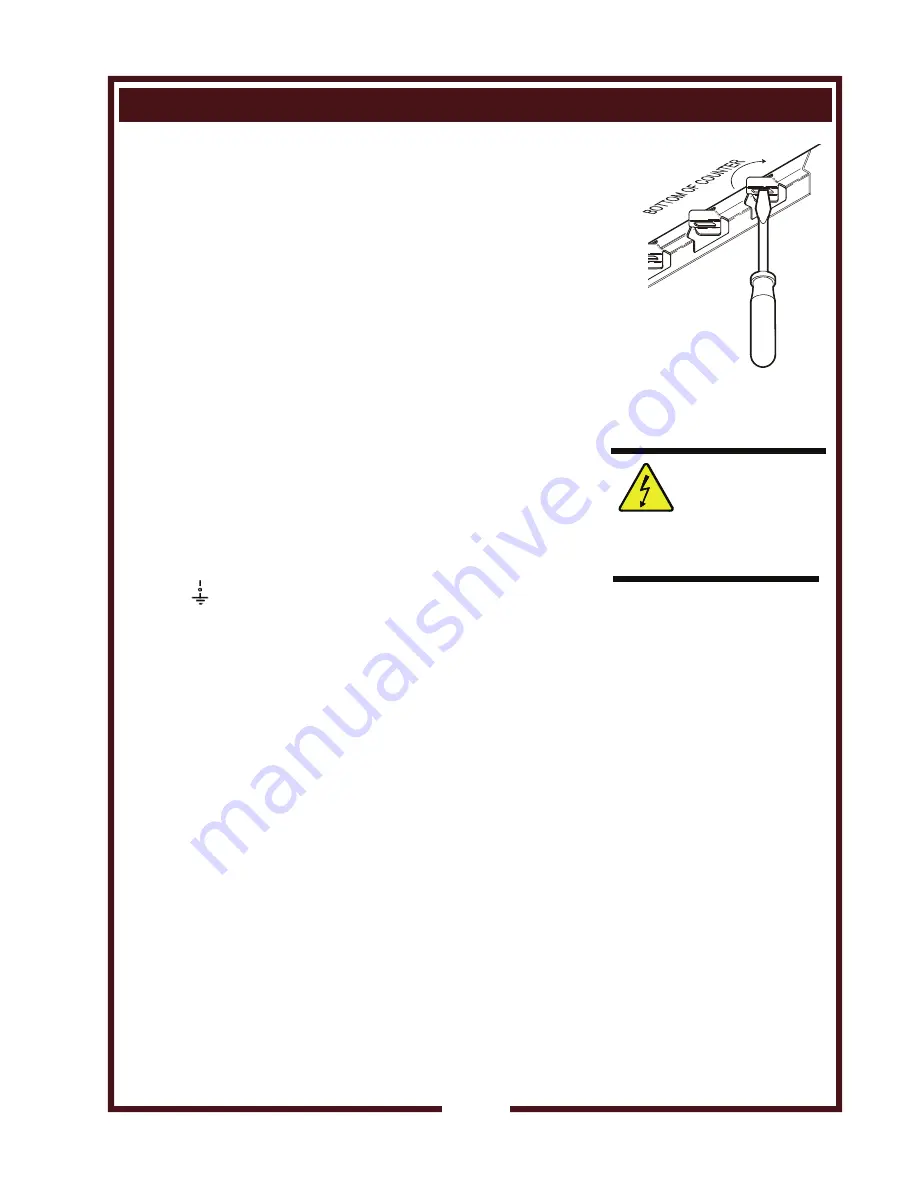
For “top-mounted”  warmers (i.e. warmers mounted from above 

  the 

counter 

top): 


a.  Verify that provided sealants are applied to the underside 


of the warmer top flange prior to setting the unit into the  

   cutout. 
  b. 

After 

installation, 

verify 

that the tabs on the Wellsloks are 


turned out to lock the warmer into the counter 


c.  Apply a thin bead of food-grade silicone sealant around the 


flange to seal it to the counter. 


d.  Wellslok extension kits are available for installing warmers 


in counter tops  where the standard Wellslok would not  


normally reach.  The extension kit will adapt to counter  


tops up to 1¾” thick. 


ELECTRICAL INSTALLATION


     1.  Refer to the product nameplate.  Verify the electrical service  


power.  Voltage and phase must match the nameplate    


specifications.  Wiring the warmer to the wrong voltage can  


severely damage the unit or cause noticeably decreased  

  performance. 


     2.  Available electrical service amperage must meet or exceed the  


specifications listed on the specification sheet provided with the 


warmer. 

     3.  Warmer and control unit must be connected to an appropriate 


building ground.  Ground connection will be marked “GND” or


”       " . 


NOTE: 

 Wire gauge, insulation type and temperature rating , as 


well as type, size and construction of conduit, must meet or exceed  


applicable specifications of local codes and of the National        

 Electrical 

Code. 


E. PLUMBING 

INSTALLATION 


For use in the State of Massachusetts, this appliance must be   


installed in compliance with 

Massachusetts Fuel Gas and  


Plumbing Code CMR 248. 


     1. 

IMPORTANT: 

 All plumbing installations must be performed by 

  a 

qualified 

plumber. 

     2.  AUTOFILL units are equipped with a DRAIN LINE:  Some     


jurisdictions may require an approved air gap or other          


back-flow  prevention device in the drain.  It is the responsibility 


of the plumber to determine such requirement, to provide and 


properly install the required device. 

     3.  For  AUTOFILL units:  Some jurisdictions may require an     


approved back-flow preventer in the water supply line.  It is the 


responsibility of the plumber to determine such requirement,  


and to provide and properly  install the required device. 


Autofill supply must be connected to a COLD WATER line only. 


NOTE: 

 Damage caused by 

leaks due to improper 
installation is NOT covered by 
warranty.  


CAUTION: 

SHOCK  HAZARD 


The ground lug of this         
appliance must be connected 
to a suitable building ground. 
 

IMPORTANT: 

Contact a licensed electrician 
to install and connect         
electrical power to the         
appliance. 


IMPORTANT: 

Damage due to being 
connected to the wrong     
voltage or phase is NOT    
covered by warranty. 


IMPORTANT:

  Electrical      

installation other than as 
specified on the specification 
sheet will void the UL  listing, 
and may void the warranty.  
 

NOTE:  

Plumb connections 

must be made in compliance 
with all Federal, State and  
Local Plumbing Codes and 
Ordinances.


M

011C.12 2M

-308023 

  Owne

rs M

anual fo

r B

uilt-

In

 Doubl

e-

W

ell

 Au

to-Fill

 M

odular 

 W

armer

Summary of Contents for MOD-200TDMAF

Page 1: ...appliance Additional manuals are available from your WELLS DEALER THIS MANUAL MUST BE READ AND UNDERSTOOD BY ALL PERSONS USING OR INSTALLING THIS APPLIANCE Contact your WELLS DEALER if you have any q...

Page 2: ...FOR DAMAGE IMMEDIATELY Regardless of the extent of the damage 3 CONCEALED LOSS OR DAMAGE if damage is unnoticed until the merchandise is unpacked notify the transportation company or carrier immediate...

Page 3: ...ery best performance and a long economical service life This manual contains the information needed to properly install this appliance and to use and care for the appliance in a manner which will ensu...

Page 4: ...ndication of the temperature setting Actual temperature will vary depending upon the type of product and food consistency B MOUNTING 1 Top mounted built in warmers may be equipped with WELLSLOKS uniqu...

Page 5: ...must be read and understood by all persons using or installing this appliance Cleanliness of this appliance is essential to good sanitation Read and follow all included cleaning instructions and sche...

Page 6: ...ore starting any installation Read and understand all labels and diagrams attached to the appliance Carefully account for all components and accessories before discarding packing materials Store all a...

Page 7: ...ode E PLUMBING INSTALLATION For use in the State of Massachusetts this appliance must be installed in compliance with Massachusetts Fuel Gas and Plumbing Code CMR 248 1 IMPORTANT All plumbing installa...

Page 8: ...2 qt 4qt 7 qt and 11 qt sizes with lids and adapter tops b For dry operation a 6 deep pan or inset is recommended 2 Turn temperature control to HI or highest temperature setting 3 Allow warmer to preh...

Page 9: ...lls Manufacturing uses an very high quality stainless steel 304DDQ for our food warmer pans Even the highest quality stainless steel however is mostly iron and will rust pit and corrode under the foll...

Page 10: ...pect warmer flange to counter seal Reseal with food grade silicone sealant if necessary Failure to do so may allow grease and water to leak into insulation and heating element causing a potential fire...

Page 11: ...her 3 Pour contents of one package of commercial delime cleaner into each warmer pan Stir to dissolve cleaner Turn heat control OFF Cover pans 4 Allow solution to soak at least one hour or overnight f...

Page 12: ...n valve not fully closed Check drain valve for debris and close fully Drain valve damaged or pan s leaking Contact your Authorized Wells Service Agency for repairs Auto fill unit overflows Water level...

Page 13: ...3713 2T 45917 2R 40498 2K 31040 2K 47662 2K 48197 2K 48198 2E 306865 2I 40034 2I Z12311 2I Z12311 2K 34136 2K 34136 2E 46529 2C 46591 2C 46591 P2 46587 OFF 0 L O H I WELLS WELLS 2 3 4 5 6 7 8 2J 35687...

Page 14: ...197 2K 48198 2E 306865 2I 40034 2I Z12311 2I Z12311 2K 34136X 2K 34136X 2E 46529 2C 46591 2C 46591 P2 46587 OFF 0 L O H I WELLS WELLS 2 3 4 5 6 7 8 2J 35687 WS 50131 2C 41974 5P 21709 2V 35609 TOP PAN...

Page 15: ...3 2T 45917 2R 40498 2K 31040 2V 47662 2K 48197 2K 48198 2E 306865 2I 40034 2I Z12311 2I Z12311 2K 34136X 2K 34136X 2E 46529 2C 46591 2C 46591 P2 46587 OFF 0 L O H I WELLS WELLS 2 3 4 5 6 7 8 2J 35687...

Page 16: ...WIRING DIAGRAM 14 M011C 12 2M 308023 Owners Manual for Built In Double Well Auto Fill Modular Warmers...

Page 17: ...NOTES 15 M011C 12 2M 308023 Owners Manual for Built In Double Well Auto Fill Modular Warmers...

Page 18: ...0 warmer to hold one 7qt and one 4 qt 21618 ADAPTER TOP convert 12 x 20 warmer to hold four 2 qt insets 21623 ADAPTER TOP convert 12 x 27 SMPT 27 to hold three 7 qt insets 21503 2 QT ROUND INSET w lid...

Page 19: ...roved for installation in wood counter tops One well units require one kit Two and three well units require two kits four and five well units require three kits DRAIN VALVE EXTENSION KIT extension fro...

Page 20: ...WELLS BLOOMFIELD LLC 10 Sunnen Dr St Louis MO 63143 telephone 314 678 6314 fax 314 781 2714 www wells mfg com...

Reviews: