background image

D.  NATURAL GAS / LP GAS (PROPANE) CONVERSION


    1. This fryer is orificed at the factory for natural gas at a pressure of 3.5” of water column.

The installed orifice is suitable for use at  -280 to 2999 feet (-85 to 914 meters) elevation.
It is the responsibility of the installer to install the factory recommended orifice and pressure
regulator kit suitable for the fuel type and elevation at the final installation site.


   2. The red tag (p/n 301217) attached to the gas connection provides pressure settings and part

numbers for conversion kits applicable to various fuels and altitudes.

     3. The natural gas altitude conversion kit contains

two orifices.  

Both orifices must be changed

.

Be sure to use a back-up wrench when
changing orifices to avoid bending the
orifice bracket on the burner tube.

Be sure to check operating pressures on both
burner systems after the orifices have been
changed.


   4. The LP gas (propane) conversion set contains

two orifices and two gas valve regulator kits.

Both orifices must be changed, and both
gas valve regulators must be converted

.

Complete instructions are included in the
regulator conversion kits.  Be sure to check
and adjust operating pressures on both burner
systems after the orifices have been changed
and the regulators have been converted.

NOTE:

  Failure to install proper orifices can potentially cause burner and flue system failure.

Damaged caused by improper orifice installation is NOT covered by warranty.

E.

FLAME ADJUSTMENT


   1. A proper flame will have a bright blue, well defined inner cone,  and a strong,

light blue outer cone with only a very little yellow along the outermost edges.


   2. Too much yellow indicated a rich flame.  Adjust by opening the shutter or

decreasing the orifice size (see tag p/n 301217 for proper orifice size for the
installation altitude).


   3. No yellow and a very small inner cone indicates a lean flame. Adjust by

closing the shutter or increasing the orifice size (see tag p/n 301217 for
proper orifice size for the installation altitude).

7

REGULATOR SEAL SCREW

(USE NEW ITEM FROM KIT)

REGULATOR SPRING

(USE NEW ITEM FROM KIT)

ADJUSTMENT SCREW

(REUSE EXISTING ITEM)

BURNER

TUBE

OUTER
CONE

INNER
CONE

35.  ORIFICE HOLDER

6.  ORIFICE WASHER

8. or 27.  BURNER

14.  ORIFICE

NOTE:  ORIFICE

SIZE MARKING

PLACE BACK-UP WRENCH ON THIS

SIDE WHEN CHANGING 

ORIFICE

PLACE BACK-UP WRENCH ON THIS SIDE

WHEN TIGHTENING 

GAS SUPPLY TUBE

Summary of Contents for WFGA-60FS

Page 1: ...ECHNICAL CONTENT OF THIS MANUAL IS DESIGNED FOR USE BY QUALIFIED PROFESSIONAL TECHNICIANS ONLY WELLS MANUFACTURING COMPANY 2 ERIK CIRCLE P O Box 280 Verdi NV 89439 Customer Service 775 345 0444 Ext 502 fax 775 345 0569 www wellsbloomfield com SERVICE MANUAL for GAS FRYER MODEL WFGA 60FS WFGA 60FS WFGA 60FS WFGA 60FS WFGA 60FS Part No 503089 Rev S370 030703 cps 371 ...

Page 2: ... PRECAUTIONS AND GENERAL INFORMATION 1 This fryer is intended for use to deep fry food products for human consumption No other use is recommended or authorized by the manufacturer or its agents 2 Service technicians must be familiar with the appliance use limitations and associated hazards Operating instructions and warnings must be read and understood by all operators and users 3 Your WELLS fryer...

Page 3: ...ty Procedures Inside Cover Specifications 1 Features and Operating Controls 2 Equipment Installation and Set up Initial Installation 4 Electrical Installation 5 Gas Plumbing Installation 6 Natural Gas LP Propane Conversion 7 Gas FlameAdjustment 7 Operation Heating and Cooking Instructions 8 Troubleshooting Operational Problems 9 Oil Filtering Instructions 10 Troubleshooting Filtering Problems 11 S...

Page 4: ...thru 6 are programmable for time and temperature Key 7 is available for individually set time temp cook cycles 8 FUNCTION KEYS Used to perform the functions of PAUSE CLEAN STANDBY BASKET raise lower and FILTER warning acknowledge 9 HI LIMIT THERMOSTAT Provides over temperature protection by de energizing the GAS VALVES if the oil temperature exceeds the factory set limit RESET must be performed ma...

Page 5: ...y Allow the motor to cool for approx 15 min then firmly press the red button on the motor until it clicks 18 BURNER ASSEMBLY Two assemblies comprised of orifice shutter burner tube and ignitor flame sensor 19 DRAIN VALVE OVAL Opens and closes the DRAIN VALVE HANDLE To OPEN turn the handle counterclockwise to vertical To CLOSE turn the handle clockwise to horizontal 20 GAS SHUT OFF VALVES Two valve...

Page 6: ...s 1 minimum The area around the fryer must be kept clear of flammable and combustible materials 3 LEVELING Verify that the fryer sits firmly ON BOTH CASTERS AND ON BOTH LEGS With a spirit level check that the fryer is level front to back and side to side With the adjustable legs adjust as required to level the fryer 4 DO NOT obstruct the flow of the two exhaust flues item 14 at the top rear of the...

Page 7: ...I Z223 1 In Canada CSA C22 2 is applicable 3 DO NOT obstruct the flow of the two exhaust flues item 14 at the top rear of the fryer It is especially critical that gas supply piping and electrical supply cord and or receptacle be routed away from the path of the hot combustion fumes 4 Because the fryer draws less than 8 amps two fryers may be plugged into the same 15 amp circuit if required CAUTION...

Page 8: ...5 of water column incoming line pressure 4 Gas pressure must be checked for BOTH burner systems while the fryer is in operation This pressure is measured by connecting a manometer to the pressure tap on the gas control valve pressure tap is threaded 1 8 NPT a Press the power switch to OFF Turn the gas shut off valve for that side OFF b Remove the pressure tap plug and insert an appropriate manomet...

Page 9: ...ncluded in the regulator conversion kits Be sure to check and adjust operating pressures on both burner systems after the orifices have been changed and the regulators have been converted NOTE Failure to install proper orifices can potentially cause burner and flue system failure Damaged caused by improper orifice installation is NOT covered by warranty E FLAME ADJUSTMENT 1 A proper flame will hav...

Page 10: ...tening has reached the programmed temperature The readout will display PRE and HEAT and the selected MENU KEY and the HEAT indicator will be lit until the shortening has reached temperature 3 When the readout displays 00 00 the fryer is ready to begin cooking B COOKING INSTRUCTIONS 1 Load frozen product into the BASKET Using the plastic coated handles set the BASKET on the LIFT CRADLE Press the BA...

Page 11: ...ner problem HEAT light lit Wiring problem loose connection Correct wiring problem Defective PROBE Replace PROBE CONTROLLER defective Replace CONTROLLER CRADLE LIFT won t Improper key strokes Press BASKET then DOWN lower ARROW BASKET DOWN RELAY defective Replace RELAY LIFT MOTOR defective Replace LIFT MOTOR Wiring problem loose connection Correct wiring problem CONTROLLER defective Replace CONTROLL...

Page 12: ...he WOOD DOWEL may be used to unplug the drain hole if necessary 4 While draining the oil press the POWER SWITCH to FILTER Pour the FILTER POWDER into the oil at the point where it is being drawn down the drain 5 After all the oil has drained from the FRYPOT use the HI TEMP BRUSH to push breading crumbs and other debris down the drain 6 After 5 minutes of oil circulation close the DRAIN VALVE and a...

Page 13: ...er debris from FILTER LEAF Service FILTER RESERVOIR at next opportunity PUMP CHECK VALVE plugged Clean CHECK VALVE or reversed Install CHECK VALVE properly PUMP pumps lots of SUCTION TUBE not seated in Make sure FILTER RESER bubbles in cooking oil SUCTION RECEPTACLE VOIR is properly installed SUCTION TUBE O RING Replace O RING missing or damaged Insufficient oil entering or in Incrementally open D...

Page 14: ...12 SERVICING INSTRUCTIONS GAS DISTRIBUTION AND BURNER SYSTEM 8 27 43 44 6 6 14 14 35 35 12 12 97 97 60 60 11 11 92 92 92 92 61 61 42 42 90 90 46 46 93 45 45 62 87 63 63 a a ...

Page 15: ...ROPANE BELOW 2000 FT 2 EA KIT 502144 PROPANE 2000 6999 FT 2 EA KIT 502145 PROPANE ABOVE 7000 FT 2 EA KIT 502146 27 BURNER ASSY RIGHT 500980 35 ELBOW ORIFICE HOLDER 42 VALVE GAS SHUT OFF 501592 43 IGNITOR ASSY RIGHT 501198 44 IGNITOR ASSY LEFT 501197 45 BRACKET REAR 46 BRACKET SIDE 60 ADAPTER 1 2 NPT x 1 4 COMP 61 UNION 1 2 NPT 62 TEE 1 2 NPT 63 ELBOW 90º 1 2 NPT 87 NIPPLE 1 2 NPT x 2 90 NIPPLE 1 2...

Page 16: ... TUBES are handed right and left Visually the row of burner slots point up and slightly inward Also the tops of the rear mounting tabs slant toward the center D IGNITOR ASSEMBLY 1 IGNITORS are handed right and left Visually a Right The flame sensor right probe is bent at a 90º angle b Left The flame sensor right probe is nearly straight 2 When properly assembled all three probes will lay on a line...

Page 17: ... filter pump heat shield to guide the rear mounting tab of the burner tube into the slot in the rear mounting bracket 3 Slide the the burner assembly over the front mounting studs thread on nuts and tighten 15 REAR MOUNTING SLOT FRONT MOUNTING PLATE REAR MOUNTING BRACKET REAR MOUNTING TAB FRONT MOUNTING BRACKET RIGHT HAND BURNER ASSY ...

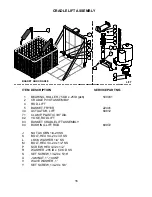
Page 18: ...STIC 3 8 DIA 82 YOKE ROD LIFT 83 BASKET CRADLE LIFTASSEMBLY 84 BUSHING LIFT ROD 69972 J NUT ACORN 1 4 20 SS K BOLT HEX 1 4 20 x 34 SS L LOCK WASHER 1 4 SS M BOLT HEX 1 4 20 x 1 2 SS P SCREW HEX 3 32 x 1 2 R WASHER 265 ID x 50 OD SS S SET SCREW 1 4 20 x 5 16 U JAM NUT 1 14 UNF V WAVE WASHER 1 Y SET SCREW 1 4 20 x 5 8 2 S 84 V U 34 71 M P 4 82 Y 5 83 K R 1 L J BASKET AND CRADLE LIFT 16 ...

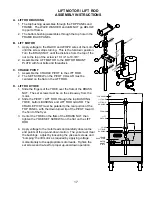
Page 19: ...YOKE 1 Slide the fingers of the YOKE over the flats of the BRASS NUT The set screws must be on the side away from the motor 2 Slide the PIVOT LIFT ROD through the top BUSHING YOKE bottom BUSHING and LIFT ROD GUARD The CRADLE PIVOT must be parallel to the rear portion of the TOP PANEL with the downturned lip of the PIVOT toward the front of the fryer 3 Center the YOKE on the flats of the BRASS NUT ...

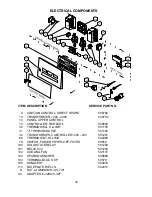
Page 20: ...MER CONTROLLER 120V 24V 501201 68 THERMOSTAT HI LIMIT 502469 79 SWITCH POWER FRYER OFF FILTER 69550 100 SOLID STATE RELAY 501200 101 RELAY 24V 501204 102 COOLING FAN 503131 103 SPARK QUENCHER 500688 104 TERMINAL BLOCK 6P 50578 105 SONALERT 500974 114 FACEPLATE WELLS 502417 N NUT ALUMINUM 8 32 x 7 8 CC ADAPTER 6 32M x 6 32F ELECTRICAL COMPONENTS 100 9 10 101 32 9 102 100 101 10 103 18 13 114 79 103...

Page 21: ... not necessary to over tighten the compression fitting Wrench tightening this fitting will make it impossible to remove should service be required at a later date 3 Attach body of HI LIMIT THERMOSTAT to the left mounting bracket below the control panel and connect wiring B TEMPERATURE CONTROL THERMOCOUPLE 1 Install THERMOCOUPLE in upper threaded hole in frypot Use hi temperature pipe thread compou...

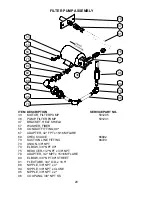
Page 22: ... 69 CHECK VALVE 66692 70 SUCTION LINE FITTING 66720 73 UNION 3 8 NPT 74 ELBOW 3 8 NPT 90º 75 REDUCER 1 2 NPT x 3 8 NPT 78 ADAPTER 1 2 MPT x 15 16M FLARE 80 ELBOW 3 8 NPT 90º STREET 81 FLEX TUBE 3 4 O D x 16 5 88 NIPPLE 3 8 NPT x 4 94 NIPPLE 3 8 NPT x CLOSE 95 NIPPLE 3 8 NPT x 2 96 COUPLING 3 8 NPT SS FILTER PUMP ASSEMBLY 36 94 94 33 47 75 74 74 95 96 88 73 69 80 81 78 67 70 58 57 20 ...

Page 23: ...r voltage configuration If necessary rewire motor at the terminal block in the end of the motor per the table shown below Also see diagram on motor WARNING Failure to correctly wire the motor will result in permanent damage to the pump motor 125V 230V 1 LINE YELLOW BLACK 1 LINE YELLOW BLACK 2 BLUE 2 BLUE BLUE BLUE 3 UNUSED 3 BROWN 4 BLACK 4 BLACK 5 BROWN 5 WHITE ORANGE ORANGE 6 LINE WHITE 6 LINE Y...

Page 24: ...R LEAF 51 HANDLE OVAL VALVE 52 ADAPTER HANDLE DRAIN 53 COVER KETTLE 54 PLATE MOUNTING RH FLUE 55 SHIM FLUE MOUNTING 56 GROMMET INSULATION 7 8 O D 57 WASHER FIBRE 58 FITTING CONDUIT 90º x 3 8 59 FITTING CONDUIT STRAIGHT x 3 8 60 CONNECTOR 1 2 NPT x 1 4 COMPRESSION ITEM DESCRIPTION 61 UNION 1 2 NPT 62 TEE 1 2 NPT 63 ELBOW 1 2 NPT 90º 64 O RING 50 x 63 65 LEG ADJUSTABLE 66 MAGNET DOOR 67 ADAPTER 1 2 ...

Page 25: ...23 WFAE 60FS PARTS BREAKDOWN GENERAL REFERENCE ONLY ...

Page 26: ...24 WFGA 60FS WIRING DIAGRAM SCHEMATIC ...

Page 27: ...ET 1 2 SIZE 1 ea 22448 BASKET 1 2 SIZE 2 ea 22554 DOWEL CLEANING 69752 CRADLE LIFT BASKET 69961 NORMAL MAINTENANCE ITEMS PART LUBE MOLYDISULFIDE LOCAL PURCHASE O RING FILTER LEAF 501900 O RING SUCTION TUBE pk 5 66474 COMMON REPAIR ITEMS PART BURNER ASSY LEFT 500781 GAS CONTROL VALVE REDUNDANT COMBO 500784 BURNER ASSY RIGHT 500980 CONTROLLER SOLID STATE 500830 LIFT MOTOR 500513 IGNITOR SENSOR ASSY ...

Page 28: ...ax 888 492 2783 w service ellsbloomfield com IMPORTANT WELLS MANUFACTURING PROPRIETARY INFORMATION DISSEMINATION OF THIS INFORMATION TO ANYONE OTHER THAN WELLS AUTHORIZED SERVICE AGENTS IS STRICTLY PROHIBITED TECHNICAL CONTENT OF THIS MANUAL IS DESIGNED FOR USE BY QUALIFIED PROFESSIONAL TECHNICIANS ONLY ...

Reviews: