background image

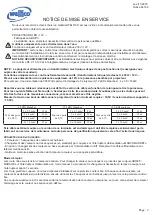
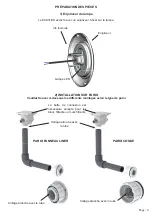
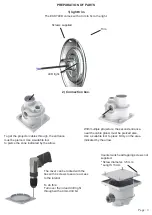
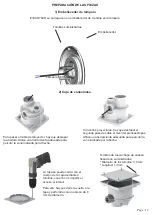
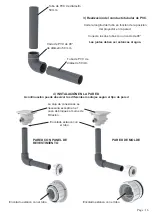
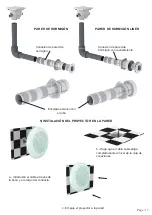
PREPARATION OF PARTS
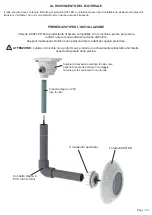
1) light trim

The EASYLED comes with a trim to fi x to the light.
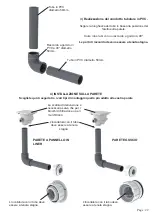
2) Connection box.

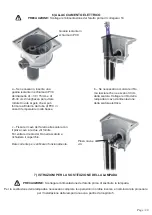
With multiple projectors, the second entrance, 

near the cable gland, must be pierced also.

Use a suitable tool to press fi rmly on the area 

indicated by the arrow.

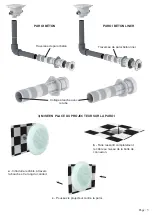
To get the projector cables through, the entrance 

must be pierced. Use a suitable tool 

to pierce the zone indicated by the arrow.

Trim.

Screws supplied.

LED light.

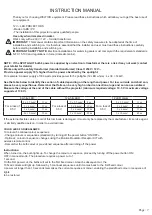
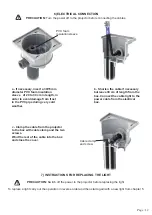
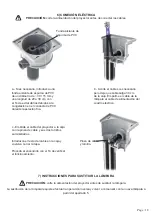
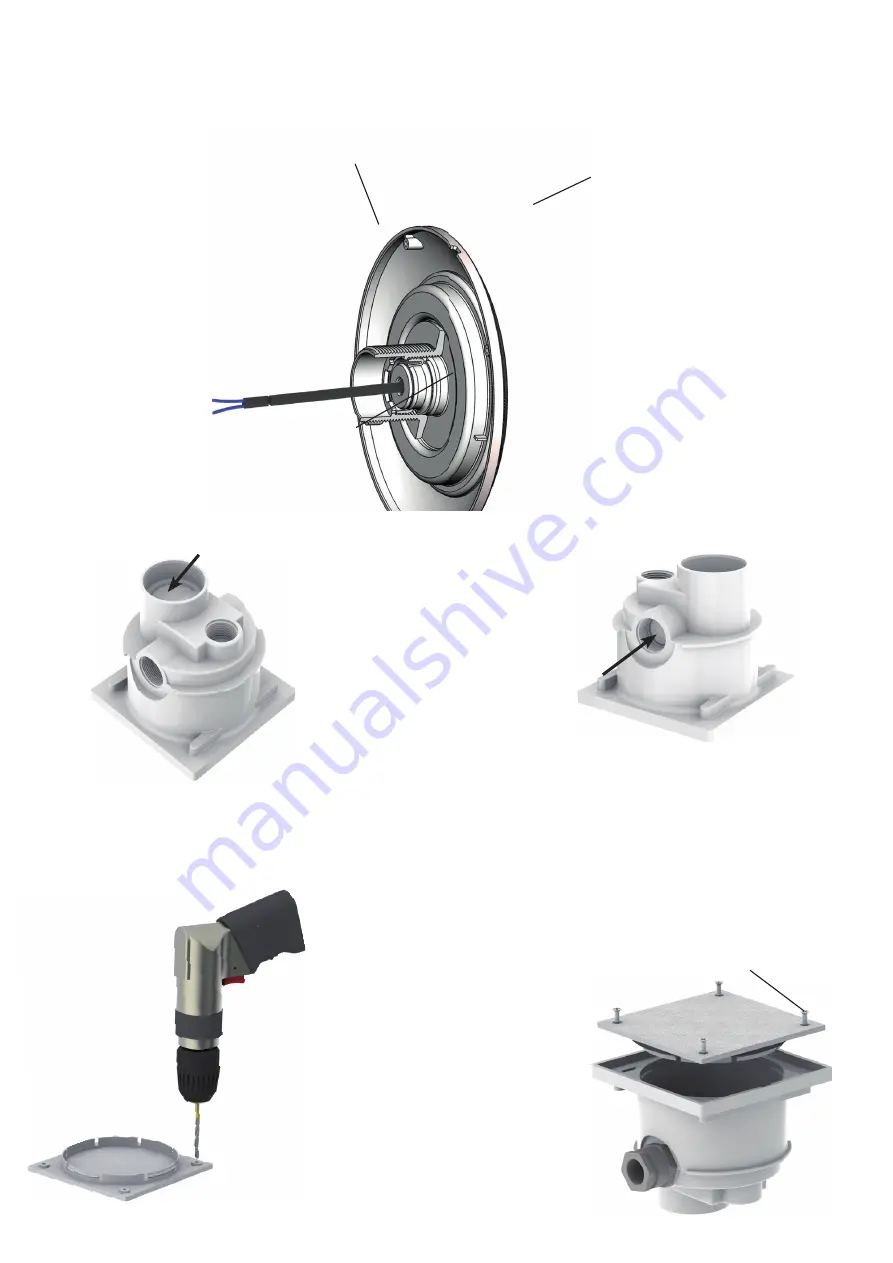
The cover can be locked with the 

box with 4 screws to secure access 

to the interior.

To do this:

Turn over the lid and drill right 

through with a 4mm drill bit.

Countersunk head tapping screws not 

supplied.

* Screw diameter: 3.5 mm

* Length: 13mm

Page : 9

Summary of Contents for EASYLED EVO

Page 1: ...class VIEW TABLE Ce luminaire contient une lampe led This luminaire contains built in LED lamps La lampe peut tre chang e dans le luminaire The lamps can be changed in the luminaire LEDs 6 LEDs blanc...

Page 2: ...r l interm diaire du KIT R cepteur Contr leur Modulateur avec t l commande sans fil Garde en m moire apr s extinction de l ampoule la couleur ou la s quence pr d finie Mode d emploi Lors de la mise so...

Page 3: ...ticularit de se fixer sur une paroi piscine selon les recommandations techniques de Weltico Les supports de maintien Weltico sont sp cialement adapt es ce projecteur ATTENTION L utilisation de support...

Page 4: ...ies Lampe LED Page 4 2 INSTALLATION SUR PAROI Veuillez trouver ci dessous les diff rents montages selon le type de paroi PAROI COQUE PAROI PANNEAU LINER La bo te de connexion est n cessaire except pou...

Page 5: ...rs e de paroi b ton Travers e de paroi b ton liner a Introduire le c ble travers la bouche et le long du conduit b Faire ressortir compl tement le c ble au niveau de la bo te de connexion 3 MISE EN PL...

Page 6: ...EMPLACER LA LAMPE PR CAUTION Couper l alimentation du projecteur avant le remplacement de la lampe Le remplacement de la lampe n cessite de faire l op ration inverse et de recommencer avec la nouvelle...

Page 7: ...ing off the power button ON OFF Optional colour or sequence changes using the Monitor Modulator Receptor KIT with wireless remote control Remember the bulb colour or pre defined sequence after switchi...

Page 8: ...he distinction of setting a mouth pool wall as technical recommendations Weltico Supports maintaining Weltico are specially adapted for this projector CAUTION Using an inlet not designed for this coul...

Page 9: ...area indicated by the arrow To get the projector cables through the entrance must be pierced Use a suitable tool to pierce the zone indicated by the arrow Trim Screws supplied LED light The cover can...

Page 10: ...the two tubes with a 90 pipe bend Fixation must be watertight 4 FIXING TO WALL Please find below the different fixations depending on the type of wall SHELLED WALL PANEL LINED WALL The connexion box...

Page 11: ...n with the pipe Piercing concrete wall Piercing concrete wall liner a Insert the cable through the inlet and along the pipe b Pull out completely the cable at the connection box 5 FIXING PROJECTOR ONT...

Page 12: ...AL CONNECTION PRECAUTION Turn the power off to the projector before connecting the cables c Clamp the cable from the projector to the box with cable clamp and the two screws Wind the rest of the cable...

Page 13: ...as mediante el kit de receptor y controlador modulador con mando a distancia inal mbrico Tras el apagado de la l mpara guarda en la memoria el color o la secuencia predefinidos Modo de empleo Al recib...

Page 14: ...cer en una boca de las paredes de la piscina seg n las recomendaciones t cnicas de Weltico Aboga por el mantenimiento Weltico est n especialmente adaptados para este proyector ATENCI N la utilizaci n...

Page 15: ...Para pasar el cable del proyector hay que destapar la abertura Utilice una herramienta adecuada para percutir la zona indicada por la flecha Embellecedor Tornillos suministrados L mpara LED La tapa se...

Page 16: ...ed Conecte los dos tubos con un codo de 90 Las juntas deben ser estancas al agua 4 INSTALACI N EN LA PARED A continuaci n puede observar los diferentes montajes seg n el tipo de pared PARED DE MOLDE P...

Page 17: ...de hormig n Conexi n de pared de hormig n con revestimiento a Introduzca el cable a trav s de la boca y a lo largo del conducto b Haga que el cable sobresalga completamente al nivel de la caja de con...

Page 18: ...te la alimentaci n del proyector antes de conectar los cables c Embride el cable del proyector a la caja con la pinza de cable y sus dos tornillos suministrados Introduzca el resto del cable en la caj...

Page 19: ...ne o la sequenza predefinita ISTRUZIONI PER L ACCENSIONE Vi ringraziamo di aver scelto un prodotto WELTICO e vi invitiamo a leggere con attenzione queste istruzioni per ottenere la massima soddisfazio...

Page 20: ...le nicchie a parete per piscina conformi alle raccomandazioni tecniche di Weltico Supporti mantenendo Weltico sono particolarmente adatti per questo proiettore ATTENZIONE L utilizzo di nicchie non co...

Page 21: ...a freccia Per far passare il cavo del faretto aprire il passaggio di entrata Utilizzare un attrezzo adatto per fare pressione sulla zona indicata dalla freccia Coprimozzo Viti fornite Lampada LED Il c...

Page 22: ...i di raccordo devono essere a tenuta stagna 4 INSTALLAZIONE SULLA PARETE Scegliete qui di seguito tra i vari tipi di montaggio quello pi adatto alla vostra parete PARETE GUSCIO PARETE A PANNELLO IN LI...

Page 23: ...Passamuro per parete in cemento Passamuro per parete in cemento liner a Introdurre il filo attraverso la nicchia e lungo il condotto b Far uscire del tutto il filo all altezza della scatola di deriva...

Page 24: ...collegare l alimentazione del faretto prima di collegare i fili c Fissare il cavo del faretto alla scatola con il pinza cavo e le due viti fornite Far entrare il resto del filo nella scatola e richiud...

Page 25: ...eim n chsten Einschalten leuchtet er zun chst in der vordefinierten Farbe oder Sequenz INBETRIEBNAHMEANLEITUNG Vielen Dank dass Sie sich f r ein Produkt von WELTICO entschieden haben Wir empfehlen Ihn...

Page 26: ...chen Empfehlungen Weltico an der Wand des Beckens befestigt Unterst tzt die Aufrechterhaltung Weltico sind speziell f r diesen Projektor angepasst ACHTUNG Bei Verwendung von nicht geeigneten Halterung...

Page 27: ...chf hren zu k nnen muss die ffnung aufgeschraubt werden Verwenden Sie ein geeignetes Werkzeug um den durch den Pfeil bezeichneten Bereich zu treffen Frontring Schrauben sind im Lieferumfang enthalten...

Page 28: ...ges gt werden Die beiden Kan le m ssen in einem Winkel von 90 verlegt werden Der verwendete Klebstoff muss wasserfest sein 4 ANBRINGUNG AN DER WAND Unten finden sie die verschiedenen Anbringungsarten...

Page 29: ...rklebt Durch Betonwand Durch Beton Paneelwand a Das Kabel durch die Halterung und den Kabelkanal f hren b Das Kabel auf H he der Anschlussdose komplett hinausf h ren 5 ANBRINGEN DER SCHEINWERFER AN DE...

Page 30: ...ten bevor Kabel angeschlossen werden c Das Kabel des Scheinwerfers im Anschlusskasten anklemmen dabei eine Zugentlastung und die beiden mitgelieferten Schrauben verwenden Das verbleibende Kabel in der...

Page 31: ...w kan instellen INSTRUCTIES VOOR INGEBRUIKNAME Wij danken u hartelijk voor het kiezen van een WELTICO product en wij vragen u vriendelijk om dit instructieboekje aandachtig door te lezen zodat u het n...

Page 32: ...d muur als technische aanbevelingen Weltico Ondersteunt het behoud van Weltico zijn speciaal aangepast voor deze projector OPGELET Door het gebruik van een niet bijpassende fitting kan de verlichting...

Page 33: ...te doorboren Om de kabel van de verlichting erdoorheen te trekken moet de opening open worden gemaakt Gebruik een geschikt stuk gereedschap om het door de pijl aangegeven gebied te doorboren Omhulsel...

Page 34: ...p de muur Verbind de twee buizen met een 90 gebogen verbindingsstuk De verbindingen moeten waterbestendig zijn 4 INSTALLATIE IN DE MUUR U vindt hieronder de verschillende installatiewijzen volgens het...

Page 35: ...s Doorvoer voor betonnen muur Doorvoer voor liner betonnen muur a Steek de kabel door de fitting en door de leiding b Laat de kabel er helemaal uitkomen ter hoogte van de aansluitdoos 5 PLAATSEN VAN D...

Page 36: ...om van de verlichting af voordat u de kabels aansluit c Bevestig de kabel van de verlichting aan de doos met de kabelklem en de twee meegeleverde schroeven Laat de rest van de kabel de doos ingaan en...

Page 37: ...2 5 mm 11 m 2 x 4 mm 21 m 2 x 4 mm 12 m 2 x 4 mm 18 m 2 x 6 mm 31 m 2 x 6 mm 19 m 2 x 6 mm 27 m 2 x 10 mm 52 m 2 x 10 mm 32 m 2 x 10 mm 45 m LED 10 5 1 5 10 WELTICO LED 12V ABS PC 230V 12V NF C 15 10...

Page 38: ...EASYLED N EASYLED Weltico Weltico EASYLED PVC Page 38...

Page 39: ...1 EASYLED 2 LED 4 4mm 3 5mm 13mm Page 39...

Page 40: ...PVC 50mm PVC 50mm PVC 90 50mm 3 PVC 90 4 Page 40...

Page 41: ...5 Page 41...

Page 42: ...30 cm PVC 30 15mm 20 30 cm PVC 6 PVC 7 5 Page 42...

Page 43: ...WELTICO ZAC Vence Ecoparc 9 rue des platanes 38120 ST EGREVE FRANCE Tel 33 0 4 76 27 10 54 Fax 33 0 4 76 26 17 95 contact weltico com...

Reviews: