background image

36

© wePresent 2017

WICS-2100-USER-GUIDE-01

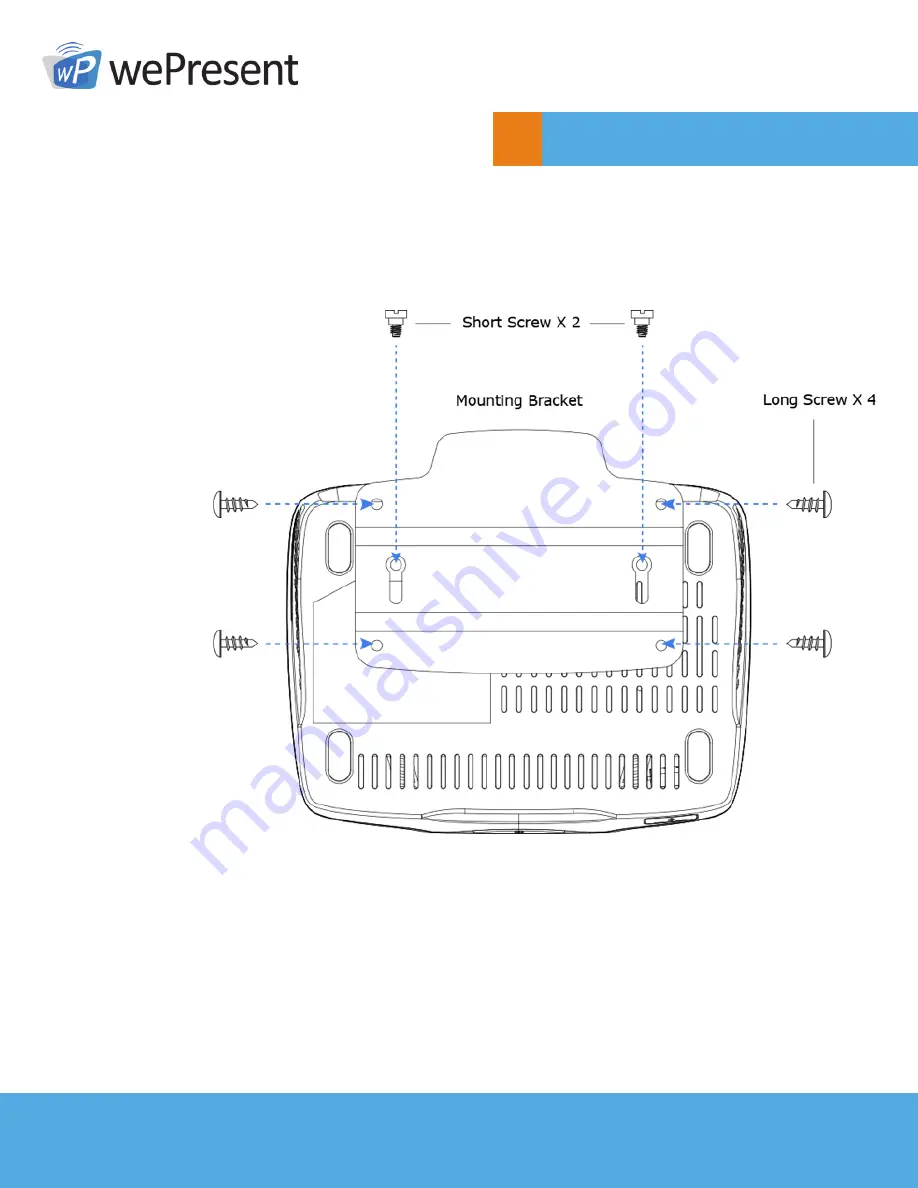
Wall-Mount Kit

10

1. 

Insert the two short screws ( ) into the two holes on the bottom of the WiCS-2100 box). 

2. 

Install the mounting bracket on the wall with the four long screws ( ). 

3. 

Secure the WiCS-2100 box to the mounting bracket.

Summary of Contents for WiCS 2100

Page 1: ...For more information www wePresentWiFi com Sales sales wePresentWiFi com Support help wePresentWiFi com wePresent 2017 WICS 2100 USER GUIDE 01 WiCS 2100 User Guide...

Page 2: ...13 6 2 Admin Page wePresent Configurator 14 6 2 1 Personalization Display 15 6 2 1 1 Wallpaper 15 6 2 1 2 Display Login 16 6 2 1 3 Energy Savers 17 6 2 2 Wi Fi Network 17 6 2 2 1 Hostname Domain Name...

Page 3: ...Control the projecting PC or Mac via iOS or Android devices WebSlides Broadcast slides to the audience multiple devices via web browser Audience can save the projecting slides for taking notes Access...

Page 4: ...less screen audio projection Remote desktop control Support Windows 7 8 10 Support Mac OS 10 9 and above Support up to 32 concurrent login users Touchscreen support for USB HID touch devices compatibl...

Page 5: ...utton and LED Stand by button press the button to enter the stand by mode LED indicator system loading red ready blue USB Port Front USB host 2 0 port for USB mouse thumb drive touch device Front Rear...

Page 6: ...e touch device RJ 45 10 100 1000M RJ 45 port PoE Power Over Ethernet HDMI Standard A HDMI 1 4b output Audio Jack 3 5mm audio jack stereo analog output Power Jack DC 12V in Reset Button Hold the reset...

Page 7: ...the start standby screen of the projector display a software download instructions b code login code passcode c device hostname d SSID WiFi network name Default hostname SSID is wePresent xxx xxx are...

Page 8: ...rner of the start standby screen Click on it and you will see a toolbar as shown below 2 When any user logs in you will see the user list button located beside the main button Click to enter the user...

Page 9: ...u will see the following icons 3 On each thumbnail device screen you may see the following icons Main Button and Toolbar 5 One device screen projected Full Screen Stop Project Disconnect Multiple devi...

Page 10: ...will then see the following icons 5 4 Dynamic Screen Layout Dynamic Screen Layout enables automatic arrangement of up to 4 projected device screens in the display layout This function is available wh...

Page 11: ...Mac touch events on the projector display screen are translated into mouse events on the screen of the sender device Each USB port on the WiCS 2100 box can supply up to 5V 0 5A power Additional power...

Page 12: ...in the address bar of the browser You can find the IP address and host name on the standby screen of the projector display Default IP address is 192 168 100 10 default host name is WiCS 2100 xxx xxx...

Page 13: ...rsion of the MirrorOp app click Install Full MirrorOp Func or install it from the USB token directly Make sure the software is not blocked by your firewall Note Please disable the Smart Screen Filter...

Page 14: ...Moderator 1 Enter the password and then click Login Default password moderator Web Management 6 2 After login you can see a user list on the screen which indicates all the users connected to WiCS 210...

Page 15: ...tor control will be disabled Either users can project their screens to WiCS 2100 freely or the moderator control can be done via the on screen user list 6 6 Click Show Login Code and the login code pa...

Page 16: ...start to capture the current projecting screen Web Management 6 3 Please refer to the 9 Launch WebSlides section on page 33 for more information 6 2 Admin Page wePresent Configurator 1 Click the Admi...

Page 17: ...custom standby screen image SSID hostname login code passcode etc in order to meet their personal and unique needs 6 2 1 1 Wallpaper 1 In addition to the default wallpaper you can add a maximum of 3...

Page 18: ...default value is Enable Connection Information refers to the overlay information on the login code passcode SSID hostname and IP address of WiCS 2100 The overlay information will pop up on the upper l...

Page 19: ...by mode 3 Click Save changes to apply your new settings 6 2 2 Wi Fi Network WiCS 2100 can act as a dual band wireless access point at 2 4GHz and 5GHz enabling the broadcast of an additional wireless S...

Page 20: ...external AP setting Encryption Key If the Encryption function is enabled you have to set the Key value according to the encryption mode you selected you shall input the key of the external AP If the...

Page 21: ...AN IP Auto if not checked The checkbox is unchecked by default If you want to set a fixed WAN IP a fixed device IP you should enter the following values in the given fields IP address Subnet mask Defa...

Page 22: ...AirPlay and Chromecast Besides WiCS 2100 features the WebSlides function enabling audience to view and save slides of the current presentation on their own devices 6 2 3 1 System Information The foll...

Page 23: ...apply your new settings Web Management 6 6 2 3 3 WebSlides Setup 1 WebSlides auto refresh seconds You can set the interval time between 10 and 90 seconds getting WebSlides to refresh automatically at...

Page 24: ...3 5 Service Management User List Enable thumbnails for base unit This refers to enabling the on screen user list to show device screens of all login users in thumbnail view The checkbox is checked by...

Page 25: ...or WiCS 2100 from time to time You can update the firmware manually You can also choose to reset your WiCS 2100 device to factory default settings Web Management 6 6 2 4 1 Firmware Update If you want...

Page 26: ...to factory defaults and then your WiCS 2100 device will be restored to factory default settings 2 Reboot Base Unit Click Reboot and your WiCS 2100 device will be rebooted 6 2 5 Log Out of Admin Page...

Page 27: ...e the user interface of MirrorOp as below 2 The MirrorOp app will automatically locate the WiCS 2100 device If not you can click or input the hostname IP in the text box to connect to the device Enter...

Page 28: ...Layout Full Screen Collapse Expand the Info Sound Mute Expand Collapse Device List Exit Close the Application Settings Start Stop Minimize the User 7 3 A Complete User s Guide on MirrorOp Sender 1 For...

Page 29: ...Manual 3 You can also find a PDF file of MirrorOp User s Manual in the wePresent token USB drive 1 Introduction SidePad is a feature that allows controlling the presenting PC Mac from an iOS Android d...

Page 30: ...SidePad function A PC Mac with the MirrorOp Sender app installed Click the Settings icon on the upper left corner of the info panel Then click Preferences in the menu bar Use the SidePad Function with...

Page 31: ...alled Android Install the MirrorOp Receiver app from the Google Play store Open the MirrorOp Receiver app Press the menu button on the upper right corner of your Android device and click Settings Set...

Page 32: ...You will see the name of the PC Mac with the MirrorOp Sender app installed Use the SidePad Function with MirrorOp Receiver 8 Select which PC Mac you want to control and enter the passcode you set ear...

Page 33: ...0 USER GUIDE 01 IOS Install the MirrorOp Receiver app from the Apple App Store Go to Settings on your iOS device and click MirrorOp Receiver Use the SidePad Function with MirrorOp Receiver 8 Enable Se...

Page 34: ...32 wePresent 2017 WICS 2100 USER GUIDE 01 Open the MirrorOp Receiver app You will see the name of the PC Mac with the MirrorOp Sender app installed Use the SidePad Function with MirrorOp Receiver 8...

Page 35: ...c PC from your iOS device Use the SidePad Function with MirrorOp Receiver 8 Launch WebSlides 9 Introduction The Webslides function allows the presenter PC Mac with the MirrorOp Sender app installed to...

Page 36: ...iCS 2100 View the presenting slides on your device save the slides as JPG files for note taking annotation or others 1 Presenter Your PC Mac needs to connect to the WiCS 2100 device via WiFi You can d...

Page 37: ...rowser Default address is 192 168 100 10 The below image Home page will appear on the audience s devices Type the password if required Click Login on the lower right of the screen Launch WebSlides 9 T...

Page 38: ...GUIDE 01 Wall Mount Kit 10 1 Insert the two short screws into the two holes on the bottom of the WiCS 2100 box 2 Install the mounting bracket on the wall with the four long screws 3 Secure the WiCS 2...

Reviews: