background image

English

ENG 

ORIGINAL INSTRUCTIONS

5

if provided, for maximum control over kickback 

or torque reaction during start-up. The operator 

can control torque reactions or kickback forces, if 

proper precautions are taken. 2) Never place your 

hand near the rotating accessory. Accessory may 

kickback over your hand. 3) Do not position your 

body in the area where this power tool will move 

if kickback occurs. Kickback will propel this power 

tool in direction opposite to the wheel’s movement 

at the point of snagging. 4) Use special care when 

working corners, sharp edges etc. Avoid bouncing 

and snagging the accessory. Corners, sharp edges 

or bouncing have a tendency to snag the rotating 

accessory and cause loss of control or kickback. 

5) Do not attach a saw chain woodcarving discs 

or toothed saw discs. Such discs create frequent 

kickback and loss of control.

6) Do not use excessively oversized sanding disc 

paper. Follow the recommendations of Werku

®

when selecting sanding paper. Larger sanding 

paper extending beyond the sanding pad presents 

a laceration hazard and may cause snagging, 

tearing of the disc or kickback.

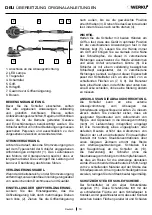
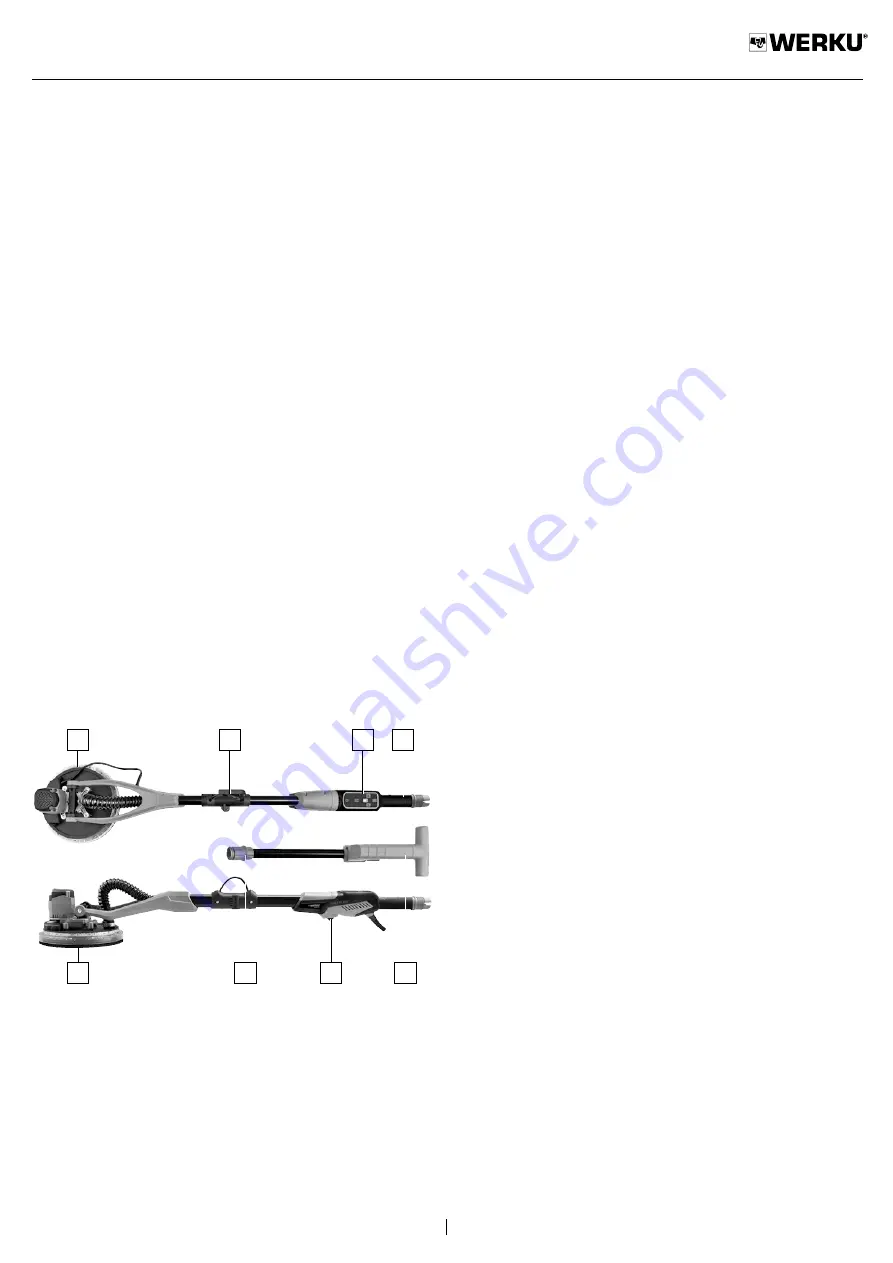
DESCRIPTION OF THE PRODUCT.

The 

sander has been designed to carry out jobs 

of sanding walls and ceilings in plasterboard or 

finished with plaster

. Refer to this plan to familiarize 

yourself with the sander before use.

1

6

7

4

8

2

5

3

1. External vacuum connection.

2. LED lamp.

3. Support plate.

4. Control panel.

5. Handle.

6. Auxiliary handle.

7. Lenght extension adjustment screw.

8. Fastening clip.

USE INSTRUCTIONS.

Before starting up the sander, we recommend 

that you carefully read all of the instructions as 

indicated. Please respect all regulations regarding 

the prevention of accidents, health and safety 

directives, laws and applicable restrictions for work 

places. The sander must only be used by persons 

who have been instructed in its use and only for 

the purposes for which it has been designed.

POWER SUPPLY.

Make sure the power supply is adapted to the 

requirements shown on the information panel of 

the sander (1).  Using the motor at low voltage 

will make it operate slowly.  This will reduce 

performance and may cause the motor to overheat.

EXTENSION CORD.

If the working area is at some distance from the 

power supply, use an extension cord of enough 

diameter and quality.

SETTING EXTENSIBLE.

Loosen  the  adjustment  screw  that  holds  the 

extensible turning several times to the left (2). Pull 

out the extendable up to the desired position (3). 

Tighten the screw by turning it clockwise (4).

IMPORTANT.

The sander must be held by the pole with both 

hands to achieve the best possible position for 

using the sander in any application (5).  Always 

keep your hands on the pole of the sander, never 

near the sanding head, as the pivots on the head 

move  in  different  directions  and  may  trap  your 

hand causing an injury (6).

 The sander has a fully 

articulated sanding head able to pivot in different 

directions, making it possible to adapt the head 

to any type of surface (7, 8, 9). This allows users 

to sand the top, middle and bottom of walls or 

ceilings without changing position.

CONNECTING TO AN EXTERNAL VACUUM 

SYSTEM.

The sander can be connected to an external 

vacuum system to collect the dust produced 

during the sanding process. 

To do so, first make 

sure that a suitable bag is fitted inside the vacuum 

(not supplied) for collecting plaster and mortar. 

Installing an unsuitable or defective dust collection 

bag will increase the amount of dust in the working 

Summary of Contents for WK403260

Page 1: ...GINALES LIJADORA CIRCULAR PAREDES TECHOS DEU ORIGINALANLEITUNGEN WAND DECKE RUNDSCHLEIFER FRA INSTRUCTIONS ORIGINALES PONCEUSE CIRCULAIRE MURS PLAFONDS ITA ISTRUZIONI ORIGINALI LEVIGATRICE CIRCOLARE P...

Page 2: ...er tool can differ from the declared total value depending on the ways in which the power tool is used Warning identify safety measures to protect the operator based on an estimation of exposure in th...

Page 3: ...o not expose power tools to rain or wet conditions Water entering the power tool will increase the risk of electric shock Hold this power tool by insulated gripping surfaces only when performing an op...

Page 4: ...f untrained users MAINTENANCE Check moving parts for misalignment or binding there are no broken parts or other conditions that may affect the operation of power tools Power tools are repaired before...

Page 5: ...ase respect all regulations regarding the prevention of accidents health and safety directives laws and applicable restrictions for work places The sander must only be used by persons who have been in...

Page 6: ...force required to maintain contact between the sander and the working surface Excessive pressure may cause damage to the surface being sanded While the sandpaper is in contact with the working surfac...

Page 7: ...o require any information in rela tion to this warranty the buyer and or distributor may contact the Technical Assistance Service by telepho ne on 34 981 648 119 or by e mail at info werku com This wa...

Page 8: ...g n la forma en que se utilice la herramienta el ctrica Advertencia identifique las medidas de seguridad para proteger al usuario bas ndose en una estimaci n de la exposici n en las condiciones reales...

Page 9: ...elacionados con el polvo SEGURIDAD EL CTRICA La clavija de la herramienta el ctrica debe coincidir con la base de la toma de corriente No modificar nunca la clavija de ninguna manera No usar ning n ad...

Page 10: ...l di metro de ubicaci n de la brida Los accesorios que no coincidan con los accesorios de montaje de esta herramienta el ctrica se desequilibrar n vibrar n excesivamente y pueden causar la p rdida de...

Page 11: ...INSTRUCCIONES DE SEGURIDAD 1 Mantenga un agarre firme en esta herramienta el ctrica y coloque su cuerpo y brazo para permitirle resistir las fuerzas de retroceso Utilice siempre el mango auxiliar si...

Page 12: ...ra recoger el polvo generado durante el proceso de lijado Para ello en primer lugar aseg rese de que dentro del aspirador no suministrado se ha instalado una bolsa apropiada para polvo procedente de p...

Page 13: ...taci n antes de efectuar la limpieza o cualquier mantenimiento de la misma La lijadora debe limpiarse de manera eficaz utilizando aire comprimido al final de cada uso Utilice siempre gafas protectoras...

Page 14: ...recarga de mantenimiento o limpieza inadecuados defectos que han sido causados por el uso de accesorios complementos o repuestos que no son piezas ori ginales Werku si el producto ha sido total o par...

Page 15: ...ats chlichen Gebrauchs des Elektrowerkzeugs kann abh ngig von der Art und Weise in der das Elektrowerkzeug verwendet wird vom angegebenen Gesamtwert abweichen Warnung identifizieren Sie Sicherheitsma...

Page 16: ...ollieren Sie in unvorhergesehenen Situationen das elektrisches Werkzeug besser ANGEMESSENE KLEIDUNG Tragen Sie weder lockere Kleidung noch Schmuck Halten Sie Haare Kleidung und Handschuhe von beweglic...

Page 17: ...u entwickelt und empfohlen wurde Nur weil das Zubeh r an diesem Elektrowerkzeug angebracht werden kann ist kein sicherer Betrieb gew hrleistet Die Nenndrehzahl des Zubeh rs muss mindestens der auf die...

Page 18: ...sachen Halten Sie die H nde von den beweglichen Teilen der Schleifer fern NACH ARBEITSENDE Ber hren Sie nach Gebrauch nicht das an der Schleifer angebrachte Zubeh r Es kann sehr hei sein und Verbrennu...

Page 19: ...e immer am Griff und bringen Sie sie niemals in die N he des Schleifkopfes da dieser in verschiedene Richtungen ausschwenkt die H nde einklemmen und einen Unfall verursachen k nnte 6 Die Schleifer ist...

Page 20: ...iden Vermeiden Sie den Kontakt des Schleifpapiers mit spitzen oder scharfen Stellen die dieSchleiferbesch digenk nnten berpr fenSiedie Schleifergebnisse regelm ig da die Maschine das Material sehr sch...

Page 21: ...Informationen zu die ser Garantie k nnen sich der K ufer oder der H ndler telefonisch ber 34 981 648 119 oder ber E Mail an info werku com mit dem Kundenservice in Verbin dung setzen Ausgenommen von...

Page 22: ...lisation r elle de l outil lectroportatif peuvent diff rer de la valeur totale d clar e en fonction de la mani re dont l outil lectroportatif est utilis Attention identifier les mesures de s curit pou...

Page 23: ...flottants les bijoux ou les cheveux longs peuvent tre pris dans les pi ces en mouvement S il existe des dispositifspourlaconnexiondemoyensd extraction et de ramassage de la poussi re assurez vous qu...

Page 24: ...ompris dans la capacit nominale de cet outil lectrique Les accessoires de taille incorrecte ne peuvent pas tre correctement prot g s ou contr l s Le montage filet des accessoires doit correspondre au...

Page 25: ...tentif ne pas inhaler ces substances et ce que votre peau ne soit pas en contact avec Utilisez les EPI con us pour pr venir et vous prot ger de ce type d accidents AUTRES CONSIGNES DE S CURIT 1 Mainte...

Page 26: ...le bas d un mur ou les diff rentes parties d un plafond sans changer de position RACCORDEMENT UN SYST ME D ASPIRATION EXTERNE La ponceuse peut tre raccord e un syst me d aspiration externe pour recue...

Page 27: ...tacher l agrafesitu esurlec t droitdelapoign eauxiliaire ENTRETIEN Laponceusea t con uepourfonctionnerlongtemps avec un minimum d entretien Le fonctionnement optimal de la ponceuse d pend des soins qu...

Page 28: ...utilisation non conforme celle laquelle est destin ce produit par des facteurs environne mentaux anormaux ou une surcharge un entretien ou un nettoyage inad quats les d fauts caus s par l utilisation...

Page 29: ...it di utilizzo dell utensile elettrico Avvertenza individuare misure di sicurezza a tutela dell operatore sulla base di una stima dell esposizione nelle effettive condizioni di utilizzo PITTOGRAMMI Le...

Page 30: ...a polvere SICUREZZA ELETTRICA La spina dell elettroutensile deve corrispondere alla base della presa Non modificare mai la spina in alcun modo Non utilizzare adattatori di spine con utensili elettrici...

Page 31: ...re un accessorio danneggiato Prima di ogni utilizzo ispezionare l accessorio Se questo elettroutensile o il suo accessorio caduto ispezionare i danni o installare unaccessorioinbuonostato Dopoaverispe...

Page 32: ...la mano 3 Non posizionare il corpo nell area in cui si sposter questo utensile elettrico in caso di contraccolpo Il contraccolpo spinge questo utensile elettrico nella direzione opposta al movimento d...

Page 33: ...egarla a un sistema di raccolta delle polveri poich ci potrebbe causare un pericolo per le vie respiratorie La velocit di riempimento del sacchetto di raccolta della polvere varia a seconda del tipo d...

Page 34: ...i danneggiano i componenti in plastica tra cui la benzina il tetraclorometano i solventi di pulizia clorurati l ammoniaca e i detergenti domestici contenenti ammoniaca Non usare nessuno dei prodotti s...

Page 35: ...i e le sostituzioni non estendono o rinnovano il periodo di validit di questa garanzia Le parti sostituite diventano propriet della Werku Qualo ra l acquirente invii il prodotto al Servizio di Assis t...

Page 36: ...eren waarop het elektrische gereedschap wordt gebruikt Waarschuwing identificeer veiligheidsmaatregelen om de gebruiker te beschermen op basis van een schatting van de blootstellingindewerkelijkegebru...

Page 37: ...anderde stekkers en passende stopcontacten zullen het risico op een elektrische schok verminderen Vermijd lichamelijk contact met geaarde oppervlakken zoals buizen verwarmingen fornuizen en koelkasten...

Page 38: ...is gevallen inspecteer het dan op schade of installeer een onbeschadigd accessoire Plaats uzelf en omstanders na inspectie en installatie van een accessoire uit de buurt van het vlak van het roterende...

Page 39: ...nhaken 4 Weesextravoorzichtigbij het werken in hoeken scherpe randen enz Voorkom dat het accessoire stuitert en blijft haken Hoeken scherpe randen of stuiteren hebben de neiging om het roterende acces...

Page 40: ...ens gebruik zodat het geleidelijk wordt ge limineerd door het externe stofzuigsysteem Als de beschermende borstel beschadigd of versleten is moet deze worden vervangen TOERENTAL SELECTOR De schuurmach...

Page 41: ...eventueel met een nieuwer model In ieder geval accepteert Werku geen vervangingen als deze kosten onevenredig in vergelijking met de reparatiekosten Deze garantie doet geen afbreuk aan de consumentenr...

Page 42: ...forma como a ferramenta el trica usada Aten o identifique medidas de seguran a para proteger o operador com base em uma estimativa de exposi o nas condi es reais de uso PICTOGRAMAS Ler manual de instr...

Page 43: ...eis reduzir n o risco de choque el ctrico Evite contacto corporal com superf cies aterradas tais como tubos radiadores fog es e geladeiras H um aumento do risco de choque el ctrico se seu corpo est no...

Page 44: ...ro do acess rio girat rio Limpe regularmente as aberturas de ventila o desta ferramenta el trica O ventilador do motor puxar a poeira para dentro do alojamento e o ac mulo excessivo de metal em p pode...

Page 45: ...ue Observe este esquema para se familiarizar com a lixadora antes de a utilizar 1 6 7 4 8 2 5 3 1 Conex o sistema aspira o 2 L mpada LED 3 Prato suporte 4 Painel de controle 5 Punho 6 Punho auxiliar 7...

Page 46: ...vez ligada rede el ctrica pressione o bot o de alimenta o para ligar a lixadora 13 Em seguida pressione o bot o iniciar parar para iniciar a lixadeira 14 Quando o trabalho terminar pressione novamente...

Page 47: ...eias ou nacionais O per odo de validade desta garantia de 3 anos O per odo de validade come a na data de aquisi o pelo primeiro consumidor Esta data est reflectida na factura ou ticket de compra A rec...

Page 48: ...48 WK403260 1 1 2 2 3 3 4 4 5 5 7 7 6 6 8 8...

Page 49: ...49 WK403260 9 9 10 10 11 11 12 12 13 13 15 15 14 14 16 16...

Page 50: ...50 WK403260 17 17 18 18 19 19 20 20...

Page 51: ...51 WK403260...

Page 52: ...tecnico in garanzia viene fornito solo dietro presentazione di questo documento firmato e timbrato insieme alla fattura o ricevuta NED Service onder garantie wordt alleen verstrekt op vertoon van dez...

Reviews: