background image

4.2  Cam bio olio

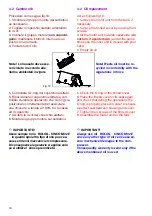
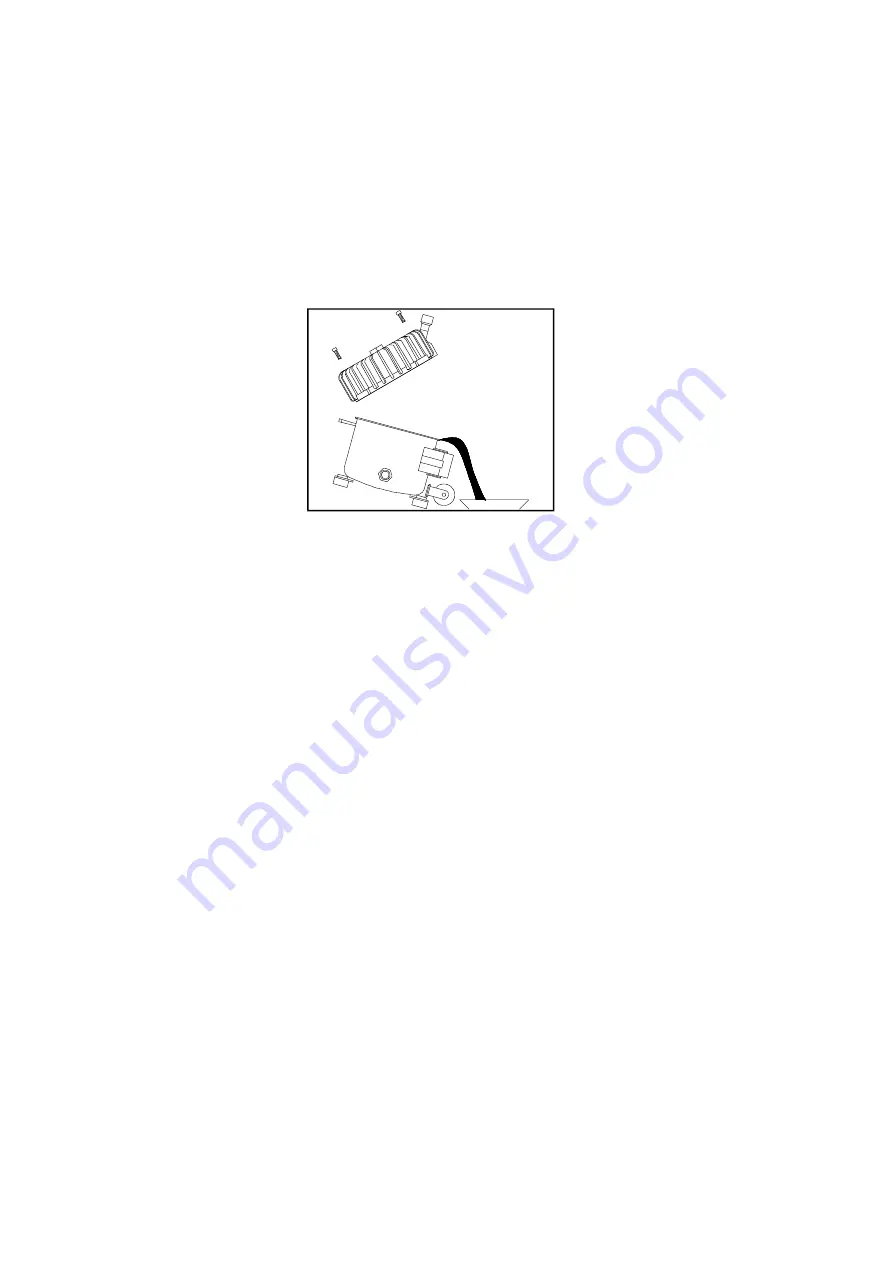
Pro ce de re come se gue fig.10:

1. Smon ta re il grup po mo to re dal ser ba toio
se necessario.

2. To glie re il co per chio alet ta to  al len tan do

le 4 viti.

3. In cli na re il gruppo mo to re  (

non ca po vol -

ger lo

) mante ne re il bloc co in ter no al suo

po sto con una mano.

4. Vuo ta re tut to l’o lio.

Nota ! L’o lio usa to deve es se -

re ri ci cla to  in ac cor do alle

nor me am bien ta li in vi go re 

Fig.10 

5. Con trol la re l’O- ring del co per chio alet ta to.
6. Ri po si zio na re il co per chio alet ta to e con -

trol la re du ran te le ope ra zio ni che l’O- ring sia 

po si zio na to cor ret ta men te per as si cu ra re
una chiu su ra  a te nu ta al 100%  tra la cas sa
ed il co per chio .

7. Av vi ta re le 4 viti del co per chio alettato.

8. Mon ta re il grup po mo to re sul ser ba toio.

I

IM POR TAN TE ! 

Usa re sem pre l’o lio “RO LOIL - SIN COM/32E 

“  in quan to ogni al tro tipo di olio può cau -

sa re seri dan ni mec ca ni ci al com pres so re.

Di con se guen za la ga ran zia si ap pli ca solo

se si uti liz za l’ olio so pra in di ca to.

4.2  Oil replacement

Act as fol lows fig.10:
1. remove the mo tor unit from the tank, if

nec es sary.

2. re mo ve the fin ned co ver by loo sing the 4

screws.

3. tilt the mo tor unit to wards outlet side (

do

not turn it up side down

 )and at the same

time keep the in ner unit in its seat with your

hand. 
4. Empty all oil

Note! Waste oil must be re -

cy cled in con for mity with the 

regu la tions in force

5. Check the O’ring of the fin ned cover

6. Pla ce the fin ned co ver in its seat again

and check that du ring the ope ra tions the
O’ring is pro perly pla ced in or der to en su re
a per fect seal betwe en hou sing and co ver.

7. Tigh ten the 4 screws of the fin ned cover

8. As semb le the mo tor unit on the tank

I

IM POR TANT!

Al ways use oil “ROLOIL – SIN COM/32E”

since any other type of oil can cause se -

vere me chani cal dam ages to the com -

pres sor.

Con se quently war ranty is va lid only if the

abo ve men tio ned oil is used.

16

Summary of Contents for 100/24

Page 1: ...L werinte tin it WEB http web tin it werther S N YEAR Rev 1 24 02 01 15 A 15 D 15 TC 15 TDC 15 EXPORT A 30 4 30 HA 30 D 30 TC 30 TDC 30 6 30 12 50 D 50 TC 50 TDC 50 9 50 12 50 15 50 24 50 S 100 24 100 50 150 50 200 100 Compressori silenziosI automatici AUTOMATIC SILENT COMPRESSORS Centro di assistenza autorizzato Authorized service center ...

Page 2: ...o olio 16 5 Inconvenienti e rimedi 17 6 Informazioni particolari 20 6 1 Demolizione del compressore 20 6 2 Parti di ricambio 20 6 3 Garanzia 20 Contents 1 General information 3 1 1 Importance and use of the manual 3 1 2 Content 3 1 3 Storage 3 1 4 Weights and dimensions 4 1 5 Packing disposal 4 1 6 Lifting 4 1 7 Safety 4 1 8 Main components 6 2 Technical specifications 7 2 1 Technical data 7 2 2 A...

Page 3: ...portance and use of the manual This manual is an integral part of the com pressor and must always accompany it even in the event of sale The compressor owner and or user must know the operating instructions and recommendations before using the compressor If the operator does not fully understand the language of this manual the retailer must supply a correct and detailed translation into his or her...

Page 4: ...ts have been damaged during transport The packing material has to be disposed of in compliance with the regulation in force in the country where the compressor is being erected or recycled or reused 1 6 Lifting The compressors have to be handled and positioned with care using if necessary fork lift trucks or transpallets 1 7 Safety Do not use the compressor for purposes other than those for which ...

Page 5: ...itare il contatto poichè può provocare bruciature La mancanza del rispetto di queste racco mandazioni può causare danni anche gravi al compressore e o alle persone When a flammable liquid is sprayed there may be danger of fire or explosion espe cially in closes rooms ventilate adequately Do not repair the compressor while it is con nected to the electric circuit or to the tank under pressure I WAR...

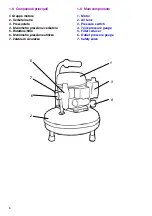
Page 6: ...essostato 4 Manometro pressione serbatoio 5 Riduttore filtro 6 Manometro pressione utilizzo 7 Valvola di sicurezza 1 8 Main components 1 Motor 2 Air tank 3 Pressure switch 4 Tank pressure gauge 5 Filter reducer 6 Outlet pressure gauge 7 Safety valve 6 1 4 7 6 3 2 5 ...

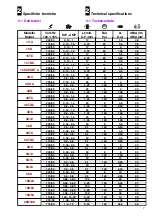
Page 7: ...19 1 4 25 8 3 5 40 115 60 0 2 2 6 1 05 120 0 93 40 30 6 230 50 0 19 1 4 25 8 6 40 115 60 0 2 2 6 1 05 120 1 58 40 30 12 230 50 0 19 1 4 25 8 6 40 115 60 0 2 2 6 1 05 120 1 58 40 50 D 230 50 0 34 2 4 50 8 3 5 43 115 60 0 4 4 8 2 1 120 0 93 43 50 TC 230 50 0 34 2 4 50 8 3 5 43 115 60 0 4 4 8 2 1 120 0 93 43 50 TDC 230 50 0 34 2 4 50 8 3 5 43 115 60 0 4 4 8 2 1 120 0 93 43 50 9 230 50 0 34 2 4 50 8 9...

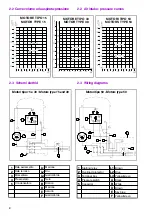
Page 8: ...Azzurro F Giallo Verde 2 2 Air intake pressure curves 2 3 Wiring diagrams 1 Starting relay L1 Brown 2 Overload protector L2 Blue 3 Terminal box L3 Yellow Green 4 Pressure switch A Black 5 Capacitor B White D Brown E Sky blue F Yellow Green 8 MOTORE TIPO 15 MOTOR TYPE 15 MOTORE TIPO 30 MOTOR TYPE 30 MOTORI TIPO 50 MOTORS TYPE 50 Motori tipo 50 Motors type 50 Motori tipo 15 e 30 Motors type 15 and 3...

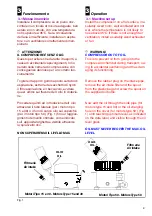
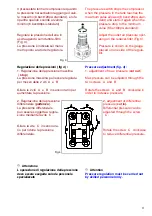
Page 9: ...me indicato sull apposita targhetta e visibile attraverso la spia livello olio NON SUPERARE MAI IL LIVELLO MAX Fig 1 3 Operation 3 1 Machine set up Install the compressor on a flat surface in a suitably sized room well ventilated and not wet where the temperature is not likely to rise above 35 C If there is not enought air ventilation install a suitably sized exhauster or fan I WARNING COMPRESSOR ...

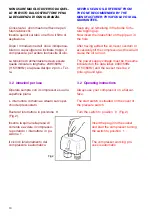
Page 10: ...ente e avviare il compresso re portando l interruttore in po sizione 1 Il ciclo di funzionamento del compressore è automatico Fig 2 NEVER USE AN OIL DIFFERENT FROM THE ONE RECOMMENDED BY THE MANUFACTURER THIS WOULD VOID ALL GUARANTEES Keep any oil remaining in the bottle for fu ture topping up Now insert the intake filter on the pipe or in the hole After having added the oil never overturn or exce...

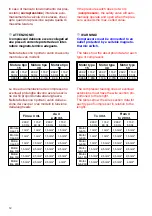
Page 11: ...rre la pressione differenziale Fig 4 I Attenzione L operazione di regolazione della pressione deve essere eseguita solo da personale specializzato The pressure switch stops the compressor when the pressure in the tank reaches the maximum value allowed 8 bar 120psi stan dard and starts it again when the pressure drop to the minimum value 6 bar 90psi standard Adjust the outlet air pressure oper atin...

Page 12: ...mm2 1 5 mm2 2 5 mm2 Motori tipo 100 1 5 mm2 2 5 mm2 1 5 mm2 2 5 mm2 Motori tipo 150 1 5 mm2 2 5 mm2 2 5 mm2 2 5 mm2 Motori tipo 200 1 5 mm2 2 5 mm2 2 5 mm2 4 mm2 If the pressure switch does not work overpressure the safety valve will auto matically operate and open when the pres sure exceeds the max setted value I WARNING Compressors must be connected to an outlet protected by a suitable magneto t...

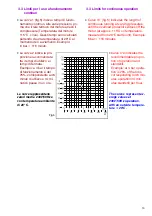
Page 13: ...te a 46 minuti di utilizzo e 14 mi nuti di pausa in un ora Le curve rappresentano valori medi a 230V 50Hz e con temperatura ambiente di 20 C Fig 5 3 3 Limits for continuous operation Curve n 1 fig 5 indicates the length of continuous running at varying pressures until the overload protector switces off the motor at approx 115 C oil temperature measured from 20 C start point Example 6 bar 116 minut...

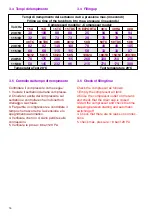
Page 14: ...ank and check that the drain cap is closed 3 Start the compressor and check the time elapsing between starting and automatic switching off 4 Check that there are no leaks on connec tions 5 check max pressure 8 bar 120 Psi 14 Tempi di riempimento del serbatoio da 0 a pressione max in secondi Filling up time of the tank from 0 to max pressure in seconds Volt Hz Compressori modello Compressor model 1...

Page 15: ...mage the floor tip the compressor slightly forward and open the tap Fig 7 Controllare l efficienza del compressore eventuale allentamento di raccordi usura dei tubi di pressione serraggio delle viti efficenza della parte elettrica etc Once a month check the compressor efficiency possible connectors slackening pressure hose wear screws tightening electric circuit efficency etc Controllare il filtro...

Page 16: ...sare seri danni meccanici al compressore Di conseguenza la garanzia si applica solo se si utilizza l olio sopra indicato 4 2 Oil replacement Act as follows fig 10 1 remove the motor unit from the tank if necessary 2 remove the finned cover by loosing the 4 screws 3 tilt the motor unit towards outlet side do not turn it upside down and at the same time keep the inner unit in its seat with your hand...

Page 17: ... difettoso Sostituirlo g Il relé termico ha fatto spegnere il compressore per sovratemperatura Quando raffreddato il compressore ripartirà automaticamente ad una temperatura idonea 5 Troubleshooting I WARNING Before any operation on the compressor disconnect the plug from the socket Empty air tank of air before dismantling any part of compressor unit s pressure system Following operations must be ...

Page 18: ... ripartirà au tomaticamente dopo 15 20 min 5 6 Perdite d aria Possono essere causate dalla cattiva tenu ta di qualche connessione Controllare tutti i raccordi bagnandoli con acqua sapona ta 5 2 The compressor does not reach the maximum pressure a Check any air leak See point 5 6 b Check the pressure switch efficency and if necessary adjust it See page 10 Pressure adjustment c The non return valve ...

Page 19: ...te troppo alta Non installare mai il compressore all interno di un mobile se non adeguata mente ventilato f Il compressore é sovraccaricato Assicuratevi che sia un modello adeguato alle vostre necessità 5 7 Leak from the valve placed under the pressure switch Damaged valve replace it The defect can be due to an unperfect valve seal See point 5 1d 5 8 The compressor starts when no air is being tapp...

Page 20: ...usura La manomissione ed il cattivo uso del compressore fanno decadere automatica mente ogni forma di garanzia Le spese di trasporto e mano d opera sono escluse dalla garanzia 6 Special informations 6 1 Compressor demolition During the compressor demolition all possible safety regulations must be ob served in order to avoid any damage to people or things All the metal parts can be recycled rubber ...

Page 21: ...30 HA 30 D 30 TC 30 TDC 30 6 30 12 50 D 50 TC 50 TDC 50 9 50 12 50 15 50 24 50S 100 24 100 50 150 50 200 100 è stato costruito in conformità alle normative 73 23 CEE 87 404 CEE 89 336 CEE ed 98 37 CE a été construite en conformité avec les normes 73 23 CEE 87 404 CEE 89 336 CEE et 98 37 CE was manufactured in conformity with the normes 73 23 CEE 87 404 CEE 89 336 CEE and 98 37 CE in Übereinstimmun...

Reviews: