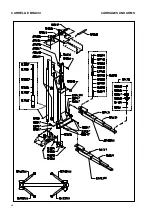
MONTAGGIO BRACCI E DISPOSITIVI DI BLOCCAGGIO-(Fig.53)
1 - Premendo il pulsante di salita, portare la parte inferiore dei
carrelli ad un’ altezza di circa 70 cm da terra, quindi premere il
pulsante di stazionamento.
PORTARE L’ INTERRUTTORE GENERALE (QS) IN POSIZIONE
“O” E TOGLIERE L’ ALIMENTAZIONE AL SOLLEVATORE.
I
ATTENZIONE
La spina dentata (1) e la rondella dentata (8) devono essere ac-
coppiati e non appoggiati uno sull’altro. Fare attenzione a non
danneggiare i denti durante l’accoppiamento. Non utilizzare
martelli per effettuare l’accoppiamento!
2 - Ingrassare i fori diametro 40 alle estremità dei bracci.
3 - Montare i bracci sul supporto tubolare (2) nella parte inferiore
del carrello ed inserire le spine dentate (1) nel supporto attraverso
gli attacchi sul braccio (Vedere Fig.51).
Ad operazione ultimata occorre che i 2 fori ciechi D=10,5 sulla spi-
na (con funzione di sede per l’ estremità del grano M14) siano in
corrispondenza dei fori M14 sul supporto del carrello (Fig.51).
4 - Inserire i grani M14 (3) avvitando i relativi controdadi (4) dall’ in-
terno del supporto tubolare, serrarli contro il perno e bloccare con i
controdadi (Fig.52).
Fig.51
5 - Inserire il perno spingimolla (5) nella spina dentata (1) e suc-
cessivamente la molla (6), avendo cura di ingrassare le suddette
parti prima di montarle.
ARM ASSEMBLING (Fig.53)
1 - Press the up push button, raise the carriages to a height of
about 70 cm off the ground, then press the park push button,
SET THE MAIN SWITCH (QS) TO POSITION 0 AND CUT OFF
THE POWER SUPPLY TO THE LIFT.
I
WARNING
The dowel pin (1) and locking washer (8) are matched pairs do
not mix them up. Be very careful not to demage the spline te-
eth when fitting. Do not use a hammer!
2 - Grease the holes ø 40 on the arms ends.
3 - Mount the arms into the carriage supports and insert the dowel
pins into the support holes as shown in fig.51.
After completing the operation, the attachment holesin the side of
the pins (the place to put the headless screw M14) must line up
with M14 holesin the carriage support (fig.51).
4 - Insert the M14 headless screws into the carriage supports.Tig-
hten them against the pin and lock them with the lock nuts.
Fig.52
5 - (Fig.52) Insert the spring thrust pin (5) into the dowel pin (1) and
then the spring (6), making sure to grease the aforementioned
parts before mounting them.
29
1
Fig.53
11
10
9
8
7
6
5
1
3
2
16
17
4
Summary of Contents for 208I/A
Page 1: ...I SOLLEVATORE ELETTROIDRAULICO A 2 COLONNE GB 2 POST ELECTRO HYDRAULIC LIFT 208I A...
Page 2: ......
Page 39: ...COLONNE E TRAVE SUPERIORE POSTS AND UPPER BEAM 39...
Page 40: ...CARRELLI E BRACCI CARRIAGES AND ARMS 40...
Page 41: ...SICUREZZE SAFETY DEVICES 41...
Page 42: ...QUADRO ELETTRICO TRIFASE THREE PHASE CONTROL PANEL 42...


