COLLAUDI E CONTROLLI DA EFFETTUARE PRIMA
DELL’AVVIAMENTO
VERIFICHE MECCANICHE
·
Fissaggio e serraggio bulloni, raccordi e connessioni;
·
Scorrimento libero delle parti mobili;
·
Pulizia delle varie parti della macchina;
·
Posizione delle protezioni.
·
Bloccaggi bracci.
VERIFICHE ELETTRICHE
·
Collegamenti corretti secondo gli schemi;
·
Messa a terra della macchina;
Funzionamento dei seguenti dispositivi:
·
finecorsa di salita,
·
elettromagneti per sicurezze.
·
elettrovalvola dell’impianto oleodinamico.
VERIFICA IMPIANTO OLEODINAMICO
·
Presenza d’olio in quantità idonea nel serbatoio;
·
Assenza di trafilamenti;
·
Funzionamento cilindri.
N.B.
In caso d’assenza d’olio, immettere nel serbatoio della centra-
lina la quantità di olio mancante.
Vedere la procedura nel capitolo 6: “MANUTENZIONE”.
VERIFICA DEL SENSO DI ROTAZIONE
·
del motore secondo la freccia posta sulla pompa della centrali-
na, mediante brevi avviamenti (ciascun avviamento deve durare
al massimo due secondi).
In caso di inconvenienti nel funzionamento dell’impianto oleodina-
mico vedere tabella “inconvenienti e rimedi” al capitolo 7.
MESSA A PUNTO
I
ATTENZIONE
QUESTE OPERAZIONI SONO DI COMPETENZA
ESCLUSIVA DEI TECNICI DEL CENTRO ASSI-
STENZA AUTORIZZATO, indicato nel frontespizio.
1 - Verifica a vuoto (senza veicoli caricati).
In questa fase occorre verificare in particolare:
·
che i pulsanti di salita, discesa e stazionamento funzionino cor-
rettamente;
·
che il ponte raggiunga l’altezza massima;
·
che non vi siano vibrazioni anomale nelle colonne e nei bracci;
·
che i martelletti si inseriscano sotto i riscontri saldati al carrello;
·
che i finecorsa salita intervengano;
·
che gli elettromagneti intervengano
·
che, dopo aver effettuato i cicli di cui al punto seguente, la diffe-
renza di altezza dei bracci di un carrello rispetto a quelli del car-
rello opposto, risulti inferiore a 1 cm; in caso contrario metterli a
livello agendo sui dadi e controdadi delle funi di sincronismo.
Per le verifiche sopracitate effettuare due o tre cicli completi
di salita e discesa anche al fine di spurgare eventuale aria
presente nel circuito idraulico.
2. Prove a carico.
·
Ripetere le prove precedenti con veicolo a bordo.
Dopo le prove a carico effettuare un controllo visivo della
macchina e riverificare il serraggio della bulloneria.
TESTING AND CHECKS TO PERFORM BEFORE START-UP
MECHANICAL TESTS
·
Attachment and tightness of bolts, fittings and connections;
·
Free sliding of moving parts;
·
Clean state of various parts of the machine;
·
Position of the protection devices.
·
Arm locking device.
ELECTRICAL TESTS
·
Connections comply with diagrams;
·
Machine earth connection;
Operation of the following devices:
·
Rise limit switch,
·
Security devices electromagnets
·
Hydraulic oil plant solenoid-valve.
·
HYDRAULIC OIL TEST
·
Sufficient oil in the tank;
·
No leaks;
·
Cylinder operation .
NOTE
: If oil is not present, fill the reservoir of the power unit with
the necessary amount of oil.
See the procedure in chapter 6: “MAINTENANCE”.
ROTATION DIRECTION TEST
·
the motor should turn in the direction of the arrow located on the
power unit pump; check using brief start-ups (each start-up must
last a maximum of two seconds).
If problems arise in the hydraulic oil plant, see the “Troubleshoo-
ting” table in chapter 7.
SET UP
I
WARNING
THESE OPERATIONS MUST ALWAYS BE PER-
FORMED BY TECHNICIANS OF THE AUTHORI-
SED SERVICE CENTRE indicated in the front of
this manual.
1 - Vacuum test (without vehicles loaded).
In this phase check the following:
·
that the up, down and parking push buttons operate correctly;
·
that the rack reaches the maximum height;
·
that there are no abnormal vibrations in the posts and in the
arms;
·
that the safety wedges enter the iron pads under the carriage;
·
that the rise limit switches trip;
·
that the electromagnet trips;
·
after having done all as previously recommended, the height dif-
ference between the arms of the two carriages, is less than 1cm.
On the contrary, adjust their level by working on the counternuts
on the synchronous steel cables.
To perform the tests listed above, complete two or three
complete up and down cycles. This is also to be done in order
to make the air in the hydraulic circuit going out.
2. Load tests.
·
Repeat the previous tests with the vehicle on the rack.
After the load tests, visually inspect the machinery and check
again that all bolts are tightened.
31
Summary of Contents for 208I/A
Page 1: ...I SOLLEVATORE ELETTROIDRAULICO A 2 COLONNE GB 2 POST ELECTRO HYDRAULIC LIFT 208I A...
Page 2: ......
Page 39: ...COLONNE E TRAVE SUPERIORE POSTS AND UPPER BEAM 39...
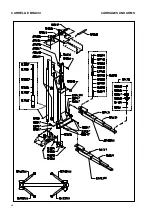
Page 40: ...CARRELLI E BRACCI CARRIAGES AND ARMS 40...
Page 41: ...SICUREZZE SAFETY DEVICES 41...
Page 42: ...QUADRO ELETTRICO TRIFASE THREE PHASE CONTROL PANEL 42...


