OLIO IMPIANTO IDRAULICO.
Effettuare la sostituzione dell’olio, provvedendo come segue:
·
Abbassare il sollevatore fino alla quota minima (a terra).
·
Assicurarsi che il cilindri idraulici siano a fine corsa.
·
Togliere alimentazione al ponte sollevatore.
·
Procedere a scaricare l’olio dal circuito idraulico, svitando il tap-
po posto nella parte inferiore del serbatoio della centralina.
·
Richiudere il tappo di scarico.
·
Procedere al riempimento della centralina, immettendo l’olio dal
tappo posto nella parte superiore del serbatoio della centralina
stessa.
L’olio deve essere filtrato.
Caratteristiche e tipi d’olio sono riportati nelle specifiche tecniche
(cap.2, pag.9).
·
Richiudere il tappo di carico.
·
Ridare tensione al ponte sollevatore.
·
Fare due o tre corse di salita - discesa (per una altezza di circa
20-30 centimetri) per immettere l’olio nel circuito.
Nel cambio dell’olio: usare solo olio raccomandato o equivalente ;
non usare olio deteriorato da lunga giacenza in magazzino.
Lo smaltimento dell’ olio esausto deve essere fatto come indicato
nell’appendice “A”, pag.37.
DOPO OGNI INTERVENTO DI MANUTENZIONE OCCORRE
SEMPRE RIPORTARE LA MACCHINA ALLO STATO INIZIALE
COMPRESE LE PROTEZIONI E LE SICUREZZE SMONTATE.
Per una buona manutenzione è importante :
·
Servirsi solo di attrezzi idonei al lavoro e di ricambi originali.
·
Rispettare le frequenze d’intervento minime previste.
·
Verificare subito le cause di eventuali anomalie (rumorosità ec-
cessiva, surriscaldamenti, trafilamenti di fluidi, etc.)
·
Prestare particolare attenzione agli organi di sollevamento (cilin-
dri) e ai dispositivi di sicurezza.
·
Servirsi di tutta la documentazione fornita dal costruttore (sche-
mi elettrici,etc.).
SCHEMA DI LUBRIFICAZIONE PERIODICA
Lubrificare il ponte come indicato in fig.57.
Il grasso deve essere prelevato da confezioni sigillate e/o ben
conservate. L’uso di grasso vecchio o avariato può danneg-
giare l’elemento da lubrificare.
Fig.57
HYDRAULIC PLANT OIL.
Replace the oil, following the instructions listed below:
·
Lower the lift to the minimum height (on the ground).
·
Make sure that the hydraulic cylinder is at the end of its travel.
·
Disconnect the power supply to the lift rack.
·
Drain the oil from the hydraulic circuit, unscrewing the plug
located at the bottom of the power unit reservoir.
·
Close the drain plug.
·
Fill the power unit with oil through the plug located at the top of
the power unit reservoir.
The oil must be filtered.
Oil characteristics and types are reported in the technical
specifications (chapter. 2, page 9).
·
Close the filler plug.
·
Energise the lift rack.
·
Go through two or three up-down cycles (for a height of about
20-30 centimetres) to insert oil into the circuit.
When changing the oil: use only recommended oil or the equiva-
lent; do not use deteriorated oil that has been in the warehouse for
an extended period of time.
Oil should be disposed as indicated in appendix “A”, page 37.
AFTER EACH MAINTENANCE OPERATION, THE MACHINE
MUST RETURN TO ITS INITIAL CONDITIONS, INCLUDING THE
DISASSEMBLED PROTECTION AND SAFETY DEVICES.
To ensure good maintenance, it is important:
·
To use only tools that are suitable for the job and original spare
parts.
·
Follow the minimum maintenance schedule as indicated.
·
Immediately find the cause of any abnormalities (excessive noi-
se, overheating, leaking fluids, etc.).
·
Pay special attention to lifting parts (cylinders) and safety devi-
ces.
·
Use all the documentation supplied by the manufacturer (wiring
diagrams, etc.).
PERIODIC LUBRIFICATION CHART
Lubricate the rack as indicated in fig.57.
Grease must be taken from perfectly closed tins and/or well
preserved. Old or damaged grease may damage the lubricated
part.
35
u
l
n
p
l
n
p
Dove - Where
Con - What
Quando - When
n
Pattini di scorrimento - Sliding runners and guides
Grasso Grease G68
3 mesi - 3 months
p
Sistema bloccaggio bracci - Arm locking system
Grasso - Grease XM2
3 mesi - 3 months
l
Perni dei morsetti - Wedges pins
Oilo - Oil CB32
3 mesi - 3 months
u
Funi sincronismo - Synchronous cable
Grasso - Grease FD10
6 mesi - 6 months
Summary of Contents for 208I/A
Page 1: ...I SOLLEVATORE ELETTROIDRAULICO A 2 COLONNE GB 2 POST ELECTRO HYDRAULIC LIFT 208I A...
Page 2: ......
Page 39: ...COLONNE E TRAVE SUPERIORE POSTS AND UPPER BEAM 39...
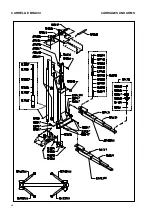
Page 40: ...CARRELLI E BRACCI CARRIAGES AND ARMS 40...
Page 41: ...SICUREZZE SAFETY DEVICES 41...
Page 42: ...QUADRO ELETTRICO TRIFASE THREE PHASE CONTROL PANEL 42...


