background image


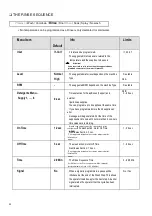
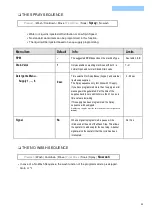
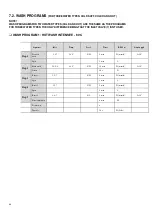
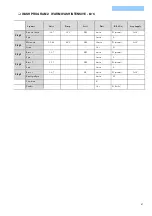
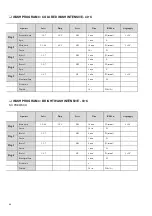
THE


FINAL


RINSE


SEQUENCE


Prewash


|


Wash


|


Cooldown


|


Rinse


|


Final


Rinse


|


Soak


|


Spray


|


No


wash


No


temperature


can


be


programmed


as


a


Last


Rinse


is


only


dedicated


for


cold


(hard)


water.


53


(3


inlets)


(2


inlets)


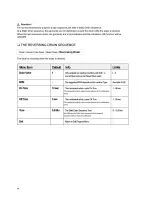
!


Attention!


If


you


insert


other


inlet


valves


than


the


suggested


ones,


problems


can


occur


at


the


water


fill


process.


  !


"#$


  %


!


"


#


&


'


(


&


#


&


)


*


+*


(Liquid


soap


supplies


must


be


switched


on


at


the


configuration


Menu)


,


+


--


$


%


&


#


.


/


0


(The


suggested


default


values


can


be


adjusted


at


the


Initialization


menu)


+


--


$


%


'


#


.&&


/


0


(The


suggested


default


values


can


be


adjusted


at


the


Initialization


menu)


+


--


%


&("


1


"


'


(for


0


Minutes


the


Final


Rinse


sequence


will


be


skipped)


(programmable


in


steps


of


0,5


Minutes)


,


+


-- 2


$


3


&


3


&


!


**


4


5


(


Summary of Contents for WMA504EP

Page 1: ......

Page 2: ......

Page 3: ......

Page 4: ......

Page 5: ......

Page 6: ......

Page 7: ......

Page 8: ......

Page 9: ......

Page 10: ......

Page 11: ......

Page 12: ......

Page 13: ......

Page 14: ......

Page 15: ......

Page 16: ......

Page 17: ......

Page 18: ......

Page 19: ......

Page 20: ......

Page 21: ......

Page 22: ......

Page 23: ......

Page 24: ......

Page 25: ......

Page 26: ......

Page 27: ......

Page 28: ......

Page 29: ......

Page 30: ......

Page 31: ......

Page 32: ......

Page 33: ......

Page 34: ......

Page 35: ......

Page 36: ......

Page 37: ......

Page 38: ......

Page 39: ......

Page 40: ......

Page 41: ......

Page 42: ......

Page 43: ......

Page 44: ......

Page 45: ...NCTIONS 44 5 4 STEP PROGRAM STEP FUNCTION 46 5 5 STEP PROGRAMMING THE WASH PART 47 5 6 STEP PROGRAMMING THE DRAIN STEP 56 6 OPERATION MENU 59 6 1 STARTING UP 59 6 2 SWITCHING ON THE POWER 59 6 3 LOAD THE WASHING MACHINE 59 6 4 PUT SOAP INTO THE SOAP DISPENSER 59 6 5 STARTING A WASH PROGRAM 59 6 6 SELECTIONOFANEWPROGRAMAFTERTHEORIGINALPROGRAM HASSTARTED 60 6 7 THE ACTIVE PROGRAM 60 6 8 ADVANCING A ...

Page 46: ... 12 ECO COLOR WASH 40 C 72 WASH PROGRAM 13 ECO BRIGHT WASH 30 C 73 WASH PROGRAM 14 EXTRACTION LOW SPEED 73 WASH PROGRAM 15 EXTRACTION HIGH SPEED 73 8 TROUBLESHOOTING 74 8 1 DISPLAY MESSAGES 74 8 2 FAULT MESSAGES 74 8 3 HOW TO HANDLE FAULT MESSAGES 75 8 4 OVERVIEW 77 8 5 SERVICE MENU 79 8 6 DIAGNOSTIC PROGRAM 82 8 7 PROBLEM CHECK LIST 85 8 8 EXTERNAL COMMUNICATION PROBLEMS 86 8 9 EXPLANATION ERROR ...

Page 47: ... voltage if loaded or not must work in the range 10 with a maximum permanent frequency deviation of 1 or a short time one at 2 of a given frequency Connecting or starting the machine at an incorrect voltage can damage the programmer The machine must not be exposed to high humidity or extreme high and low temperatures Do not tamper with the controls INSTRUCTIONS IN THIS MANUAL DO NOT COVER ALL DANG...

Page 48: ...D BUTTONS Hidden navigation button LEFT Hidden navigation button RIGHT 7 START ADVANCE function for the OPL version CONFIRM THE SELECTION ENTER CANCEL THE SELECTION MOVE UP MOVE DOWN SELECTION OF ADDITIONAL FUNCTIONS ...

Page 49: ...8 ...

Page 50: ...e progression bar Indication of wait for heat if selected Diagnostic messages THE OPERATION MENU A program can be manually Shortened Extended Stopped A pause can be programmed A direct operation of selected components water valves etc Program overview Service information THE HARDWARE AND SOFTWARE OF THE WASH COMPUTER Easy operation by a comprehensive keypad The hardware contains 2 electronic board...

Page 51: ...egrees Fahrenheit the selection Full Heating the selection of Wet Cleaning very low programmable water levels the selection of the minimum level start supplies The INITIALIZATION Menu is designated for the selection of the displayed Language programming the Service due value the selection of the Buzzer time interval the selection of the Advance function the selection of the Wait for temperature fu...

Page 52: ...how to enter the number 321 1 Use the LEFT button to move the cursor into the position of the digit for single units 2 Use the FUNCTION SELECTION button and set the digit to 1 3 Use the RIGHT button to move the cursor into the position of the digit for tens 4 Use the FUNCTION SELECTION button and set the digit to 2 5 Use the RIGHT button to move the cursor into the position of the digit for hundre...

Page 53: ...ION button 3 The display shows Service Info 4 Press the buttons LEFT and RIGHT at the same time 5 The display shows the main menu If the password has been activated you will have to enter the correct password first How to leave a setup mode When the Main Menu screen is shown Press the INFO button on the keypad Then you will return to Run Mode and the program overview is shown 12 ...

Page 54: ... Drain Extraction Sequence Wash Sequence Drain Extraction Sequence Wash Sequence Drain Extraction Sequence Step 3 Step 3 Wash Sequence Drain Extraction Sequence Wash Sequence Drain Extraction Sequence Step 99 Step 99 Wash Sequence Drain Extraction Sequence Tumble Sequence Tumble Sequence Tumble Sequence Wash Sequence Drain Extraction Sequence Tumble Sequence Available Wash Sequences Prewash Wash C...

Page 55: ... FINAL RINSE SOAK SPRAY No WASH Then program all the related functions of the sequence The available functions are Temperature Water Level Water Inlet Valves The Wash Speed The Reversing Interval times Supplies Sequence Time length of step Drain valve 1 2 Pause Signal You will notice that each step has default settings This feature is very helpful as most of the newly created programs will not req...

Page 56: ...1 2 As you will notice it s also possible to skip a sequence between two other sequences by programming No WASH or No Drain Example The No drain sequence should be programmed between a wash and a cool down sequence ATTENTION A MORE DETAILED EXPLANATION FOR THE SPECIFIC SEQUENCES CAN BE FOUND IN CHAPTER 5 The Tumble sequence The wash cycle will always end with the Tumble sequence The tumble sequenc...

Page 57: ...the soap must be added If you want to program a wash sequence with Cold Water only Cold Inlet Valves must be programmed Warm or Hot water Cold and Hot Inlet Valves must be programmed The cold water inlet valves Inlet Valve 1 corresponds with soap box for a Prewash Inlet Valve 2 corresponds with soap box for a Wash detergent Inlet Valve 3 corresponds with soap box for a Wash liquid soap Inlet Valve...

Page 58: ... PREWASH WASH and SOAK sequences The Normal High Level is recommended for the RINSE and FINAL RINSE Sequences At the COOLDOWN sequence the Wash Computer makes use of a low water level and is draining the water automatically At the Spray sequence the Drain valve stays open Wet Cleaning selection Configuration menu It s possible to program a level below default minimum programmable level see table 3...

Page 59: ...5 20 22 5 24 8 31 3 31 8 15 20 5 22 5 25 5 27 5 34 6 35 8 16 22 5 25 28 5 30 5 38 6 40 2 17 25 27 5 31 33 8 42 6 44 6 18 27 30 34 37 3 46 8 49 4 19 29 32 37 40 8 51 4 54 20 31 35 40 44 54 5 59 21 33 37 43 47 5 59 5 63 6 22 35 5 40 46 50 4 63 7 68 5 23 37 5 42 5 49 5 53 9 68 5 73 6 24 40 45 53 57 4 73 78 5 25 42 47 5 56 61 1 77 7 83 8 26 44 5 50 59 5 64 5 82 3 89 7 27 46 5 52 5 62 5 68 3 86 7 94 6 ...

Page 60: ...achine type Minimum programmable level Normal Low Level Default value Normal High Level Default value Maximum programmable level Cabinet Hardmount 80L 9 14 15 29 105L 9 14 15 30 135L 9 15 16 30 180L 7 18 19 30 240L 7 18 19 30 280L 7 18 19 30 ...

Page 61: ...150 91 149 760 250 135L 46 10 60 720 150 91 149 760 250 180L normal spin 42 10 55 440 150 91 149 490 250 240L normal spin 42 10 55 440 150 91 149 490 250 280L normal spin 42 10 55 440 150 91 149 490 250 180L medium spin 42 10 55 640 150 91 149 690 250 240L medium spin 42 10 55 640 150 91 149 690 250 280L medium spin 42 10 55 640 150 91 149 690 250 Tab 3 6 B Speed of machines with frequency inverte...

Page 62: ...lowed g force at high spin for each washing machine type Programming Supplies Up to 4 Supplies can be programmed at the same time in a sequence If Liquid soap pumps have been installed on the washing machine then these pumps will be activated by programming a time value for the corresponding supply signal 1 2 3 4 5 6 7 8 Time Limits The maximum programmable time is 99 Seconds If the time is 0 Seco...

Page 63: ...For a Cooldown Sequence the programmed time corresponds with the time for decreasing the water temperature Recommendation At least a cooldown of 3 minutes must be programmed And to avoid the shrinking of the garments it s recommended to program the time so that the temperature will decrease with about 3 C for each minute ATTENTION FOR A SPRAY SEQUENCE IF A SUPPLY HAS BEEN PROGRAMMED THE SEQUENCE T...

Page 64: ...KING CHANGES TO CAREFULLY WRITE DOWN WHAT THE PREVIOUS SETTINGS WERE AS THE WASH COMPUTER IS USED FOR A WHOLE RANGE OF WASHING MACHINES AFTER THE INSTALLATION OF A NEW WASH COMPUTER YOU NEED TO PROGRAM MACHINE SPECIFIC SETTINGS INTO THE CONFIGURATION MENU SEE PARAGRAPH 4 2 AT THE INSTALLATION OF NEW SOFTWARE AFTER LOADING THE FACTORY SETTINGS SEE PARAGRAPH 4 2 YOU NEED TO CHECK THE DEFAULT SETTING...

Page 65: ...e Main menu is now available The Initialization Menu is the first Menu Press the ENTER button to make your selection Now you will see the first menu item By pressing the ARROW DOWN or UP button you can select the menu items one by one 25 0 1 1233 4 5 6 7 8 ...

Page 66: ...5 7 81 9 Attention If 99 minutes has been selected NO error message will be generated at all even if the heating time exceeds 99 minutes The machine will only stop heating when the programmed temperature has been reached 1 1 ...

Page 67: ... programmed water level has been reached Attention It s strongly recommended that the heating power of the steam installation has enough power to heat the bath quickly Otherwise the tub will be filled with extra water and an error message will occur that the machine takes more then 5 units extra water This will also increase the water energy and detergent supply consumption ...

Page 68: ...tic cooldown function will only be functional if a hot wash with a temperature above 65 C has been programmed and if a cold water inlet valve is programmed in the next step When a Cooldown sequence has been programmed the automatic cooldown will not function The automatic cooldown differs from a normal cooldown sequence The purpose of a normal cooldown sequence is to avoid the shrinking of the gar...

Page 69: ...NTO THE CONFIGURATION MENU The configuration menu can only be accessed when the machine is in standby the power is switched on but no program is started The program overview is shown Switch the machine to the setup mode see chapter 3 4 The Main menu is now available Press the ARROW DOWN button to select the Configuration Menu Press the ENTER button to make your selection For the Configuration Menu...

Page 70: ...fter changing the wash machine type it s recommended to erase the program memory and load the standard wash programs again as the wash program settings differ for each machine type Attention MAKE SURE THAT YOU HAVE SELECTED THE CORRECT MACHINE TYPE OTHERWISE THE MACHINE WILL NOT FUNCTION PROPERLY Attention Reset Defaults must only be executed for each new installed wash Computer and after selectin...

Page 71: ...rly if the inverter contains the right list of inverter parameters By the wash computer it is possible to load the list of parameters in the inverter Make sure that the correct Supply Voltage has been selected first Attention Loading parameters is only required after installing a new inverter Parameter List Version machine type inverter type software version Sending Param 0 100 Verify Param 0 100 ...

Page 72: ...ll be suggested at the final rinse sequence Depending on this selection other inlet valves will be programmed when the standard programs are loaded 0 1 2 3 3 3 4 3 5 22 6 3 5 6 3 5 17 6 8 Attention In case of a hygienic program 100 must be selected 22 6 ...

Page 73: ...33 Attention If 2 or more machines have the same Communication Address the communication network will not function properly ...

Page 74: ...INTO THE ADVANCED MENU The Advanced menu can only be accessed when the machine is in standby the power is switched on but no program is started The program overview is shown Switch the machine to the setup mode see chapter 3 4 The Main menu is now available Select the Advanced Menu after turning it on in the Configuration menu The advanced menu contains a list of extra menu s with special function...

Page 75: ...he Strict Temperature Control function In this case the wash computer works with a temperature control with a hysteresis above the programmed temperature value See line 2 at the fig 4 3 Strict Temperature Control is not applicable for delicates and woollens and will not work for a programmed temperature 30 C Water Temperature Target 2 Strict Temperature Control 1 Normal Temperature Control Water T...

Page 76: ... wash program can be locked individually When the program is locked it means no settings can be changed anymore It avoids that programs once created get changed by somebody else To get access to this menu a password is needed if it has been set 36 Attention The Password will not be requested if it has not been set Attention The Password will not be requested if it has not been set ...

Page 77: ... DATA EXPORT IMPORT 37 ...

Page 78: ...al functions HOW TO ENTER THE PAYMENT MENU You can only enter the Payment Menu when the machine is in the standby state it is connected to the power supply but no program is running The program overview is shown Switch the machine into the setup mode see chapter 3 4 The main menu is now available In the configuration menu select the Payment Menu 38 ...

Page 79: ...39 ...

Page 80: ...40 ...

Page 81: ...a wash program is running or if the machine is in a failure state the coin selector will not accept coins For connecting the coil to the programmer see the electrical wiring diagram 4 4 2 SELECTION OF ADDITIONAL FUNCTIONS One additional function may be selected from the Additional Functions menu This additional function may be activated selected by the washing machine user customer during the proc...

Page 82: ...42 ...

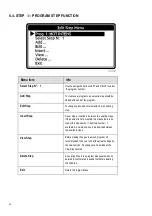
Page 83: ... steps Step Number Selecting the Program Step Add Adding a Program Step at the end of the program Edit Adjusting the Program Step Insert Adding a Program Step between two other steps View Inspecting the Step settings without making changes Delete Deleting a Step Exit Leave the Program Step Menu Follow the flowchart step by step 5 2 STEP PROGRAM MENU HOW TO GET INTO THE PROGRAM MENU The Program men...

Page 84: ...Press the ENTER button to confirm your selection Go to 5 3 STEP PROGRAM FUNCTIONS 44 ...

Page 85: ...gram individually If a program is locked a sign Locked is displayed in brackets next to the program number and it is not possible to change the wash programs Only the View function will be functional and the other functions to adjust the program will be disabled 45 ...

Page 86: ...5 4 STEP PROGRAM STEP FUNCTION 46 ...

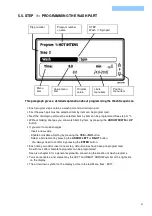
Page 87: ...an watch item by item by pressing the ARROW DOWN or UP button If you want to make changes Insert a new value Enable or disable a Setting by pressing the YES or NO button Select a list element by pressing the ARROW LEFT or RIGHT button You always need to confirm by pressing the ENTER button Each time you add or insert a new step default values have been pre programmed So with less effort complete p...

Page 88: ...quence Now by pressing the ARROW LEFT or RIGHT button you can select the desired sequence Press the ENTER button to confirm You can also use the ARROW DOWN button if you accept the pre programmed default value THE PREWASH SEQUENCE Prewash Wash Cooldown Rinse Final Rinse Soak Spray No wash 48 Attention If you insert other inlet valves than the suggested ones problems can occur at the water fill pro...

Page 89: ...49 The suggested default values can be adjusted at the Initialization menu for 0 Minutes the Prewash sequence will be skipped programmable in steps of 0 5 Minutes ...

Page 90: ...occur at the water fill process Liquid soap supplies must be switched on at the configuration Menu 0 1 2 3 4 The suggested default values can be adjusted at the Initialization menu 1 2 3 4 The suggested default values can be adjusted at the Initialization menu 5 for 0 Minutes the Wash sequence will be skipped programmable in steps of 0 5 Minutes 0 6 5 1 5 7 8 ...

Page 91: ...s of adding and draining water doesn t allow this ATTENTION DO NOT PROGRAM A DRAIN SEQUENCE BEFORE A COOLDOWN SEQUENCE 51 The suggested default valuescan be adjusted at the Initializationmenu The suggested default valuescan be adjusted at the Initializationmenu for 0 Minutes the Cooldown sequence will be skipped programmable in steps of 0 5 Minutes Attention If a short time is programmed the water...

Page 92: ... valves than the suggested ones problems can occur at the water fill process Liquid soap supplies must be switched on at the configuration 0 MENU 1 2 The suggested default values can be adjusted at the Initialization menu 0 1 2 The suggested default values can be adjusted at the Initialization menu for 0 Minutes the Rinse sequence will be skipped programmable in steps of 0 5 Minutes 3 4 4 5 6 ...

Page 93: ... insert other inlet valves than the suggested ones problems can occur at the water fill process Liquid soap supplies must be switched on at the configuration Menu 0 The suggested default valuescan be adjusted at the Initializationmenu 0 The suggested default valuescan be adjusted at the Initializationmenu 1 for 0 Minutes the Final Rinse sequence will be skipped programmable in steps of 0 5 Minutes...

Page 94: ...roblems can occur at the water fill process Liquidsoapsuppliesmustbeswitchedonattheconfigurationmenu 00 1 2 The suggested default valuescan be adjusted at the Initializationmenu 00 1 2 The suggested default valuescan be adjusted at the Initializationmenu 00 for 0 Hour the Soak sequence will be skipped programmable in steps of 0 1 Hour 3 4 5 1 5 6 7 ...

Page 95: ...ater inlets can be programmed in this function The liquid will be injected based on soap supply programming THE NO WASH SEQUENCE Prewash Wash Cooldown Rinse Final Rinse Soak Spray No wash In case of a No Wash Sequence the wash function of the programmed step is skipped Goto 55 Liquid soap supplies must be switched on at the configuration menu 0 1 0 2 3 4 ...

Page 96: ...epending on the machine type you have more or less functions For a new step the first sequence that is displayed is the Drain sequence default Select the desired Drain step sequence from the list by pressing the ARROW LEFT or RIGHT button Press the ENTER button to confirm your selection You can also use the ARROW DOWN button if you accept the pre programmed default value THE DRAIN SEQUENCE Drain E...

Page 97: ......

Page 98: ......

Page 99: ... information 6 5 STARTING A WASH PROGRAM Use the navigation buttons UP and DOWN and choose the required program Press the CONFIRM SELECTION button If any of the special functions is activated the screen for activation of the selected function is shown Use the ADDITIONAL FUNCTION SELECTION button and carry out the setting End the process of selecting function by using the CONFIRM SELECTION button T...

Page 100: ...ot insert the required coins the program returns to the program number which was selected when the START button was pressed 6 7 THE ACTIVE PROGRAM The cycle time will decrease minute by minute and gives you an indication how long it will take before the cycle is finished A Progression bar shows the progression of the wash cycle and the active wash step Progression bar Program number Wash program n...

Page 101: ...achine is ready to start a new program The program overview is shown 6 11 WATER FILL PROCESS Depending on the water temperature the cold and hot inlet valves will be opened The water level is measured by an electronic water level sensor If the Temperature Balance function is enabled the Wash Computer will control the water temperature until the target temperature is reached For Hot wash programs e...

Page 102: ...e programmed speed the drum will spin at distribution or low spin speed 6 15 UNBALANCE When the machine is badly loaded during the spin sequence then the tilt switch will get activated The spin sequence will be interrupted and the garments in the drum will be redistributed The washing machine will try up to 5 times to redistribute the garments 6 16 PAUSE When a signal has been programmed at the en...

Page 103: ...igh it s not possible to open the door The messages WATER IN CAGE or TOO HOT will be displayed together with the level and the temperature ATTENTION IT S UP TO THE OPERATOR TO TAKE THE NECESSARY PRECAUTIONS IF THE DRAIN VALVE IS NOT FUNCTIONAL AND THERE IS STILL HOT WATER IN THE TUB AT THE END OF THE WASH CYCLE ON THE DISPLAY THE ACTUAL WATER TEMPERATURE AND LEVEL WILL BE DISPLAYED WAIT UNTIL THE ...

Page 104: ...the actual wash machine states at the running wash cycle By pressing the ARROW DOWN button you will see all the menu items 6 20 3 PROGRAM OR COIN SELECTOR COUNTER Move to the SERVICE INFO see chapter 3 4 Press the navigation arrow DOWN to move into the screen with counters OPL version the program counter is shown Coin operated machines the coin selector counter is shown Resetting the counters to z...

Page 105: ... rinse Fabric softener Inlet Valve 5 Hot Soft Water Soap Dispenser Compartment I Pre wash Inlet Valve 6 Hot Soft Water Soap Dispenser Compartment II Wash detergent Inlet Valve 7 Cold Hard Water Direct Inlet External liquid soap Inlet Valve 8 Hot Soft Water Soap Dispenser Compartment III Wash liquid WATER LEVEL NL Normal Low level NH Normal High level EL Economic Low level EH Economic High level WA...

Page 106: ...WASH PROGRAM 1 HOT WASH INTENSIVE 90 C 66 Sequence Inlet Temp Level Time R P M x Soap Supply Step 1 Prewash wash 1 5 7 30 C NH 5 min W normal 1 30 Spin 1 min L Step 2 Main wash 2 3 6 8 90 C NH 10 min W normal 2 30 Drain 30 s D Step 3 Rinse 1 1 2 7 NH 4 min W normal Spin 1 min L Step 4 Rinse 2 1 2 7 NH 4 min W normal Spin 1 min L Step 5 Rinse 3 1 4 7 NL 4 min W normal 3 30 Final spin Spin 9 min H S...

Page 107: ...1 5 7 30 C NH 5 min W normal 1 30 Spin 1 min L Step 2 Main wash 2 3 6 8 60 C NH 10 min W normal 2 30 Drain 30 s D Step 3 Rinse 1 1 2 7 NH 4 min W normal Spin 1 min L Step 4 Rinse 2 1 2 7 NH 4 min W normal Spin 1 min L Step 5 Rinse 3 1 4 7 NL 4 min W normal 3 30 Final spin Spin 9 min H Slowdown X Tumble 30 s W 5s 5s ...

Page 108: ...NH 4 min W normal Spin 1 min L Step 4 Rinse 2 1 2 7 NH 4 min W normal Spin 1 min L Step 5 Rinse 3 1 4 7 NL 4 min W normal 3 30 Final spin Spin 9 min H Slowdown x Tumble 30 s W 5s 5s Sequence Inlet Temp Level Time R P M x Soap Supply Step 1 Main wash 2 3 6 8 30 C NH 10 min W normal 2 30 Drain 30 sec D Step 2 Rinse 1 1 2 7 NH 4 min W normal Drain 1 min D Step 3 Rinse 2 1 2 7 NH 4 min W normal Drain ...

Page 109: ...ec D Step 3 Rinse 2 1 2 7 NH 2 min W gentle Drain 30 s D Step 4 Rinse 3 1 4 7 NH 3 min W gentle 3 30 Final spin Spin 2 5 min L Slowdown X Tumble 30 s W gentle Sequence Inlet Temp Level Time R P M x Soap Supply Step 1 Main wash 2 3 6 8 90 C NL 1 20 min W normal 2 30 Drain 30 s D Step 2 Rinse 1 1 2 7 EH 4 min W normal Spin 1 min L Step 3 Rinse 2 1 2 7 EH 4 min W normal Spin 1 min L Step 4 Rinse 3 1 ...

Page 110: ...p 2 Rinse 1 1 2 7 EH 4 min W normal Spin 1 min L Step 3 Rinse 2 1 2 7 EH 4 min W normal Spin 1 min L Step 4 Rinse 3 1 4 7 EH 6 min W normal 3 30 Final spin Spin 9 min H Slowdown x Tumble 30 s W 5s 5s Sequence Inlet Temp Level Time R P M x Soap Supply Step 1 Main wash 2 3 6 8 40 C NL 1 20 min W normal 2 30 Drain 30 s D Step 2 Rinse 1 1 2 7 EH 4 min W normal Spin 1 min L Step 3 Rinse 2 1 2 7 EH 4 mi...

Page 111: ...C NL 1 20 min W normal 2 30 Drain 30 s D Step 2 Rinse 1 1 2 7 EH 4 min W normal Drain 1 min D Step 3 Rinse 2 1 2 7 EH 4 min W normal Drain 1 min D Step 4 Rinse 3 1 4 7 EH 6 min W normal 3 30 Final spin Spin 9 min H Slowdown x Tumble 30 s W 5s 5s Sequence Inlet Temp Level Time R P M x Soap Supply Step 1 Main wash 2 3 6 8 85 C EH 1 14 min W normal 2 30 Drain 1 min L Step 2 Rinse 1 1 2 7 EL 2 4 min W...

Page 112: ...t Temp Level Time R P M x Soap Supply Step 1 Main wash 2 3 6 8 55 C EH 1 14 min W normal 2 30 Drain 1 min L Step 2 Rinse 1 1 2 7 EL 2 4 min W normal Spin 1 min L Step 3 Rinse 3 1 4 7 EL 3 4 min W normal 3 30 Final spin Spin 9 min H Slowdown X Tumble 30 s W 5s 5s Sequence Inlet Temp Level Time R P M x Soap Supply Step 1 Main wash 2 3 6 8 40 C EH 1 14 min W normal 2 30 Drain 1 min L Step 2 Rinse 1 1...

Page 113: ... 2 3 6 8 30 C EH 1 14 min W normal 2 30 Drain 1 min D Step 2 Rinse 1 1 2 7 EL 2 4 min W normal Spin 1 min D Step 3 Rinse 3 1 4 7 EL 3 4 min W normal 3 30 Final spin Spin 9 min H Slowdown x Tumble 30 s W 5s 5s Sequence Inlet Temp Level Time R P M x Soap Supply Step 1 Rinse 1 4 7 NH 3 min W normal 3 30 Final spin Spin 5 5 min L Slowdown x Tumble 30 s W normal Sequence Inlet Temp Level Time R P M x S...

Page 114: ...the individual functions of the washing machine one by one 8 2 FAULT MESSAGES If a failure occurs the computer will display a diagnostic error message The program number and step at which the interruption has occurred are displayed The fault message itself contains a number and a corresponding text label by which it s easy to find the related information in the manual If UNLOAD is displayed the do...

Page 115: ...m with the door lock system Each time at the end of the cycle the Wash computer will fulfill a safety test sequence If at the end of the cycle the safety conditions are not fulfilled the messages TOO HOT or WATER IN CAGE will be displayed If the problem disappears the water has dropped below the safety level for spin or the water temperature has dropped below 55 C the Errormessage TOO HOT or WATER...

Page 116: ... stopped but will run the tumble sequence Full stop safety time the program is stopped and a safety time is started Don t start the program will not be started as long as the safety conditions are not fulfilled WHEN SAFETY IS NOT INVOLVED Skip continue the actual cycle step is skipped and the program continues with the next step Continue the program continues SPECIAL CASES For E24 Defective Level ...

Page 117: ...14 Heat Time Heating time failure Full stop request for Continue While heating E15 Too Hot Too Hot Full stop tumble While heating E16 Coin blocking 1 Coin meter failure Before start up E17 Coin blocking 2 Coin meter failure Before start up E21 Overflow Overflow failure Full stop tumble Wash step E24 Level Sens Defective level sensor Continue Don t start Before start up E25 Temp Sensor Defective te...

Page 118: ...ong Voltage Range Selection Make correct selection Configuration menu E44 Model Type Incorrect selection of machine type Make correct selection Configuration menu E80 Soap Time Out On Hold Signal Failure Soap Dispensing System Full stop tumble Whole cycle E300 E353 Mits Err Specific Mitsubishi Inverter Alarm Full stop safety time Whole cycle E500 E525 Memory Err Memory Error Full stop safety time ...

Page 119: ... Reset Cycle Counter and Statistics Error Messages HOW TO GET INTO THE SERVICE MENU The SERVICE menu can only be accessed when the machine is in standby the power is switched on but no program is started The program overview is shown Turn the washing machine to the setup mode see chapter 3 4 The Main menu is now available Press the ARROW DOWN button to select the SERVICE menu Press the ENTER butto...

Page 120: ...eset by the Reset Service Counts menu item in the toolbox menu The List with Statistics No Drain E2 E37 Door Switch E6 E7 E8 E9 No Fill E11 E40 No Heating E13 E14 Temp Sensor E25 Level Sensor E24 Out of balance switch E3 Invert Com E27 Invert Alarm E26 E28 E29 E72 E73 E74 E75 Invert OV Alarm E303 E304 E305 ...

Page 121: ... CARE HAS BEEN TAKEN AT THE INITIALIZATION OF THE PARAMETERS OF THE FREQUENCY INVERTER THE MANUFACTURER IS NOT RESPONSIBLE FOR THE WRONG BEHAVIOR OF THE WASHING MACHINE IF THE OWNER HAS INSTALLED NEW PARAMETER SETTINGS IN THE INVERTER THAT DO NOT CORRESPOND WITH THE ORIGINAL SETTINGS AT THE FACTORY 00 0 1 2 3 45 ...

Page 122: ... the machine is in standby the power is switched on but no program is started The program overview is shown Turn the washing machine to the setup mode see chapter 3 4 The Main menu is now available Press the ARROW DOWN button to select the Service menu Select the Diagnostic Program menu at the Service menu Select diagnostic program Press START if you want to start the diagnostic program 82 ...

Page 123: ...on high spin 8 Motor High spin High spin speed the drum is turning away from the soap box 9 Motor Stop Free run or controlled deceleration 20 Inlet I1 The machine takes water by inlet 1 21 Drain 1 The water is drained by drain valve 1 22 Inlet I2 The machine takes water by inlet 2 until the safety level for heating is reached Heating activated only if Wait temp on 23 Drain 1 2 The water is drained...

Page 124: ...rated Check also the Error Log List in the Service menu Check the error handling and explanation of the error messages 84 Sequence Wash Supply 2 30 Inlet 2 3 6 8 Temp 40 C Level NL Washaction A 12 R 3 Time 6 min R P M W Drain Rinse1 1 2 7 NH A 12 R 3 30 s 1 5min D W Spin FinalRinse 3 30 4 7 NL A 12 R 3 1 min 2 min L W Spin Slowdown 4 5min 1 min H Tumble A 12 R 3 30 s W ...

Page 125: ...functioning check the electrical wiring of the slot Make sure that you entered the coin value in the Payment menu Check correct functioning of the slot contact Check that positive impulses are generated Check correct functioning of the optical sensor Check that positive impulses are generated If the electrical connection is faulty repair it Enter correct coin value in the Payment menu The machine ...

Page 126: ...ns into high revolutions or during the spinning sequence at low revolutions If the safety switch is activated the machine first attempts five times to redistribute the linen in the drum and carry out the spinning sequence If the safety switch gets activated 5 times the spinning sequence will be skipped This function will protect the machine against overload and assures the normal lifetime of the w...

Page 127: ...capacity 5 Check the springs Check the springs 1 Check the well functioning of the door lock switch The door lock switch is a normal open contact If the door lock switch is broken or doesn t function correct replace the door lock 2 Check the door lock coil If the door lock coil doesn t function replace the door lock 3 Check the mechanical functionality of the door lock If the door lock is not func...

Page 128: ...or lock switch If the door lock switch is broken or doesn t function correct replace the door lock 4 Check the door lock coil If the door lock coil doesn t function replace the door lock coil 5 Check the mechanical functionality of the door lock If the door lock is not functioning mechanically and can not be corrected replace the door lock system 6 Check the continuity of the wiring If the wiring ...

Page 129: ... Max fill time The default value is 10 minutes 2 Check if the external water valves are open If the water valves are closed open the water inlet valves 3 Check if the water inlet valves are not blocked by dirt If the water inlet valves are blocked by dirt clean the water inlet valves or replace the water inlet valves 4 Check the coil of the water inlet valves If the coil of the water inlet valve i...

Page 130: ... create or adjust the parameters of the wash program Don t program only hot water inlet valves but also cold ones 90 1 Check if the programmed Max Heating time in the Initialization menu is acceptable If the machine has a small heating capacity increase the value of the Max heating time The default is 60 for machines with big heating capacity 2 Check if the heating resistors are heating If the hea...

Page 131: ...sor is defective replace the temperature sensor 5 Check if the heating contactor stays closed check voltage to contactor coil If the heating contactor stays closed Replace the heating contactor 6 Check the output relay that powers the heating contactor If the relay stays closed and the relay is broken replace the power board 7 Check the output relay that powers the heating contactor If the relay i...

Page 132: ... the temperature sensor is broken replace the temperature sensor 3 Measure the resistance of the sensor If the resistance is not OK replace the temperature sensor 4 Check if the earth wire is at the middle position of the connector If the earth wire is not at the middle position put the earth wire in the middle position of connector T 5 Check the PCB board visually If you see some damage replace t...

Page 133: ...y hand Repair clean what is necessary 5 Check if the fault is persistent If the fault is persistent contact the manufacturer 1 Check if the correct machine type is selected at the Configuration menu If the wrong machine type is selected enter the right machine type 2 Check if the dedicated inverter parameters have been loaded by the wash computer Load the correct Inverter parameters 3 Check if the...

Page 134: ...redistribute the linen better If there still is unbalance in the machine it lowers the revolutions of the spinning sequence based on the unbalance magnitude This function prevents machine overload by uneven distribution of the filled in linen and thus increases the service life of the machine DIAGNOSE 1 Unbalance may be caused by inserting only half the linen load into the machine Always fill in t...

Page 135: ... of the machine Select the same Voltage range in the Configuration menu as on the Identification plate of your washing machine Menu Item C Supply Voltage PORUCHA 44 INCORECT SELECTION OF MACHINE TYPE Failure 44 is displayed when the operator selects the freestanding machine option i e machine with a safety switch on a rigid mount machine i e machine without a safety switch DIAGNOSE 1 Check the mac...

Page 136: ...ailed explanation below 304 Err OV2 Overvoltage See detailed explanation below 305 Err OV3 Overvoltage See detailed explanation below 306 Err THT Inverter overload See detailed explanation below 307 Err THM Motor overload See detailed explanation below 308 Err FAN Fan stopped Repair the cooling fan clean or replace if necessary 309 Err OLT Stall prevention See detailed explanation below 310 Err BE...

Page 137: ... fault 325 Err OP3 Option slot 3 Problem with the option in slot 3 or option contact fault 326 Err CTE PU short circuit Short circuit on the RS485 communication connector Check for short circuit in the communication cable 327 Err P24 24VDC short circuit Short circuit on the 24VDC power output PC terminal Check for short circuit on the inverter control terminals 328 Err MB1 Brake sequence error 1 S...

Page 138: ... AIE Analog input error Overcurrent or overvoltage on input terminal 2 4 348 Err USB USB communication error USB communication check time interval has elapsed 349 Err OS Overspeed Speed exceeded the limit during encoder feedback control 350 Err OD Position error Too big difference between the position command and the position feedback during position control 351 Err EP Encoder phase error Rotation...

Page 139: ...OR COOLING FIN INVERTER OVERHEAT If the heatsink temperature of the inverter crosses it s max allowed operation temperature the inverter will 99 1 Check if the cooling fan of the inverter if present rotates normally Replace the cooling fan on the inverter on the heatsink of the inverter 2 Check if the cooling fan in the washer that takes fresh air to the inverter s environment if present rotates n...

Page 140: ...ls FAILURE 561 FILE NOT FOUND The error message is displayed when the respective file is not found during an attempt to read from a USB flash disk FAILURE 562 EXPORT FAILED The error message is displayed when an attempt to write onto a USB flash disk fails FAILURE 563 IMPORT FAILED The error message is displayed when an attempt to read from a USB flash disk fails FAILURE 600 628 SOFTWARE ERRORS So...

Page 141: ...JURIES CAUSED BY ELECTRICITY 9 1 MAINTENANCE Remove dirt from the keyboard by a damp cloth after disconnection from the power supply ATTENTION DO NOT USE AGGRESSIVE SOAPS CAUSTIC CHEMICALS GASOLINE OR OTHER PETROCHEMICAL SUBSTANCES WHICH CAN DAMAGE THE KEYBOARD 9 2 INFORMATION FOR SERVICE Finding out the SW version Press the INFO button and then the ADDITIONAL FUNCTIONS SELECTION button The displa...

Page 142: ... SUPPLY MAY CAUSE SERIOUS BODILY INJURY AS WELL AS DAMAGE TO THE ELECTRONIC PARTS AND TO THE WASHING MACHINE ITSELF Voltage 200 240 Vac 50 60 Hz Power max 20 VA Outputs 24 relays Serial interface RS485 2 wire networking between wash computer and external device PC Computer Display LCD display 102 ...

Page 143: ...EW SOFTWARE Switch the machine power supply off Open the cover plate of the washing machine Insert a flash drive containing the software into the USB connector E of the CPU board Switch the machine power supply on Thedisplayshowsinformationthatthesoftwareisbeingcopiedfromtheflashdriveintotheprogrammerboard When the copying is finished a prompt to remove the flash drive from the CPU is displayed Sw...

Page 144: ...es No LIQUID SOAP SUPPLY Yes No MINIMUM LEVEL START SUPPLY Units TEMPERATURE Celsius Fahrenheit FULL HEATING WET CLEANING Yes No MACHINE INITIALIZATION DATA FUNCTION DATA ENTERED LANGUAGE SERVICE INTERVALL BUZZER TIME Seconds ALLOW ADVANCE Yes No AUTOMATIC COOLDOWN Yes No WAIT FOR TEMP Yes No MANUAL OVERRIDE Yes No TEMPERATURE BALANCE Yes No WASH MOTOR ON TIME Seconds WASH MOTOR OFF TIME Seconds S...

Page 145: ...ipswitch 13 On coins group 2 is blocked The electronic coin selector is capable of accepting or blocking coins If the electronic coin selector is accepting invalid coins foreign coins the tolerances can be narrowed Valid coins may be occasionally rejected but they will be returned to the customer Example Dipswitch for wide tolerance On Medium tolerance is selected Block coin completely Wide Medium...

Page 146: ...Upper Frame CFD2838P_D1617 4 ...

Page 147: ...0880 Bolt M8x80 4 SP557472 Distance Case 5 SP533737 Lower Weight 6 SP525284 Washer M8 7 SP309933000820 Bolt M8x20 8 9 10 SP517232 Seal 11 SP533886 Upper Frame 12 SP309084000416 Bolt M4x16 13 SP311679800004 Washer M4 14 SP533388 Oscillation Limiter 15 16 SP533753 Lower Weight 17 SP309933000850 Bolt M8x50 18 5 ...

Page 148: ...Lower Frame CFD2839P_D1617 6 ...

Page 149: ...5000010 Nut M10 10 SP534978 Spring Holder Left 11 SP310985000008 Nut M8 12 SP533876 Spring 13 SP309933000820 Bolt M8x20 14 SP310934000020 Nut M20 15 SP534977 Spring Holder Right 16 SP533875 Spring 17 SP533881 Lower Frame 18 SP547779 Rivet 4x16 7 19 SP520408 Pin Insertion 20 SPPRI504000001 Adjustable Foot 21 SP310934000010 Nut M10 22 SP533726 Bolt 23 SP311679800004 Washer M4 24 SP506432 Bolt M10x60...

Page 150: ...Stabilizing Springs CFD2840P_D1617 8 ...

Page 151: ...Stabilizing Springs REF PART NO DESCRIPTION COMMENTS 1 SP505372 Spring 2 SP555517 Rear Spring Holder 3 SP529206 Screw 4x11 9 ...

Page 152: ...Cabinet CFD2890P_D1617 16 ...

Page 153: ...x27x1 10 SP547527 Lock SP550616 Key Used with SP547527 Lock 11 SP558966 Top Cover 12 SPPRI610002007 Small Hook Lock 13 SPPRI551016250 Hook Stick on 14 SPPRI326002004 Holder 15 SP553406 Automatic Door Opening Module 16 17 18 SP550133 Upper Lid Prop 19 SP273121005052 Cable Passage 5x2 20 SP516832 Hinge 21 SP313250048008 Rivet 4 8x8 22 SP529206 Screw 23 SP533111 Rear Cover 24 25 SP558943 Reinforcemen...

Page 154: ...Cabinet CFD2891P_D1617 18 ...

Page 155: ...t Panel 6 SP555658 Bolt M6x16 7 SP533381 Lower Rear Cover 8 SP558919 Side Panel Stainless Right SP558998 Side Panel Black Right 9 SP529206 Screw 10 SP527083 Latch 11 SP313250004063 Rivet 4x6 3 12 SP521706 Rivet 3x8 13 SP521511 Drain Pump Cover 14 SP527084 Bolt 15 SP527086 Spring 16 SP527087 Washer 17 SP527021 Washer M3 18 SPPRI247000013 Washer 19 SP527085 Ring 20 SP521553 Drain Cover 21 SP527088 P...

Page 156: ...Control Panel 32 ...

Page 157: ... 11 SP528312 Switching Unit 12 SP528311 Emergency Stop Connector 13 SP547779 Rivet 4x16 7 14 SP520408 Pin Insertion 15 SP553419 Control Board MC7 16 SP528313 Cable Holder 17 SP553405 Control Board Power MC7 SP547005 Board Interconnection Cable 18 SP550113 Leading Pin 19 SP558887 Programmer Holder 20 SP558885 Control Panel 21 SP284000012003 Adhesive 22 SP528310 Emergency Stop Knob OPL SP520032 Emer...

Page 158: ...Control Panel CFD2896P_D1617 34 ...

Page 159: ...oin Meter 1 pound 20PC SP560414 Coin Meter 1 pound 50PC SP560415 Coin Meter 100JPY SP560416 Coin Meter 500JPY 100JPY SP560417 Coin Meter 1AUD 2AUD SP560418 Coin Meter 1AUD SP560419 Coin Meter 20PC SP560420 Coin Meter 50 Malaysian cent SP560421 Coin Meter 1SGD new Singaporean dollar SP560422 Coin Meter 2MYR 0 5MYR SP560423 Coin Meter 1SGD SP560424 Coin Meter 1NZD 2NZD SP560425 Coin Meter Easy games...

Page 160: ...Control Panel CFD2896P_D1617 36 ...

Page 161: ...trol Panel REF PART NO DESCRIPTION COMMENTS 1 SP560092 Coin Meter 10K jeton SP560093 Coin Meter 12K jeton SP560094 Coin Meter 15K jeton SP560100 Coin Meter Asard jeton SP560087 Coin Meter Gettone jeton 37 ...

Page 162: ...Coin Meter CFD2729P_D1617 42 ...

Page 163: ...PTION COMMENTS 1 SP530884 Washer M6 2 SP529206 Screw 4x11 3 SP310934000004 Nut M4 4 SPPRI350000007 Terminal Board 5 SPPRI350012007 Insulation Paper 6 SP309933000416 Bolt M4x16 7 SP547548 Coin Meter Case 8 SP102532 Coin Meter Box 43 ...

Page 164: ...Door Drawing 1 of 2 CFD2899P_D1617 44 ...

Page 165: ...245704000603 Adhesive Loctite 603 Used with SP537854 Bolt 1 SP556226 Door Glass 2 SP556230 Front Panel 3 SP556137 Bolt M5x25 4 SP537852 Door and Lock Holder 5 SP537760 Lock 6 SP310985000006 Nut M6 7 SP537849 Hinge Spacer 8 SP552972 Cover 9 SP537856 Connector 10 SP547779 Rivet 4x16 7 11 SP313251002104 Nut M4 12 SP556235 Heating Element Front Cover 13 SP309084000416 Bolt M4x16 14 SP537854 Bolt M6x14...

Page 166: ...Door Drawing 2 of 2 CFD2900P_D1617 46 ...

Page 167: ... 7 SP537839 Upper Hinge 8 SP537841 Upper Hinge 9 SP535402 Handle Torsion Spring 10 SP537933 Lock Pin 11 SP535414 Door Seal 12 SP537842 Lower Hinge 13 SP537864 Bolt M6x16 14 SP537840 Lower Hinge 15 SP535479 Bolt M6x25 16 SP535421 Hinge Spacer 17 SP535425 Door SP535428 Door 18 SP553524 Bolt M6x6 19 SP535406 Compression Spring 20 SP535407 Handle Ball 21 SP535437 Distinguishing Ring 22 SP552909 Handle...

Page 168: ...Water Inlet System CFD2732P_D1617 48 ...

Page 169: ...6557 Mixer Lid 16 SPPRI240000003 Hose Clamp 20 32 17 SP526509 Vent Hose 18 SP526491 Hose Clamp 62 70 19 SP526439 Temperature Sensor Seal 20 SP503839 Temperature Sensor 21 SPPRI240000017 Hose Clamp 40 60 22 SP526481 Overflow Tube 23 SP526456 Filling Elbow Pipe 24 SPPRI240000007 Hose Clamp 70 90 25 SP526497 Screw 4x12 26 SP526565 Mixer Body 27 SP547959 3 Way Valve 3 4 28 SP309084000416 Bolt 4x16 29 ...

Page 170: ...Drain System CFD2848P_D1617 50 ...

Page 171: ...crew 4x12 15 SP526454 Tee 16 SPPRI240000007 Hose Clamp 70 90 17 SP526591 Drain Elbow 18 SP309933000820 Bolt M8x20 19 SP311902100008 Washer 8 20 SP526511 Drain Valve Holder 21 SP529206 Screw 4x11 22 SP526460 Drain Valve Includes SP550674 Drain Valve Chamber and SPPRI340002051 Drain Valve Motor SP550674 Drain Valve Chamber SPPRI340002051 Drain Valve Motor SP547821 Reverse Function Drain Valve Non CS...

Page 172: ...Drain System Drain Pump CFD2735P_D1617 52 ...

Page 173: ...Pump Hose Bushing 10 SP313250004063 Rivet 4x6 3 11 SPPRI240000008 Hose Clamp 32 50 12 SP311125000006 Washer 6 4 13 SP311127000006 Washer 6 14 SP309933000616 Bolt M6x16 15 SP529206 Screw 4x11 16 SP547804 Pump Holder 17 SP309916000810 Bolt M8x10 18 SPPRI333000017 Drain Pump 19 SP500140 Pump Cover 20 SP547803 Drain Elbow 21 SP526532 Hose Clamp 82 90 22 SP500125 Reinforcement Tube 23 SPPRI503002049 Ai...

Page 174: ...Rear Panel Drawing 1 of 2 CFD2901P_D1617 54 ...

Page 175: ...tch 63A 6 SP516648 Transformer 7 SP311125000004 Washer 4 3 8 SP311127000004 Washer 4 9 SP310934000004 Nut M4 10 SP309084000416 Bolt M4x16 11 SP526474 Holder Partition 12 SP525929 Frequency Inverter SP528323 Communication Cable 13 SP529206 Screw 4x11 14 SP525935 Filter FR D740 xxx 15 SP309933100625 Bolt M6x25 16 SP273121022002 Cable Passage 22x2 17 SPPRI345002019 Contactor LC1D32M7 SP514043 Contact...

Page 176: ...Rear Panel Drawing 2 of 2 CFD2902P_D1617 56 ...

Page 177: ...SP311125000004 Washer 4 3 12 SP529206 Screw 4x11 SP309933240408 Bolt M4x8 13 SP540123 Liquid Detergent Box 14 SP310934000004 Nut M4 15 SP311127000004 Washer 4 16 SP540121 Rear Panel Lid 17 SP524714 Soap Relay Board SP528149 Pump Relay Board to LED Terminal Cable SP557944 Soap Link Kit SP557947 External Block Signal Cable 2 8m 18 SP528392 Cable Clamp 19 SP345805005020 Fuse 5x20mm T0 5A 250V SP34580...

Page 178: ...Steam Heating CFD2852P_D1617 58 ...

Page 179: ...alve Support 5 SP313251000006 Nut M6 6 SP514164 Steam Valve 1 2 7 SP554156 Connector 8 SP554110 Coil 50 60Hz 9 SP319428324012 Adapter 1 2 10 SP405054120215 Steam Filter 1 2 11 SPR22112000114 Pipe Nipple 1 2 12 SP514165 Steam Valve Body 13 SP526522 Steam Hose I 465mm 14 SP526525 Steam Injector 15 SP547968 Adapter G3 8 G1 2 16 SP547981 Washer 17 SPPRI426001268 Plug 1 2 Prep for electric and steam he...

Page 180: ...Washing Drum and Tub CFD2742P_D1617 60 ...

Page 181: ...asher M10 6 SP310985000010 Nut M10 7 SP309933240825 Bolt M8x25 8 SP311125240008 Washer M8 9 SP537861 Cross Piece 10 SP311125000008 Washer M8 11 SP309933000835 Bolt M8x35 12 SP537843 Shaft Ring 13 SP537886 Washing Drum 14 SP537719 Seal d10 1800mm 15 SP537717 Clamp 16 SP310934240008 Nut M8 17 SP311125240008 Washer M8 18 SPF02119000415 Bolt M8 19 SP537722 External Tub Front Plate 20 SP540143 Heating ...

Page 182: ...Drive CFD2853P_D1617 62 ...

Page 183: ... Holder 10 SP533392 Bolt M12x180 SP533394 Bolt 15 30 and 135 models M12x220 11 SP533742 Cage 1 12 SP310985000006 Nut M6 13 SP555580 Motor and Pulley 0 75kW 230V 75Hz SP555583 Motor and Pulley 0 75kW 400V 76Hz 14 SP533326 Tensioning Angle Piece Fixed 15 SP533327 Tensioning Angle Piece Movable 16 SP309933000616 Bolt M6x16 17 SP310985000012 Nut M12 18 SP528925 Belt 19 SP309933000870 Bolt M8x70 20 SP3...

Page 184: ...Bearing Housing CFD2747P_D1617 64 ...

Page 185: ...ve Loctite 603 SP111313000002 Lubrication Grease SP537862 Bearing Housing SP538787 Bearing Replacement Tools 1 SP537860 Bearing Housing 2 SPPRI608000002 Bearing 6207 3 SPPRI608000048 Bearing 6309 4 SP525813 Sealing Ring 65x100x10 5 SP537848 Sealing Ring 65x100 114x9 12 65 ...

Page 186: ......

Reviews: