background image

14

EN

time for the tool to cool down before re-
charging to achieve the full charge. 

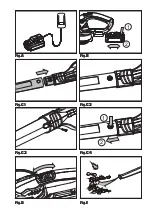
2. TO REMOVE OR INSTALL THE BATTERY 
PACK (SEE FIG. B)

Depress the battery pack release button to release and 
slide the battery pack out from your tool. After recharge, 
slide it back into your tool. A simple push and slight 
pressure will be sufficient. 

ASSEMBLY

1. ASSEMBLING THE BLOWER TUBE (SEE 
FIG. C1, C2, C3)

Before assembling the blower tube, be sure the on/off 
switch is in ‘’O’’ off position.
Fit the blower tube to the motor housing as shown in Fig. 
C1. Check the blower tube is firmly secured (See Fig. C2).
Fix the blower tube to the blower port with the screw 
provided (See Fig. C3). 

WARNING: Do not attempt to operate  

 or disable the on/off switch by any 

means other than the normal assembly or 
removal of the tube.
NOTE:


Before disassembling the blower tube, be sure 

the on/off switch is in ‘’O’’ Off position. First loosen the 
screw, as shown in Fig. C3. Press the tube release button, 
so that you can separate the tube (See Fig. C4). Do not try 
to separate the tubes by force or by using tools.

OPERATION

1. STARTING/STOPPING (SEE FIG. D)
Starting

Move the on/off switch to the “I” On position.

Stopping

Move the on/off switch to the “O” Off position.

WARNING: The tool runs for a few  
 seconds after it has been switched off. 

Let the motor come to a complete standstill 
before setting the tool down.

2.  USING THE BLOWER (SEE FIG. E)

The blower is intended for residential use only. Use the 
blower outdoors to move debris from hard surfaces. This 
blower is not designed to clear leaves from large grassy 
areas, or move wet, heavy debris.

USER TIPS

Hold the blow tube approx 180mm above the ground    

   when operating the tool.

- Use a sweeping motion from side to side. Advance  
slowly keeping the accumulated debris/leaves in front  of you.
- After blowing the debris/leaves into a pile, it is easy to  
   dispose of the pile.

CAUTION! 

- Do not blow hard objects such as  

 nails, bolts, or rocks.

- Do not operate the blower near bystanders or pets.
- Use extra care when cleaning debris from stairs or other    
   tight areas.
- Wear safety goggles or other suitable eye protection,  
   long pants, and shoes.

MAINTENANCE

1. Remove the battery pack before any work on the  
    device.
2. Store the tool, instruction manual and accessories  
    in a secure, dry place. In this way you will always  
    have the information ready.
3. Keep the tool’s air vents unclogged and clean at  
    all times.
4. Remove dust and dirt regularly. Cleaning is best  
    done with a rag or brush.
5. Never use caustic agents to clean plastic parts.

CAUTION: 

Do not use cleaning agents to clean

 the plastic parts of the tool. A mild detergent on a 

damp cloth is recommended. Water must never come into 
contact with the tool.

FOR BATTERY TOOLS

The ambient temperature range for use and storage of 
tool and battery is between 0 °C and 45 °C.
The recommended ambient temperature range for the 
charging station is between 0 °C and 40 °C.

TROUBLESHOOTING

Problem

Possible
cause

Fault
correction

The tool 
does not 
work

Low battery 
capacity

Charging the battery

The battery 
pack is not 
fully inserted


Insert the battery pack 
to the end

The battery 
pack 
cannot be 
removed

The battery 
pack release 
button is not 
pressed

Press the battery pack 
release button

Summary of Contents for CBV18LW

Page 1: ...Ventilador de l tio i o sem fios PT P04 Cordless Li ion blower EN P10 Soplador inal mbrico de iones de litio ES P15 WS8511 WS8511 9 CBV18LW...

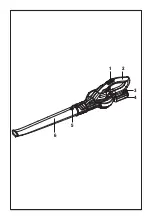
Page 2: ...1 2 3 4 5 6...

Page 3: ...Fig A Fig B Fig C1 Fig C2 Fig C3 Fig C4 Fig D Fig E 1 2 1 2...

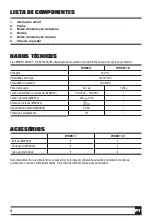
Page 4: ...n Velocidade do soprador 200 km h Peso da m quina 1 61 kg 1 25kg Tens o de entrada do carregador WS9924 100 240V 50 60Hz Tens o de sa da WS9924 20V 2 0A Classe de prote o WS9924 II Capacidade da bater...

Page 5: ...e culos de prote o d Recomendamos tamb m a utiliza o de uma m scara para evitar qualquer irrita o da pele devido ao p e Nunca utilize este equipamento caso as suas guardas ou mecanismos de seguran a e...

Page 6: ...ta press o INSTRU ES DE SEGURAN A PARA O CARREGADOR AVISO Leia todos os avisos de seguran a e todas as instru es N o seguir os avisos e instru es pode resultar em choque el trico inc ndio e ou les o s...

Page 7: ...arregada em temperaturas entre os 18O C e os 24O C N o carregue a bateria em temperaturas abaixo dos 0O C ou acima dos 40O C Isto importante pois evita danos graves a bateria S MBOLOS Aviso Leia o man...

Page 8: ...ve ser devolvida a um centro de assist ncia ou centro de reciclagem Se a bateria nova exibir o mesmo problema que a bateria original pe a a um centro de assist ncia autorizado que teste o carregador L...

Page 9: ...de baterias antes de realizar qualquer trabalho no dispositivo 2 Guarde la herramienta el manual de instrucciones y los accesorios en un lugar seguro y seco De esta manera siempre tendr la informaci...

Page 10: ...12500 min Blower speed 200 km h Machine weight 1 61 kg 1 25kg Charger input WS9924 100 240V 50 60Hz Charger output WS9924 20V 2 0A Charger Protection class WS9924 II Battery capacity WS9928 2 0Ah Cha...

Page 11: ...devices for example debris collector in place 3 OPERATION a Remove the battery pack from the appliance whenever you leave the machine before clearing a blockage before checking cleaning or working on...

Page 12: ...agent or similarly qualified persons in order to avoid a hazard ADDITIONAL SAFETY INSTRUCTIONS FOR YOUR BATTERY CHARGER 1 Before charging read the instructions 2 Do not charge a leaking battery 3 Do n...

Page 13: ...This charger is designed to detect some problems that can arise with battery packs Indicator lights indicate problems see table below If this occurs insert a new battery pack to determine if the char...

Page 14: ...r is not designed to clear leaves from large grassy areas or move wet heavy debris USER TIPS Hold the blow tube approx 180mm above the ground when operating the tool Use a sweeping motion from side to...

Page 15: ...ocidad del aire 200 km h Peso de la m quina 1 61 kg 1 25kg Entrada del cargador WS9924 100 240V 50 60Hz Salida del Cargador WS9924 20V 2 0A Clase de protecci n delcargador WS9924 II Capacidad de la ba...

Page 16: ...eraci n d Para evitar irritaci n por polvo se recomienda usar una careta e Nunca opere el aparato con protecciones o escudos defectuosos o sin dispositivos de seguridad por ejemplo el recolector de de...

Page 17: ...s instrucciones El no seguir todas las instrucciones a continuaci n puede ocasionar descargas el ctricas incendios y o heridas graves Conserve todas las advertencias e instrucciones para consulta futu...

Page 18: ...0 C o superiores a 40 C Esto es importante ya que puede evitar da os graves a la bater a S MBOLOS No quemar Si no se eliminan correctamente las bater as podr an interferir en el ciclo del agua una sit...

Page 19: ...st defectuosa y se debe devolver a un centro de servicio o de servicio de reciclaje Si la bater a nueva muestra el mismo problema que la bater a original haga probar el cargador en un centro de servic...

Page 20: ...NTO 1 Retire el paquete de bater as antes de realizar cualquier trabajo en el dispositivo 2 Guarde la herramienta el manual de instrucciones y los accesorios en un lugar seguro y seco De esta manera s...

Page 21: ......

Page 22: ......

Page 23: ......

Page 24: ...AR01606300 Copyright 2021 Positec All Rights Reserved...

Reviews: