


10
EN
The on/off switch is fitted with a brake function which
stops your chuck immediately when you quickly release
the switch.
It is also a variable speed switch that delivers higher
speed and torque with increased trigger pressure. Speed
is controlled by the amount of switch trigger depression.
WARNING:
Do not operate for long periods
at low speed because excess heat will be
produced internally. When overload occurs, release
the on/off switch immediately to avoid the motor
overheating.
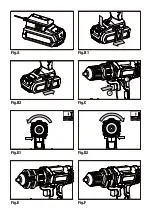
2. SWITCH LOCK (SEE FIG. C)
The switch trigger can be locked in the OFF position.
This helps to reduce the possibility of accidental starting
when not in use. To lock the switch trigger, place the
rotation control in the center position.
3. REVERSIBLE (SEE FIG. D1, D2)
For drilling and screw driving use forward rotation
marked “
” (lever is moved to the left of the drill)
(D1). Only use reverse rotation marked “
” (lever is
moved to the right of the drill) (D2) to remove screws or
release a jammed drill bit.
WARNING: Never change the direction of
rotation when the chuck is rotating, wait until
it has stopped!
4. CHUCK ADJUSTMENT (SEE FIG. E)
To open the chuck jaws rotate the front section of the
chuck. Insert the drill bit between the chuck jaws and
rotate the front section in the opposite direction. Ensure
the drill bit is in the center of the chuck jaws. Finally, firmly
rotate the front chuck section in the opposite directions.
Your drill bit is now clamped in the chuck.
5. TORQUE ADJUSTMENT (SEE FIG. F)
(Screw driving force of your drill driver)
The torque is adjusted by rotating the torque adjustment
ring. The torque is greater when the torque adjustment
ring is set on a higher setting. The torque is less when the
torque adjustment ring is set on a lower setting.
Make the setting as follows:
1 - 4 for driving small screws
5 - 9 for driving screws into soft material
10 - 14 for driving screws into soft and hard material
15 - 19 for driving screws into hard wood
20 - 21 for driving larger screws
for heavy drilling
6. AUTOMATIC SPINDLE LOCK
The automatic spindle lock allows you to use it as a
regular screwdriver. You can give an extra twist to firmly
tighten a screw, loosen a very tight screw or continue
working when the battery energy has expired. For
manual screwdriver purposes, the chuck is automatically
locked when the tool is off.
7. USING THE LED LIGHT
To turn on the LED light simply press the on/off switch.
When you release the on/off switch, the light will be off.
LED lighting increases visibility-great for dark or
enclosed area.
8. DRILLING
When drilling into a hard smooth surface, use a center
punch to mark the desired hole location. This will
prevent the drill bit from slipping off center as the hole
is started.
Hold the tool firmly and place the tip of the bit at the
point to be drilled.
Depress the switch trigger to start the tool.
Move the drill bit into the workpiece, applying only
enough pressure to keep the bit cutting. Do not force or
apply side pressure to elongate a hole.
WARNING: Tungsten carbide drill bits should
always be used for concrete and masonry.
When drilling in metal, only use HSS drill bits in
good condition. Always use a magnetic bit holder
when using short screwdriver bits. When screw-
driving, apply a small quantity of liquid soap or
similar to the screw threads to ease insertion.
9. DISPOSAL OF AN EXHAUSTED BATTERY PACK
To preserve natural resources, please recycle or
dispose of the battery pack properly. This battery
pack contains Lithium batteries. Consult your
local waste authority for information regarding available
recycling and/or disposal options. Discharge your
battery pack by operating your drill, then remove the
battery pack from the drill housing and cover the battery
pack connections with heavy-duty adhesive tape to
prevent short circuit and energy discharge. Do not
attempt to open or remove any of the components.
10. OVERLOAD PROTECTION
When overloaded, the motor comes to a stop. Relieve
the load on the machine immediately and allow cooling
for approx. 30 seconds at the highest no-load speed.
11. TEMPERATURE DEPENDENT OVERLOAD PROTECTION
When using as intended for the power tool cannot be


