background image

Summary of Contents for CADENCE 880

Page 1: ...that there are missing or damaged parts we will guarantee you complete satisfaction through dlrect assis tance from our factory TO AVOID UNNECESSARY DELAYS PLEASE CALL DIRECT TO OUR TOLL FREE CUSTOMER HOT LINE The trained techni cians on our Customer Hot Line will provide immediate assis tance free of charge to you CUSTOMER HOT LINE 1 800 999 3756 Mon Frl 6 a m 6 p m MST USER S MANUAL ...

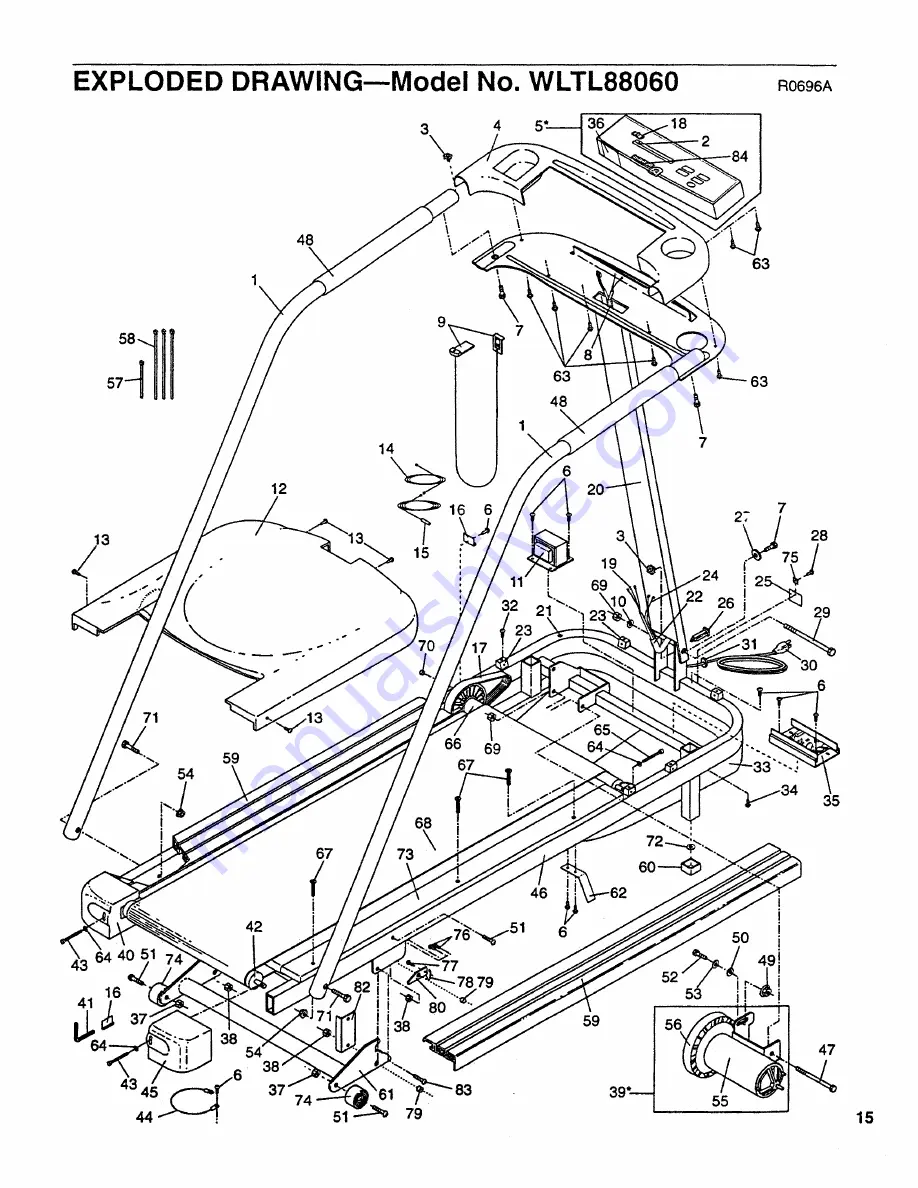
Page 2: ...IONS 3 BEFORE YOU BEGIN 4 WARNING DECAL PLACEMENT 5 ASSEMBLY 5 OPERATION AND ADJUSTMENT 7 TROUBLE SHOOTING AND STORAGE 11 CONDITIONING GUIDELINES 13 PART LIST 14 EXPLODED DRAWING 15 ORDERING REPLACEMENT PARTS Back Cover LIMITED WARRANTY _ Back Cover 2 ...

Page 3: ...i MPO RTA NT i i i _ iilfol 3 ...

Page 4: ...day through Friday 6 a m until 6 p m Mountain Time excluding holidays To help us assist you please note the product model number and serial number before calling The model number is WLTL88060 The serial number can be found on a decal attached to the treadmill see the front cover of this manual for the location Before reading further please review the drawing below and familiarize yourself with the...

Page 5: ...an adjustable wrench _ not Included 3 8 x 1 1 2 Washer Flange Nut 54 2 3 8 x 1 Bolt 7 3 Raise the Upright 20 to the vertical position Slide the 3 8 x 1 1 2 Washer 27 onto the 3 8 x 1 Bolt 7 Insert the Bolt into the lower end of the Upright Finger tighten the Bolt into the Frame 46 20 2 If there are plastic ties in the upper ends of the Handrails 1 cut them off Insert the upper end of one of the Ha...

Page 6: ...s the Adhesive Clip onto the Right Endcap 45 in the indicated location Press the Allen Wrench 41 into the Adhesive Clip The Console 5 requires three AA batteries not includ ed Alkaline batteries are recommended Slide up the Battery Cover 36 Press three batteries into the bat tery compartment with the negative ends of the batteries touch ing the springs Close the Battery Cover 5 5 Make sure that al...

Page 7: ...t drawing 1 can be installed by a qualified electrician Your treadmill like any other type of sophisticated electronic equipment can be seriously damaged by sudden voltage changes in your home s power Voltage surges spikes and noise interference can result from weather conditions or from other appli ances being tumed on or off To decrease the possibility of your treadmill being dam aged always use...

Page 8: ...ce of the console remove it Be careful to avoid spilling liquids on the console l v_ DL_AN_ I THUMB PJL SE k_nlL Pulse Display 20 I s 141sI 141s 30 tto 13S lS3 410 IIS 1_10 14S 50 110 123 140 60 10 113 130 70 9S 11 t2S 80 to _o3 11s r at Max Aerobic Burn Fat CONSOLE2 WESLO Fit Speed Control n e s s Guide E I e t r e n I w_k_ UP t_T_ _B_O_C I _ 1 4ES 1 J i i i ii OPEt _T_ON _ PRE_Oe4 l_ES_ i_ rrtoN...

Page 9: ... to move at slow speed Carefully step onto the walking belt and begin exer cising Change the speed of the walking belt as desired by moving the speed control To stop the walking belt step onto the foot rails and move the speed control to the RESET position Follow your progress with the monitor displays CALJFAT CAL This display shows the approximate numbers of ca ories and fat ca ories you have bur...

Page 10: ...se sensor Try the sensor several times untilyou become familiar with it Remember to stand still while measuring your pulse ElWhen you are finished exercising stop the walking belt and remove the SAFEKEY Step onto the foot rails stop the walking belt and remove the SAFE KEY from the console Store the SAFEKEY in a secure place After the SAFEKEY is removed the displays will remain on for about five m...

Page 11: ...the switch will protrude See the drawing above To reset the circuit breaker wait for five minutes and then press the switch back in b Make sure that the power cord is plugged in c Remove the SAFEKEY from the console Reinsert the SAFEKEY fully into the console 3 SYMPTOM THE DISPLAYS OF THE CONSOLE DO NOT FUNCTION PROPERLY a Check the batteries in the console See assembly step 5 on page 6 Most probl...

Page 12: ... the walking belt slips when walked on first remove the SAFEKEY and UNPLUG THE POWER CORD Using the allen w ench tJrn both rear roller adjustment bolts clockwise 1 4 of a turn When the walking belt is correctly tightened you should be able to lift each side of the walking belt 2 to 3 inches off the walk ing platform The center of the walking belt should just touch the walking platform Be careful t...

Page 13: ...training zone It may also be helpful to set the speed control on the console to FAT BURN to help you main tain the proper intensity level See page 9 Aerobic Exercise If your goal is to strengthen your cardiovascular sys tem your exercise must be aerobic Aerobic exercise is activity that requires large amounts of oxygen for prolonged periods of time This increases the demand on the heart to pump bl...

Page 14: ...37 2 Incline Leg Nut 82 1 38 3 Incline Nut 83 2 39 1 Motor Pulley Flywheel Fan 84 1 40 1 Left Endcap 12 41 1 Allen Wrench 1 42 1 Rear Roller 1 43 2 Rear Roller Adjustment Bolt 44 1 Ground Wire 45 1 Right Endcap Specifications ment pads Description Frame Motor Pivot Bolt Foam Grip Motor Tension Nut Motor Tension Star Washer Incline Leg Wheel Bolt Motor Tension Bolt Motor Tension Washer Flange Nut M...

Page 15: ...EXPLODED DRAWING Model No WLTL88060 Ro696A 3 4 57 48 1 12 14 15 6 7 63 48 19 69 3 7 63 63 26 40 43 41 71 42 67 i 1 51 73 66 69 8 79 46 6 59 I 5O i 35 47 15 ...

Page 16: ...y ICON This warranty does not extend to any product or damage to a product caused by or attributable to freight damage abuse misuse improper or abnormal usage or repairs not provided by an ICON authorized service center to products used for commercial or rental purposes or to products used as store display models No other warranty beyond that specifically set forth above is authorized by ICON ICON...

Reviews: