background image

9

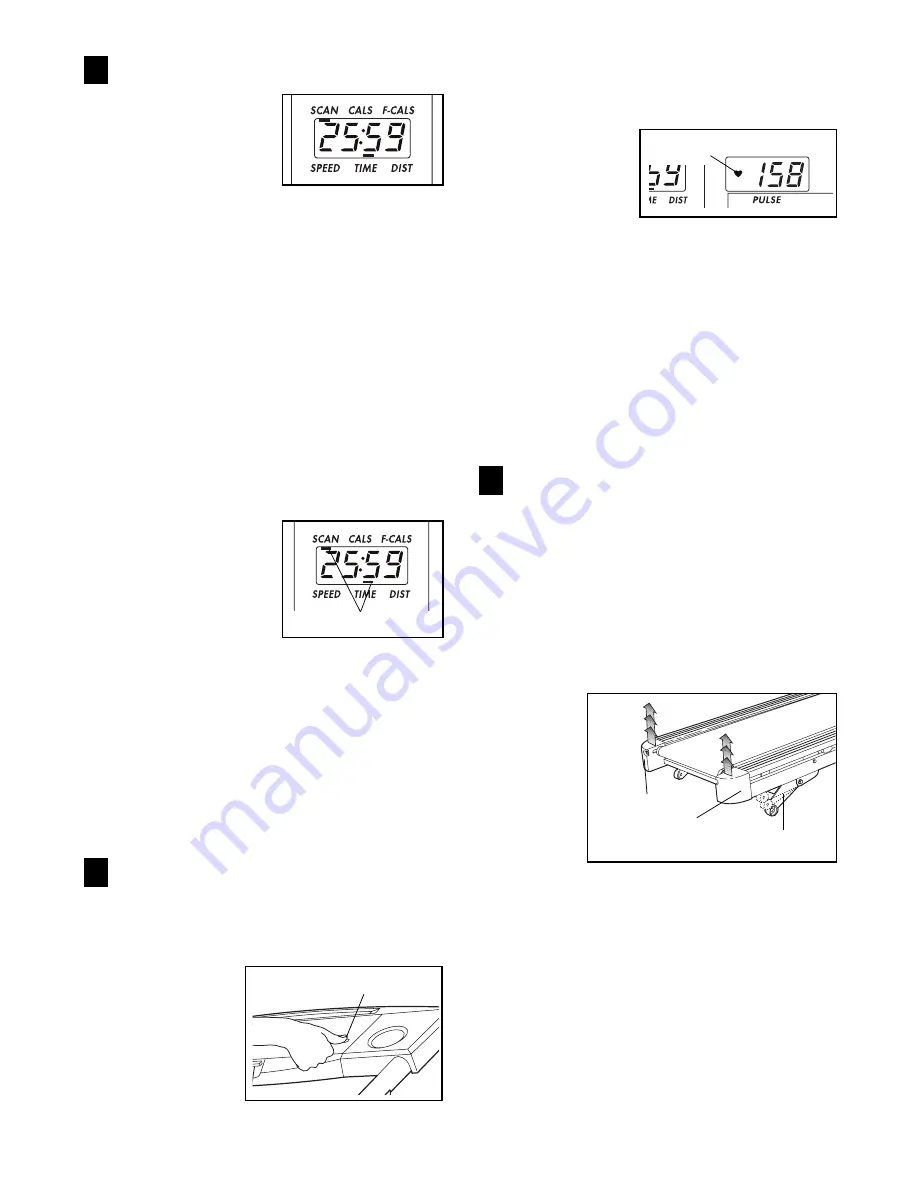
Follow your progress with the monitor display.

The monitor display
offers six modes 
that provide instant 
exercise feedback:  

¥ SpeedÑThis mode

shows your speed,
in miles per hour. 

¥ TimeÑThis mode shows the elapsed time. 

¥ Distance (DIST)ÑThis mode shows the total

number of miles you have walked or run.

¥ Fat Calories (FAT CALS)ÑThis mode shows the

approximate number of fat calories you have
burned. (See FAT BURNING on page 14.)

¥ Calories (CALS)ÑThis mode shows the approxi-

mate number of calories you have burned. 

¥ ScanÑThis mode displays the other five modes,

for five seconds each, in a repeating cycle.

When the power is
turned on, the Scan
mode will be select-
ed. One mode indica-
tor will appear by the
word SCAN, and
another mode indica-
tor will show which
mode is currently displayed.

If desired, the Speed, Time, Distance, Fat Calories
or Calories mode can be individually selected.
Press the MODE button repeatedly until the
desired mode indicator appears. Make sure that
there is not a mode indicator by the word SCAN.

If desired, the display can be reset by pressing the
RESET button.

Measure your pulse, if desired.

To measure your pulse, stand on the foot rails and
place your thumb on the pulse sensor as shown.
The pulse sensor is pressure activatedÑfully press
it down. 

Do not

press too
hard, or the
circulation in
your thumb
will be
restricted, and
your pulse will
not be detect-

ed.

Next, raise your thumb slightly until the heart-

shaped indicator in the pulse display flashes

steadily

. Hold your thumb at this level. After a few

seconds, three
dashes will
appear in the
display and your
pulse will be
shown. Hold your
thumb on the
sensor for
another 15 seconds for the most accurate reading.
If the displayed pulse appears to be too high or too
low, or if your pulse is not displayed, lift your thumb
off the sensor and allow the display to reset. Press
down again on the sensor as described above.

Make sure that your thumb is positioned as shown,
and that you are applying the proper amount of
pressure to the pulse sensor. Try the sensor several
times until you become familiar with it. Remember to
stand still while measuring your pulse.

Turn off the power.

To turn off the power, simply wait for about six
minutes.

If the walking belt is not moved and the

DISPLAY button is not pressed for six minutes, the
power will turn off automatically.

HOW TO CHANGE THE INCLINE OF THE TREADMILL

The incline of the treadmill can be changed by raising
or lowering the back end. 

Before changing the

incline, remove the key and unplug the power cord. 

Hold the rear
roller endcap
with both
hands.
When the
back end of
the treadmill
is in the low-
est position,
the incline is
about 10%.
Raise the back end until it clicks into position. (Note: It
may be necessary to shake the treadmill lightly so that
it clicks into position.) The incline will then be about 5%.
Raise the back end again until it clicks into position.
The incline will then be about 3%. To lower the back
end, raise it past the highest position and then lower it.

CAUTION: Before exercising, push on the back of
the treadmill to make sure that the incline legs are
locked in position. Do not place objects under the
treadmill to change the incline; change the incline
only as described above.

5

4

3

Mode Indicators

Indicator

Pulse Sensor

Incline Leg

Hold the Rear
Roller Endcap
in these locations

Summary of Contents for Cadence LS 8

Page 1: ...RY DELAYS PLEASE CALL DIRECT TO OUR TOLL FREE CUSTOMER HOT LINE The trained techni cians on our customer hot line will provide immediate assis tance free of charge to you CUSTOMER HOT LINE 1 800 999 3...

Page 2: ...ds 8 Never allow more than one person on the treadmill at a time 9 Wear appropriate exercise clothing when using the treadmill Do not wear loose clothing that could become caught in the treadmill Athl...

Page 3: ...ttempt to modify the incline of the treadmill by placing objects under the front or rear of the treadmill 24 Always unplug the power cord before per forming the maintenance and adjustment procedures d...

Page 4: ...e Department toll free at 1 800 999 3756 Monday through Friday 6 a m until 6 p m Mountain Time excluding holidays To help us assist you please note the product model number and serial number before ca...

Page 5: ...8 Nuts 34 Carefully turn the treadmill onto its other side Assemble the other Base Leg 38 as described With the help of a second person carefully raise the treadmill to the upright position so that bo...

Page 6: ...ch Clip Feed the excess Wire Harness 28 into the right Upright 31 6 The console requires two AA batteries not included Alkaline batteries are recommended To install batter ies open the battery cover a...

Page 7: ...ly installed and grounded in accordance with all local codes and ordinances This product is for use on a nominal 120 volt circuit and has a grounding plug that looks like the plug illus trated in draw...

Page 8: ...lking belt Move the speed control to the RESET position Note Each time the walking belt is stopped the speed control must be moved to the RESET position before the walking belt can be restarted Next s...

Page 9: ...play and your pulse will be shown Hold your thumb on the sensor for another 15 seconds for the most accurate reading If the displayed pulse appears to be too high or too low or if your pulse is not di...

Page 10: ...s fully over the catch To protect the floor or carpet from damage place a mat under the treadmill Keep the treadmill out of direct sunlight Do not leave the treadmill in the stor age position in tempe...

Page 11: ...your left hand slide open the storage latch Pivot the treadmill until the catch and the foot rail are past the storage latch 2 Hold the treadmill firmly with both hands and lower the treadmill to the...

Page 12: ...ROBLEM The power turns off during use SOLUTION a Check the circuit breaker located on the treadmill frame near the power cord see the drawing above If the circuit breaker has tripped wait for five min...

Page 13: ...kwise 1 4 of a turn When the walking belt is correctly tightened you should be able to lift each side of the walking belt 2 to 3 inches off the walking platform Be careful to keep the walking belt cen...

Page 14: ...s of oxygen for prolonged periods of time This increases the demand on the heart to pump blood to the muscles and on the lungs to oxygenate the blood For aerobic exercise adjust the speed of the tread...

Page 15: ...15 counts then relax Repeat 3 times for both legs To cause further stretching of the achilles tendons bend your back leg as well Stretches Calves achilles tendons and ankles 4 Quadriceps Stretch With...

Page 16: ...Bolt 37 4 Wheel Nut 38 2 Base Leg 39 2 Front Wheel 40 2 Wheel Bolt 41 4 Base Leg Pad 42 7 Belly Pan Screw 43 4 3 8 x 2 Bolt 44 1 Catch Spacer 45 2 Base Leg Endcap 46 1 Wire Harness Grommet 47 2 Rolle...

Page 17: ...74 48 77 50 71 86 24 86 24 24 86 71 58 48 57 13 48 60 63 42 59 54 75 53 55 52 51 71 49 88 51 84 90 88 87 87 73 64 34 65 75 53 66 67 64 85 51 62 68 56 76 82 83 42 49 89 47 47 91 87 36 75 36 39 40 37 41...

Page 18: ...ON This warranty does not extend to any product or damage to a product caused by or attributable to freight damage abuse misuse improper or abnormal usage or repairs not provided by an ICON authorized...

Reviews: