background image

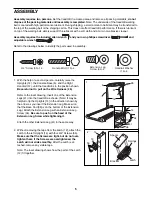
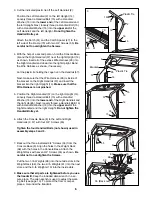
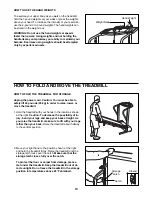
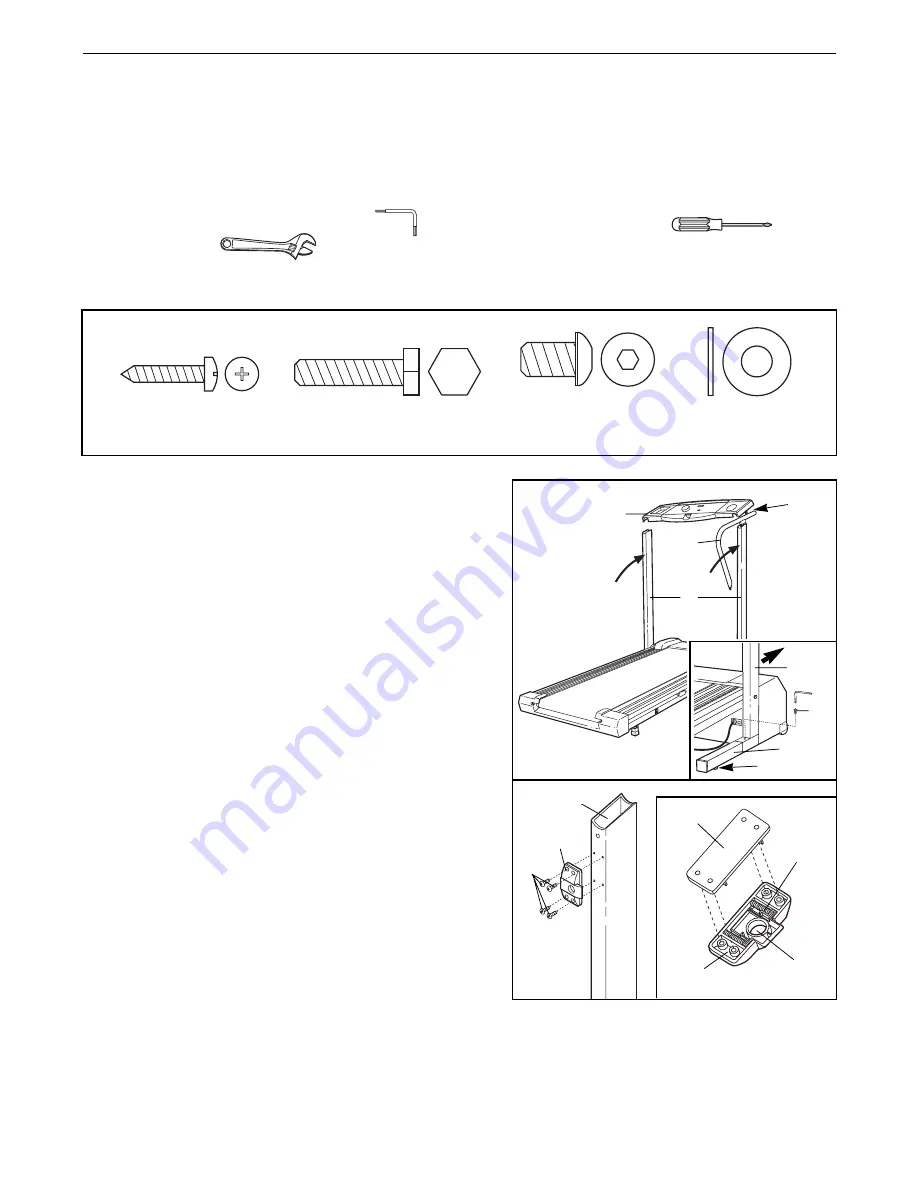
1. With the help of a second person, carefully raise the

Uprights (14), the Console Base (6), and the Right
Handrail (57), until the treadmill is in the position shown.

Be careful not to pull on the Wire Harness (26).

Refer to the inset drawing. Insert one of the Extension
Legs (41) into the treadmill as shown. (Note: It may be
helpful to tip the Uprights [14] in the direction shown by
the arrow as you insert the Extension Leg. Make sure
that the Base Pad [36] is on the bottom of the Extension
Leg.) Attach the Extension Leg with an Extension Leg
Screw (34). 

Be sure to push on the head of the

Extension Leg Screw while tightening it.

Attach the other Extension Leg (41) in the same way.

5

ASSEMBLY

Assembly requires two persons.

Set the treadmill in a cleared area and remove all packing materials; 

do not

dispose of the packing materials until assembly is completed.

Note: The underside of the treadmill walking

belt is coated with high-performance lubricant. During shipping, a small amount of lubricant may be transferred to
the top of the walking belt or the shipping carton. This does not affect treadmill performance. If there is lubricant
on top of the walking belt, simply wipe off the lubricant with a soft cloth and a mild, non-abrasive cleaner.

Assembly requires the included allen wrench      and your own phillips screwdriver                           and 
adjustable wrench                         .

Refer to the drawings below to identify the parts used in assembly. 

Extension Leg

Screw (34)Ð2

Handrail Washer

(16)Ð4

Handrail Bolt (15)Ð4

3/4Ó Screw (55)Ð14

34

41

14

26

14

57

6

1

36

12

55

14

2

Spacer

Springs

Bracket

Latch

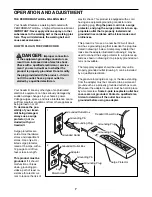
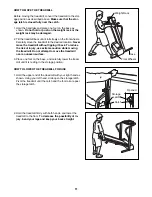
2. Without removing the tape from the Latch (12), attach the

Latch to the left Upright (14) with four 3/4Ó Screws (55).

Make sure that the Screws are tight, but do not over-
tighten them; if the Screws are overtightened, the
Latch will not slide smoothly. 

After the Latch is at-

tached, remove any visible tape.

Note: The inset drawing shows how the parts of the Latch
(12) fit together.

Summary of Contents for Cadence Sl 15

Page 1: ...ance from our factory TO AVOID UNNECESSARY DE LAYS PLEASE CALL DIRECT TO OUR TOLL FREE CUSTOMER HOT LINE The trained techni cians on our Customer Hot Line will provide immediate assis tance free of ch...

Page 2: ...ll should not be used by persons weighing more than 250 pounds 8 Never allow more than one person on the treadmill at a time 9 Wear appropriate exercise clothing when using the treadmill Do not wear l...

Page 3: ...ect and tighten all parts of the treadmill regularly 23 Never drop or insert any object into any opening 24 DANGER Always unplug the power cord immediately after use before cleaning the treadmill and...

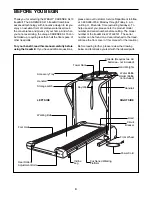
Page 4: ...gh Friday 6 a m until 6 p m Mountain Time excluding holidays To help us assist you please note the product model number and serial number before calling The model number of the treadmill is WLTL22191...

Page 5: ...derside of the treadmill walking belt is coated with high performance lubricant During shipping a small amount of lubricant may be transferred to the top of the walking belt or the shipping carton Thi...

Page 6: ...nto the right Upright 14 Make sure that the Wire Harness is not pinched 5 Position the Right Handrail 57 on the right Upright 14 Loosely thread a Handrail Bolt 15 with a Handrail Washer 16 into the lo...

Page 7: ...rly installed and grounded in accordance with all local codes and ordinances This product is for use on a nominal 120 volt circuit and has a grounding plug that looks like the plug illus trated in dra...

Page 8: ...PLUG IN THE POWER CORD on page 7 If there is a thin sheet of clear plastic on the console remove it Next step onto the foot rails of the treadmill Find the clip attached to the key see the drawing abo...

Page 9: ...Fat Calories F CALS This mode shows the approximate number of fat calories you have burned See FAT BURNING on page 14 Calories CALS This mode shows the approxi mate number of calories you have burned...

Page 10: ...catch Make sure that the storage latch closes fully over the catch To protect the floor or carpet from damage place a mat under the treadmill Keep the treadmill out of di rect sunlight Do not leave t...

Page 11: ...reduce the risk of injury use extreme caution while moving the treadmill Do not attempt to move the treadmill over an uneven surface 3 Place one foot on the base and carefully lower the tread mill unt...

Page 12: ...wer turns off during use SOLUTION a Check the circuit breaker located on the treadmill frame near the power cord see 1 c above If the circuit breaker has tripped wait for five minutes and then press t...

Page 13: ...stment bolt clockwise and the right bolt counterclockwise 1 4 of a turn each Be careful not to overtighten the walking belt Plug in the power cord insert the key and run the treadmill for a few minute...

Page 14: ...ercise If your goal is to strengthen your cardiovascular sys tem your exercise must be aerobic Aerobic exercise is activity that requires large amounts of oxygen for prolonged periods of time This inc...

Page 15: ...ankles 4 Quadriceps Stretch With one hand against a wall for balance reach back and grasp one foot with your other hand Bring your heel as close to your buttocks as possible Hold for 15 counts then re...

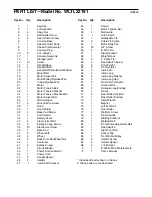
Page 16: ...Extension Leg 42 1 Circuit Breaker 43 1 Power Cord Grommet 44 1 Power Cord 45 2 Upright Spacer 46 2 Isolator 47 1 Latch Catch Spacer Key No Qty Description 48 1 Choke 49 1 Motor Tension Nut 50 2 Belt...

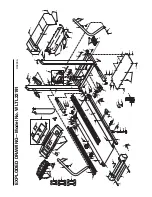
Page 17: ...55 41 15 16 17 18 19 26 15 16 25 21 20 22 23 24 36 30 60 84 82 74 85 45 77 77 16 81 14 33 34 36 30 56 27 53 52 46 4 50 48 35 45 34 41 79 80 77 83 77 46 5 75 15 76 67 49 5 39 39 16 16 69 69 55 62 55 7...

Page 18: ...of pur chase All returns must be pre authorized by ICON This warranty does not extend to any product or damage to a product caused by or attributable to freight damage abuse misuse improper or abnorma...

Reviews: