background image

15

The hydrotherapy spa is designed to provide you with

years of enjoyment. Please follow the guidelines

below to properly maintain your hydrotherapy spa.

MAINTENANCE SCHEDULE

DAILY

• Check the water level and refill the spa to the level

shown in step 3 on page 10.

• Check the pH balance and sanitizer level. Adjust if

necessary (see WATER CHEMISTRY below).

• Clean the surface of the water with a skimming net.

WEEKLY

• Clean the spa shell at the waterline.

• Check and thoroughly clean the filter (see CHECK-

ING AND CLEANING THE FILTER on page 18).

• Replace the filter if needed (see ORDERING

REPLACEMENT PARTS on the back cover).

MONTHLY

• Clean the spa cover (see MAINTAINING THE SPA

COVER below).

• Soak the filter for two hours in a trisodium phos-

phate (TSP) solution. Rinse the filter in clean water.

• Replace the filter if needed (see ORDERING

REPLACEMENT PARTS on the back cover).

EVERY THREE MONTHS

• Drain the spa and refill with clean water. Sanitize

and test the pH of the water.

• Check for any leaks around the pump or joints in

the pipes. The seals will wear out over time; detect-

ing leaks early can reduce repair costs.

• Clean the interior of the spa. Do not use solvents or

waxes.

EVERY SIX MONTHS

• Treat the exterior with a wood sealant (see MAIN-

TAINING THE SPA EXTERIOR below).

MAINTAINING THE SPA EXTERIOR

The wood panel exterior has been treated with a

sealant at the factory to protect the wood from water

damage. We suggest that you treat the wood finish

twice a year with an additional coat of weather

sealant. Contact your local spa and pool supplier for

advice on which sealants work best in your climate.

CLEANING THE SPA SHELL

The spa shell should be cleaned with a mild soap

solution. Do not use solvents. The spa should always

be clean and dry before being moved or stored.

MAINTAINING THE SPA COVER

The spa cover should be cleaned monthly. Using

water and a non-abrasive cleaner, clean the entire

spa cover. Rinse the cover with a garden hose to

remove any cleaner residue and then let the cover dry

completely. Use a non-silicone based vinyl conditioner

on the cover after you clean it to help protect it from

sun damage.

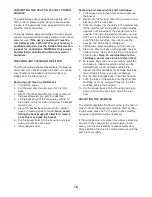
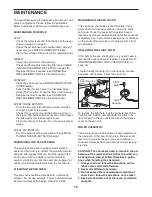
REPLACING THE LIGHT BULB

If the light in the spa shell burns out, you will need to

remove the access cover to replace it (see ATTACH-

ING AND REMOVING THE ACCESS COVER on

page 16).

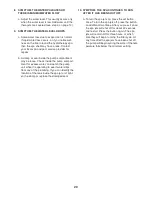
Locate the light housing. Turn the housing counter-

clockwise and remove it from the spa shell.

To replace the light bulb, pull the old bulb out of the

housing and insert a new light bulb. Re-attach the

light housing to the spa shell. Re-attach the access

cover to the spa unit.

WATER CHEMISTRY

The maintenance of the pH level is very important to

the operation of the spa. To maintain the proper pH

level and to sanitize the spa, you can purchase a

chemical starter kit from your local pool and spa sup-

ply store.

CAUTION: The chemicals used to maintain the pH

balance of the water and to sanitize the water can

be dangerous. Always follow these basic guide-

lines when handling the chemicals:

1. Always read and follow the directions on the

label, unless directed otherwise.

2. Never mix different chemicals.

3. Do not exceed the recommended amounts of

chemicals—follow the directions on the label.

4. Keep all chemicals out of the reach of children

and pets.

MAINTENANCE

Light Housing

Light

Housing

Light

Bulb

Summary of Contents for Daybreak 510

Page 1: ...gh direct assistance from our factory TO AVOID UNNECESSARY DELAYS PLEASE CALL DIRECT TO OUR TOLL FREE CUSTOMER HOT LINE The trained techni cians on our customer hot line will provide immediate assis t...

Page 2: ...TANT SAFETY INSTRUCTIONS 4 BEFORE YOU BEGIN 7 CHOOSING A LOCATION FOR THE HYDROTHERAPY SPA 8 SETUP AND ASSEMBLY 9 USING THE HYDROTHERAPY SPA 11 MAINTENANCE 15 TROUBLE SHOOTING 19 PART LIST 22 EXPLODED...

Page 3: ...eratures or damage to the spa shell resulting from exposure to direct sunlight and ultraviolet rays while the spa is empty damage to the pump motor plumbing and compo nents due to improper maintenance...

Page 4: ...spa shell can reach temperatures as high as 150 F in a matter of minutes if exposed to the sun while it is empty These high temperatures can cause significant damage such as blistering of the shell s...

Page 5: ...Children must always be super vised 28 DANGER To reduce the risk of drowning Never use the hydrotherapy spa alone Children should not use the spa unless they are supervised by an adult Keep pets away...

Page 6: ...To reduce the risk of injury It is especially important for persons over the age of 35 or persons with pre existing health problems such as obesity heart disease high or low blood pressure circulator...

Page 7: ...ed treatment you need to feel your best For your safety and benefit read this manual care fully before using the DAYBREAK 510 If you have additional questions please call our Customer Service Departme...

Page 8: ...eck system that is built flush with the top of the spa provided you leave access to the motor for ser vice 9 Be sure to note any other considerations such as aesthetics or privacy concerns that may af...

Page 9: ...he information on the previous two pages Remove the four cover screws from the access cover Remove the access cover from the spa unit by sliding the access cover down and pulling the bottom of the acc...

Page 10: ...8 over the spa Be sure that the Spa Cover is properly centered Snap a Buckle 2 onto each of the four latches on the Spa Cover 18 See the inset drawing Position one of the Buckles 2 on the wood panels...

Page 11: ...nd of the power cord Always test the GFCI before using the hydrotherapy spa First turn on the spa by pressing the jet control on the console see USING THE CONSOLE on page 13 Once the unit is running p...

Page 12: ...e on your lower or middle back The remain ing jet located on the other bench seat focuses a water massage on your upper or lower back The filter C can be removed for replacement and cleaning see page...

Page 13: ...ther accurate ther mometer to check the temperature of the water Note The word COOL will appear in the console display if the temperature of the water is more than 20 F cooler than the set temperature...

Page 14: ...in use Keep the keys in a safe place out of the reach of children ATTACHING THE RED AND BLUE LIGHT COVERS The hydrotherapy spa includes red and blue light covers for the spa light To attach one of th...

Page 15: ...vice on which sealants work best in your climate CLEANING THE SPA SHELL The spa shell should be cleaned with a mild soap solution Do not use solvents The spa should always be clean and dry before bein...

Page 16: ...oad temperature and water conditions Proper water maintenance is a com plex process Contact your local pool and spa supplier for information concerning which chemicals you should use in your area to s...

Page 17: ...e spa and treat the water with chemicals see pages 15 and 16 DRAINING THE PUMP After the hydrotherapy spa is drained see DRAINING THE HYDROTHERAPY SPA the pump in the spa jet unit should also be drain...

Page 18: ...our above to remove the basket 2 Reach into the housing and turn the valve on the diverter until it is fully open 3 Stick two fingers into the holes in the diverter and lift the diverter and the top f...

Page 19: ...rranty you may also con tact a local spa and pool service provider 6 SYMPTOM THE WATER DOES NOT HEAT a Make sure that the hydrotherapy spa is fully covered with the spa cover The spa cover must be tig...

Page 20: ...rt ment for excess water and watch the pump unit while it is operating to see if water drips from any of the plumbing If you can identify the location of the leak inside the spa jet unit tight en the...

Page 21: ...21 NOTES...
Page 22: ...1 Control Unit 15 4 Lock Washer 16 2 Heater Gasket 17 1 Air Control Knob 18 1 Spa Cover 19 1 Red Lens 20 3 Multidirectional Jet 21 1 Diverter 22 1 Basket 23 10 8 x 1 1 2 Screw 24 1 Filter Door 25 2 C...

Page 23: ...23 4 28 5 13 29 12 3 14 9 16 16 3 9 15 8 1 2 2 7 17 18 26 25 20 20 31 20 27 EXPLODED DRAWING Model No WLSB40070 WLSG40070 or WLSG51020 R0202A...

Page 24: ...following information when calling 1 The MODEL NUMBER of the product WLSB40070 WLSG40070 or WLSG51020 2 The NAME of the product WESLO DAYBREAK 510 3 The SERIAL NUMBER of the product see the front cove...

Reviews: