background image

Inspect and properly tighten all parts of the elliptical
trainer regularly. Replace any worn parts immediately.

The elliptical trainer can be cleaned with a soft cloth
and a small amount of mild detergent. Do not use
abrasives or solvents. 
To prevent damage to the
console, keep liquids away from the console and keep
the console out of direct sunlight.

When storing the elliptical trainer, remove the batter-
ies from the console. Keep the elliptical trainer in a
clean, dry location, away from moisture and dust.

CONSOLE TROUBLESHOOTING

If the console does not function properly, replace the
batteries (see assembly step 6 on page 7).

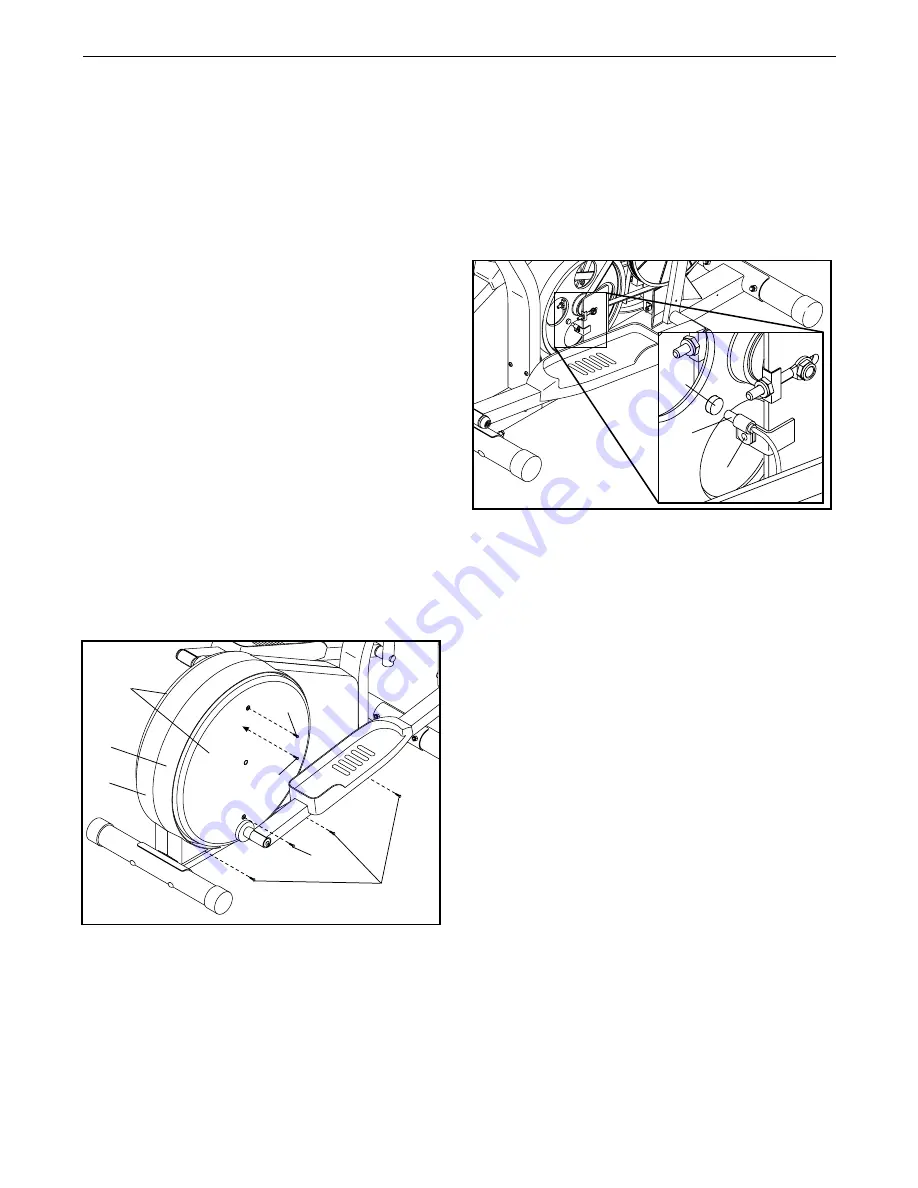
HOW TO ADJUST THE REED SWITCH

If the console does not display correct feedback, the
reed switch should be adjusted. Remove the two
Screws (72) from both Pedal Discs (13), and slide the
Pedal Discs toward the Pedal Arms (19). Remove the
three Screws (70) from the bottoms of each Side
Shield (5, 6). Remove the Screw (70) from the Right
Side Shield, located beneath the right Pedal Disc. Lift
the Side Shields off of the elliptical trainer. 

Next, refer to the drawing below and locate the Reed
Switch (35). Loosen, but do not remove, the indicated
Screw (70). Slide the Reed Switch slightly toward or
away from the Magnet (32) on the flywheel. Retighten
the Screw. Rock the Magnet back and forth past the
Reed Switch for a moment. Repeat until the console
displays correct feedback. 

When the Reed Switch (35) is correctly adjusted, reat-
tach the Side Shields (5, 6) and the Pedal Discs (13).

11

MAINTENANCE AND TROUBLESHOOTING 

72

32

35

70

72  

70

70

13

5

6

Summary of Contents for gllider III

Page 1: ...Decal QUESTIONS As a manufacturer we are committed to providing com plete customer satisfaction If you have questions or if there are missing or damaged parts please call Or write ICON Health Fitness...

Page 2: ...U BEGIN 4 ASSEMBLY 5 HOW TO USE THE ELLIPTICAL TRAINER 9 MAINTENANCE AND TROUBLESHOOTING 11 CONDITIONING GUIDELINES 12 PART LIST 14 EXPLODED DRAWING 15 HOW TO ORDER REPLACEMENT PARTS Back Cover WESLO...

Page 3: ...ion 9 Always hold the pulse grips or the handle bars when mounting dismounting or using the elliptical trainer 10 Each time you stop exercising on the ellipti cal trainer allow the pedals to come to a...

Page 4: ...carefully before you use the elliptical crosstrainer If you have ques tions after reading this manual please call our Customer Service Department at 08457 089 009 To help us assist you please note the...

Page 5: ...n Screw 55 4 M10 x 25mm Button Screw 56 10 M8 x 36mm Button Bolt 66 4 M10 x 75mm Carriage Bolt 64 4 M8 Flat Washer 48 2 M8 x 45mm Button Screw 65 2 M4 x 10 5mm Screw 70 1 ASSEMBLY Assembly requires tw...

Page 6: ...Upper Cable 24 into the wire clip on the Lower Cable 30 as shown See drawing B Firmly pull the Upper Cable 24 and slide it into the metal bracket on the Lower Cable 30 as shown See drawing C Using pl...

Page 7: ...ews 69 Press the Resistance Knob 8 onto the Resistance Control 24 Make sure that the mark on the Resistance Knob is correctly aligned 6 The Console 4 requires two 1 5V batteries Alkaline batteries are...

Page 8: ...ghtly it may be helpful to use the rubber mallet at this time Attach the left Pedal Arm 19 to the left Crank Arm 25 with an M8 Flat Washer 48 and an M8 x 19mm Patch Screw 62 Attach the left Pedal Arm...

Page 9: ...nce of the ped als with the resistance knob on the console To increase the resistance turn the knob clockwise to decrease the resistance turn the knob counterclockwise Important When it becomes diffic...

Page 10: ...f the pedals are not moved and the monitor but tons are not pressed for a few minutes the power will turn off automatically in order to conserve the batteries HOW TO USE THE PULSE SENSOR Note Before u...

Page 11: ...does not display correct feedback the reed switch should be adjusted Remove the two Screws 72 from both Pedal Discs 13 and slide the Pedal Discs toward the Pedal Arms 19 Remove the three Screws 70 fr...

Page 12: ...is to strengthen your cardiovascular sys tem your exercise must be aerobic Aerobic exer cise is activity that requires large amounts of oxygen for prolonged periods of time This increases the demand o...

Page 13: ...le Hold for 15 counts then relax Repeat 3 times for each leg Stretches Hamstrings lower back and groin 3 Calf Achilles Stretch With one leg in front of the other reach forward and place your hands aga...

Page 14: ...Switch Wire 36 1 Reed Switch Clamp 37 2 Axle Bearing 38 1 Axle 39 1 Spring 40 1 Extension Wire 41 2 Small Axle Cap 42 2 Large Axle Cap 43 8 Pedal Arm Bushing 44 2 Handlebar Leg Spacer 45 2 Pedal Arm S...

Page 15: ...40 41 42 42 43 43 43 43 43 44 44 45 45 41 46 46 47 46 46 47 48 48 49 76 50 50 51 51 52 53 54 54 55 55 56 56 56 56 57 50 59 67 59 60 60 61 61 61 61 62 62 63 63 64 64 65 66 66 67 67 74 69 70 70 71 70 70...

Page 16: ...Road Industrial Estate Revie Road Beeston Leeds LS118JG UK Tel Outside the UK 0 044 113 387 7133 Fax 0 044 113 387 7125 To help us assist you please be prepared to give the following information the...

Reviews: