6
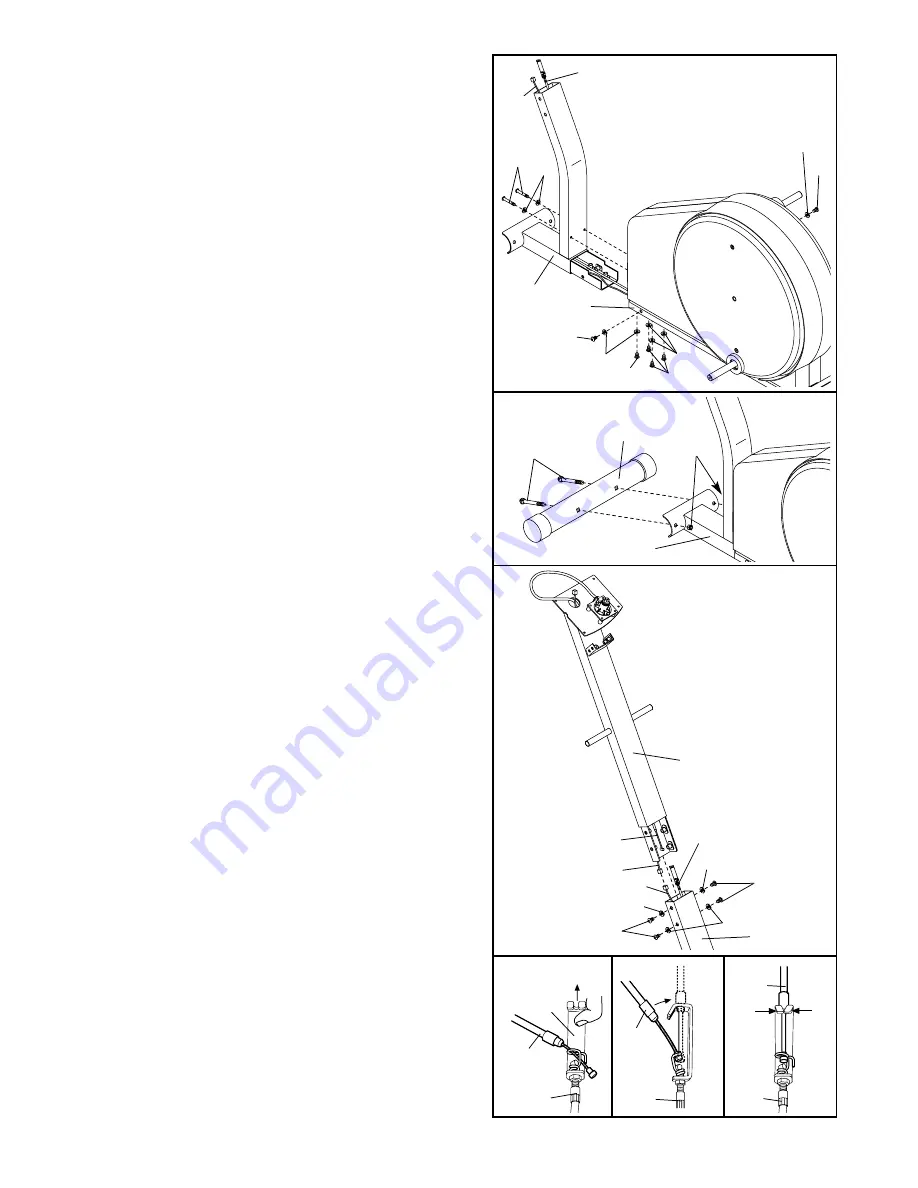
2. Insert the Lower Cable (30) and the Reed Switch
Wire (35) together up through the Head Frame (2).
Whilst another person lifts the front of the Frame (1)
slightly, slide the Head Frame into the Frame; make
sure not to pinch the Wire or the Cable. Attach
the Head Frame to the Frame with six M10 x 25mm
Button Screws (56) and six M10 Split Washers (14).
Finish attaching the Head Frame with two M8 x
45mm Button Screws (65) and two M8 Split
Washers (20).
30
35
1
2
56
14
65
56
56
56
14
14
20
4. Whilst another person holds the Upright (3) near the
Head Frame (2) as shown, connect the Extension
Wire (40) to the Reed Switch Wire (35).
Next, connect the Upper Cable (24) to the Lower
Cable (30) in the following way:
• See drawing A. Pull up on the metal bracket, and
insert the tip of the Upper Cable (24) into the wire
clip on the Lower Cable (30) as shown.
• See drawing B. Firmly pull the Upper Cable (24)
and slide it into the metal bracket on the Lower
Cable (30) as shown.
• See drawing C. Using pliers, squeeze the prongs
on the upper end of the metal bracket together.
Slide the Upright (3) into the Head Frame (2); make
sure not to pinch the wires or cables. Attach the
Upright with four M10 x 25mm Button Screws (56)
and four M10 Split Washers (14). Pull up on the
Upper Cable (24) to remove any slack cable in the
Upright.
15
64
61
3
2
1
4
56
14
14
14
56
35
24
40
3
30
2
Make sure that
the Wires (35, 40)
and Cables (24,
30) do not get
pinched and
damaged during
this step.
Make sure the Wire
(35) and Cable (30)
do not get pinched
and damaged dur-
ing this step.
30
30
24
Metal
Bracket
24
B
A
C
30
24
3. Whilst another person lifts the front of the Frame
(1), attach the Front Stabiliser (15) to the Frame
with two M10 x 75mm Carriage Bolts (64) and two
M10 Nylon Locknuts (61).


