background image

6

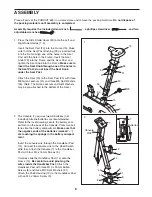
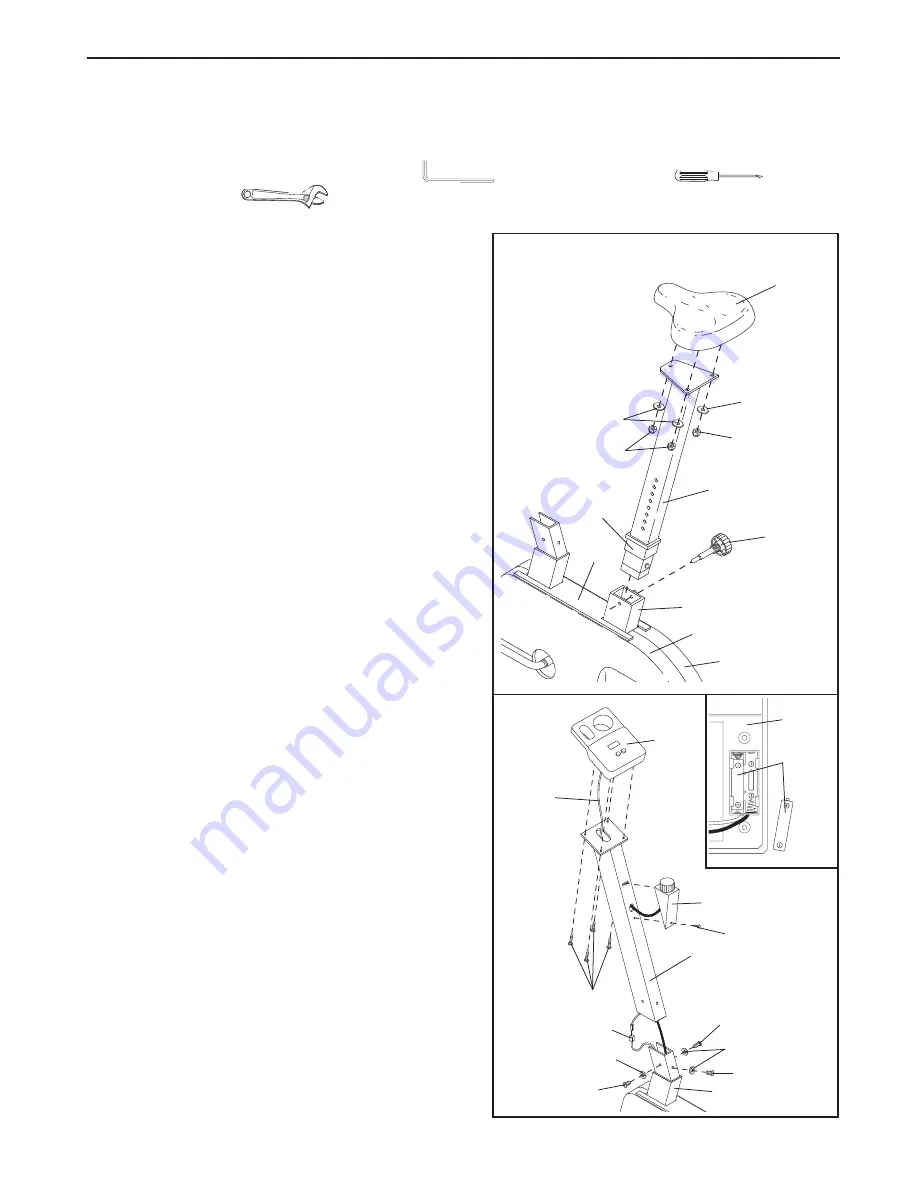
2. The Console (7) requires two AA batteries (not

included). Alkaline batteries are recommended.
Refer to the inset drawing. Locate the battery com-
partment on the back of the Console. Press two bat-
teries into the battery compartment. 

Make sure that

the negative ends of the batteries (marked “–”)
are touching the springs in the battery compart-
ment.

Insert the console wire through the Handlebar Post
(14). Connect the console wire to the Reed Switch
Wire (54). Attach the Console (7) to the Handlebar
Post with four M4 x 16mm Screws (9). 

Carefully slide the Handlebar Post (14) onto the
Frame (15). 

Be careful to avoid pinching the

wires inside the Handlebar Post. 

Attach the

Handlebar Post with three M10 x 25mm Button
Screws (8) and three M10 Split Washers (31).
Attach the Knob Housing (12) to the Handlebar Post
with an M4 x 16mm Screw (9).

2

8

15

14

8

9

54

7

8

31

31

Console

Wire

7

Batteries

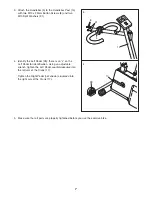
1. Press the Side Shield Cover (30) onto the Left and

Right Side Shields (1, 2).

Insert the Seat Post (20) into the Frame (15). Make
sure that the Seat Post Bushing (23) is inserted fully
into the Frame. Align one of the holes in the Seat
Post with the hole in the Frame. Insert the Seat
Knob (29) into the Frame and the Seat Post, and
tighten the Seat Knob into the Frame. 

Make sure to

insert the Seat Knob through one of the holes in
the Seat Post; do not insert the Seat Knob
under the Seat Post. 

Attach the Seat (19) to the Seat Post (20) with three
M8 Nylon Locknuts (21) and three M8 Split Washers
(53). (Note: The Nylon Locknuts and Split Washers
may be pre-attached to the bottom of the Seat.)

1

15

1

2

20

21

21

53

53

19

29

23

30

12

9

ASSEMBLY

Place all parts of the PURSUIT 695i in a cleared area and remove the packing materials. 

Do not dispose of

the packing materials until assembly is completed.

Assembly requires the included allen wrench                    , a phillips screwdriver                       , and two
adjustable wrenches                     . 

Summary of Contents for PERSUIT 695i

Page 1: ...ere are missing or damaged parts we will guarantee complete satis faction through direct assistance from our factory TO AVOID UNNECESSARY DELAYS PLEASE CALL DIRECT TO OUR TOLL FREE CUSTOMER HOT LINE T...

Page 2: ...r repairs not provided by an ICON authorized service center to products used for commercial or rental purposes or to products used as store display models No other warranty beyond that specifically se...

Page 3: ...cle Always wear athletic shoes for foot protection 8 When adjusting the seat insert the seat knob through one of the holes in the seat post see the drawing on page 4 Do not insert the seat knob under...

Page 4: ...free at 1 888 936 4266 Monday Friday 8 00 am 6 30 pm EST excluding holidays To help us assist you please note the prod uct model number and serial number before calling The model number is WLCCEX6907...

Page 5: ...s to the key number of the part The second number refers to the quantity used in assembly Note Some parts may have been pre attached for shipping purposes If a part is not found in the parts bag check...

Page 6: ...14 8 9 54 7 8 31 31 Console Wire 7 Batteries 1 Press the Side Shield Cover 30 onto the Left and Right Side Shields 1 2 Insert the Seat Post 20 into the Frame 15 Make sure that the Seat Post Bushing 2...

Page 7: ...dentify the Left Pedal 28 there is an L on the Left Pedal for identification Using an adjustable wrench tighten the Left Pedal counterclockwise into the left arm of the Crank 17 Tighten the Right Peda...

Page 8: ...e 15 Insert the Seat Knob into the Frame and the Seat Post and tighten the Seat Knob into the Frame Caution Make sure to insert the Seat Knob through one of the holes in the Seat Post do not insert th...

Page 9: ...until your heart rate is near the lowest num ber in your training zone as you exercise For maximum fat burning adjust the intensity of your exercise until your heart rate is near the middle num ber i...

Page 10: ...wo AA batter ies must be installed If you have not installed batter ies see assembly step 2 on page 6 HOW TO OPERATE THE CONSOLE 1 To turn on the power press the on reset button or simply begin pedali...

Page 11: ...hing of the achilles tendons bend your back leg as well Stretches Calves achilles tendons and ankles 4 Quadriceps Stretch With one hand against a wall for balance reach back and grasp one foot with yo...

Page 12: ...re that the console wire is connected to the reed switch wire HOW TO ADJUST THE REED SWITCH If the console does not display correct feedback the reed switch should be adjusted In order to adjust the r...

Page 13: ...he exercise cycle features a belt that must be kept properly adjusted If the belt causes excessive noise or slips as you pedal the belt should be checked To do this the left side shield must first be...

Page 14: ...hield Cover 31 5 M10 Split Washer 32 1 Small Spring Key No Qty Description 33 2 Handlebar Endcap 34 2 M8 Washer Nut 35 2 Adjustment Bolt 36 2 Adjustment Bracket 37 2 M6 Nut 38 1 Flywheel Axle 39 1 Fly...

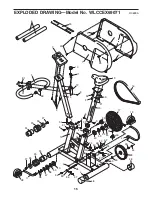
Page 15: ...3 53 20 9 22 23 29 24 25 26 27 15 16 24 25 26 27 40 59 42 55 41 28 17 56 57 58 59 40 13 17 54 9 18 46 47 51 32 50 50 49 52 34 36 37 35 60 43 39 43 48 48 37 36 35 34 38 44 31 31 30 54 8 8 31 31 9 33 45...

Page 16: ...16 NOTES...
Page 17: ...17 CUSTOMER RECORD Model No Serial No Retailer Name Purchase Date Retailer Address ICON of Canada Inc 900 de l Industrie St J r me Qu bec Canada J7Y 4B8 PLACE STAMP HERE...

Page 18: ...times or more 5 Have you ever purchased an ICON product before o Yes o No 6 Where did you first see or hear about ICON products o Magazine o Friend relative o Newspaper Ad o Store o Other 7 What was...

Reviews: