background image

10

CONDITIONING GUIDELINES

The following guidelines will help you to plan your
exercise program. Remember that proper nutrition
and adequate rest are essential for successful results. 

EXERCISE INTENSITY

Whether your goal is to burn fat or to strengthen your
cardiovascular system, the key to achieving the
desired results is to exercise with the proper intensity.
The proper intensity level can be found by using your
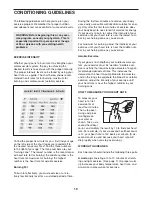
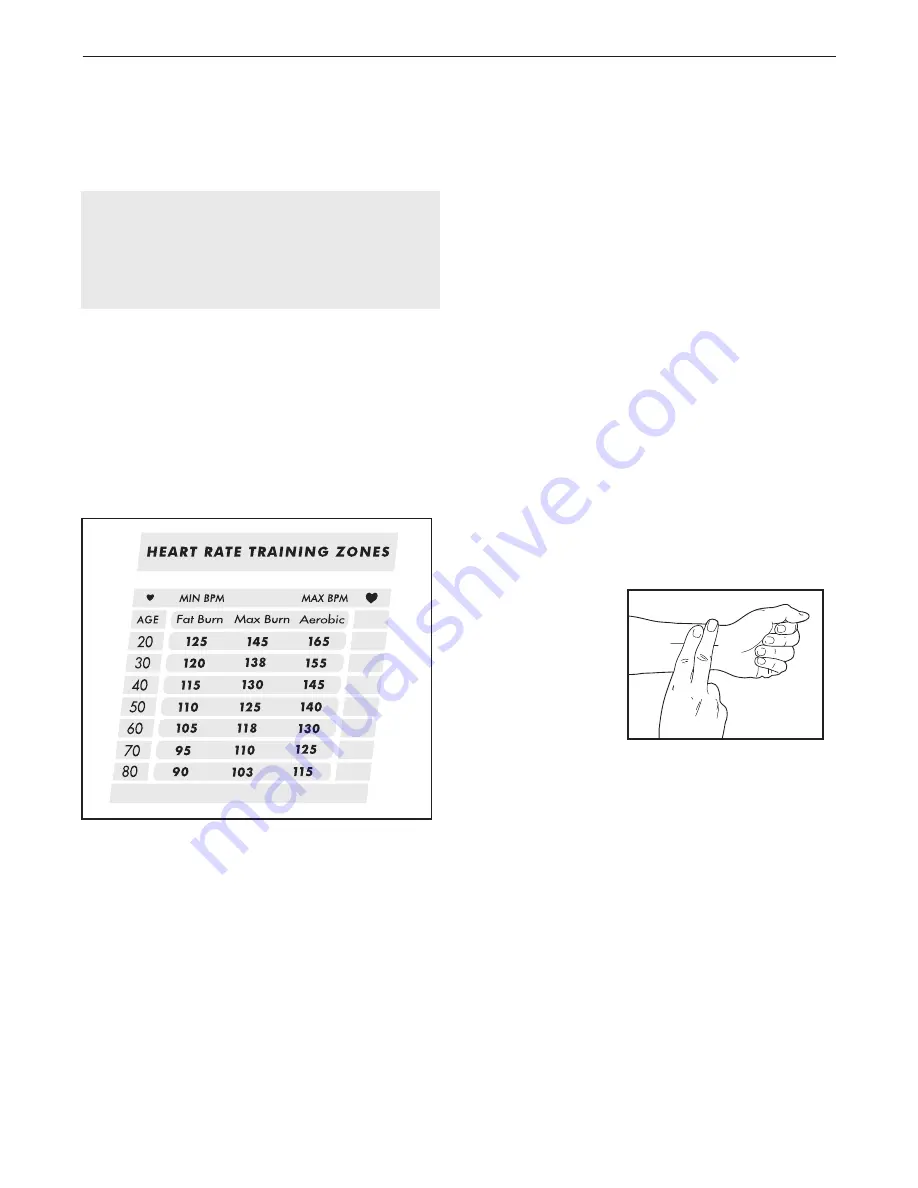
heart rate as a guide. The chart below shows recom-
mended heart rates for fat burning, maximum fat
burning, and cardiovascular (aerobic) exercise.

To find the proper heart rate for you, first find your age
on the left side of the chart (ages are rounded off to
the nearest ten years). Next, find the three numbers
to the right of your age. The three numbers are your
“training zone.” The lowest number is the recommend-
ed heart rate for fat burning; the middle number is the
heart rate for maximum fat burning; the highest 
number is the heart rate for aerobic exercise.

Burning Fat

To burn fat effectively, you must exercise at a rela-
tively low intensity level for a sustained period of time.

During the first few minutes of exercise, your body
uses easily accessible 

carbohydrate 

calories for ener-

gy. Only after the first few minutes of exercise does
your body begin to use stored 

fat 

calories for energy.

If your goal is to burn fat, adjust the intensity of your
exercise until your heart rate is near the lowest num-
ber in your training zone as you exercise.   

For maximum fat burning, adjust the intensity of your
exercise until your heart rate is near the middle num-
ber in your training zone as you exercise.  

Aerobic Exercise

If your goal is to strengthen your cardiovascular sys-
tem, your exercise must be “aerobic.” Aerobic exer-
cise is activity that requires large amounts of oxygen
for prolonged periods of time. This increases the
demand on the heart to pump blood to the muscles,
and on the lungs to oxygenate the blood. For aerobic
exercise, adjust the intensity of your exercise until
your heart rate is near the highest number in your
training zone. 

HOW TO MEASURE YOUR HEART RATE

To measure your
heart rate, first
exercise for at
least four minutes.
Then, stop exer-
cising and place
two fingers on
your wrist as
shown. Take a six-
second heartbeat
count, and multiply the result by 10 to find your heart
rate. For example, if your six-second heartbeat count
is 14, your heart rate is 140 beats per minute. (A six-
second count is used because your heart rate will
drop rapidly when you stop exercising.) 

WORKOUT GUIDELINES

Each workout should include the following three parts:

A warm-up

, consisting of 5 to 10 minutes of stretch-

ing and light exercise. (See page 11.) A proper warm-
up increases your body temperature, heart rate, and 
circulation in preparation for exercise. 

WARNING: Before beginning this or any exer-
cise program, consult your physician. This is
especially important for persons over the age
of 35 or persons with pre-existing health
problems.

Summary of Contents for PERSUIT 695i

Page 1: ...ere are missing or damaged parts we will guarantee complete satis faction through direct assistance from our factory TO AVOID UNNECESSARY DELAYS PLEASE CALL DIRECT TO OUR TOLL FREE CUSTOMER HOT LINE T...

Page 2: ...r repairs not provided by an ICON authorized service center to products used for commercial or rental purposes or to products used as store display models No other warranty beyond that specifically se...

Page 3: ...cle Always wear athletic shoes for foot protection 8 When adjusting the seat insert the seat knob through one of the holes in the seat post see the drawing on page 4 Do not insert the seat knob under...

Page 4: ...free at 1 888 936 4266 Monday Friday 8 00 am 6 30 pm EST excluding holidays To help us assist you please note the prod uct model number and serial number before calling The model number is WLCCEX6907...

Page 5: ...s to the key number of the part The second number refers to the quantity used in assembly Note Some parts may have been pre attached for shipping purposes If a part is not found in the parts bag check...

Page 6: ...14 8 9 54 7 8 31 31 Console Wire 7 Batteries 1 Press the Side Shield Cover 30 onto the Left and Right Side Shields 1 2 Insert the Seat Post 20 into the Frame 15 Make sure that the Seat Post Bushing 2...

Page 7: ...dentify the Left Pedal 28 there is an L on the Left Pedal for identification Using an adjustable wrench tighten the Left Pedal counterclockwise into the left arm of the Crank 17 Tighten the Right Peda...

Page 8: ...e 15 Insert the Seat Knob into the Frame and the Seat Post and tighten the Seat Knob into the Frame Caution Make sure to insert the Seat Knob through one of the holes in the Seat Post do not insert th...

Page 9: ...until your heart rate is near the lowest num ber in your training zone as you exercise For maximum fat burning adjust the intensity of your exercise until your heart rate is near the middle num ber i...

Page 10: ...wo AA batter ies must be installed If you have not installed batter ies see assembly step 2 on page 6 HOW TO OPERATE THE CONSOLE 1 To turn on the power press the on reset button or simply begin pedali...

Page 11: ...hing of the achilles tendons bend your back leg as well Stretches Calves achilles tendons and ankles 4 Quadriceps Stretch With one hand against a wall for balance reach back and grasp one foot with yo...

Page 12: ...re that the console wire is connected to the reed switch wire HOW TO ADJUST THE REED SWITCH If the console does not display correct feedback the reed switch should be adjusted In order to adjust the r...

Page 13: ...he exercise cycle features a belt that must be kept properly adjusted If the belt causes excessive noise or slips as you pedal the belt should be checked To do this the left side shield must first be...

Page 14: ...hield Cover 31 5 M10 Split Washer 32 1 Small Spring Key No Qty Description 33 2 Handlebar Endcap 34 2 M8 Washer Nut 35 2 Adjustment Bolt 36 2 Adjustment Bracket 37 2 M6 Nut 38 1 Flywheel Axle 39 1 Fly...

Page 15: ...3 53 20 9 22 23 29 24 25 26 27 15 16 24 25 26 27 40 59 42 55 41 28 17 56 57 58 59 40 13 17 54 9 18 46 47 51 32 50 50 49 52 34 36 37 35 60 43 39 43 48 48 37 36 35 34 38 44 31 31 30 54 8 8 31 31 9 33 45...

Page 16: ...16 NOTES...
Page 17: ...17 CUSTOMER RECORD Model No Serial No Retailer Name Purchase Date Retailer Address ICON of Canada Inc 900 de l Industrie St J r me Qu bec Canada J7Y 4B8 PLACE STAMP HERE...

Page 18: ...times or more 5 Have you ever purchased an ICON product before o Yes o No 6 Where did you first see or hear about ICON products o Magazine o Friend relative o Newspaper Ad o Store o Other 7 What was...

Reviews: